Imagine finding yourself in the wild, with no modern tools or equipment to keep you safe. Your first priority?
Building a shelter that can protect you from the elements—fast. You need a simple, reliable way to create a primitive survival shelter using what’s around you. This guide will show you how to do just that, step by step. By the end, you’ll know how to build a shelter quickly that keeps you warm, dry, and safe.
Ready to learn the skills that could save your life? Keep reading.

Credit: www.youtube.com
Essentials Of Primitive Shelter
Building a primitive survival shelter fast demands understanding the essentials that make it both functional and reliable. Your shelter must protect you from the elements, provide warmth, and offer a safe space to rest. Knowing what to focus on can save you precious time and energy when every minute counts in the wild.
Purpose And Benefits
What’s the main goal of your shelter? It’s simple: shield yourself from rain, wind, cold, and insects. A well-built shelter reduces your risk of hypothermia and keeps you dry, which is crucial for survival.
Besides protection, a shelter offers psychological comfort. When you have a secure place, your stress levels drop, helping you think clearly and plan your next steps. Have you ever noticed how a small dry corner can feel like a fortress during a storm?
Key Survival Criteria
- Location:Choose a spot safe from hazards like falling branches, flooding, or strong winds.
- Structure:Use sturdy materials that can hold up under pressure, such as thick branches and leaves.
- Insulation:Add layers of leaves, grass, or moss to trap heat and keep the cold out.
- Size:Keep it just big enough to fit you comfortably; smaller shelters retain heat better.
- Ventilation:Allow airflow to prevent moisture buildup but avoid drafts that cool you down.
Think about your last outdoor experience—did you notice how a small gap in your shelter let in a chilling breeze? That’s why sealing and insulation are just as important as the frame.
Choosing The Right Location
Choosing the right location for your primitive survival shelter can make the difference between comfort and danger. It’s not just about finding a spot to rest; it’s about ensuring your safety and making survival easier. The right location sets the foundation for everything else in your shelter-building process.
Safety Factors
Your shelter needs to protect you from natural hazards and potential threats. Avoid low-lying areas that can flood during heavy rain. Look out for unstable ground like loose rocks or steep slopes where landslides might occur.
Consider animal activity in the area. You don’t want to camp near animal trails or waterholes where predators are likely to visit. Also, stay clear of dead trees or branches that could fall unexpectedly.
Have you thought about wind direction? Position your shelter so that strong winds hit the side, not the front. This simple adjustment can save you from cold drafts and structural damage.
Natural Resources Nearby
Being close to natural resources reduces the effort you need to survive. Look for a nearby water source like a stream or lake, but not too close to avoid flooding and insects. Water is essential for drinking, cooking, and cleaning.
Check for availability of firewood and building materials around your site. Dead branches, leaves, and bark are perfect for constructing and insulating your shelter. Avoid areas where wood is scarce; hauling materials long distances wastes precious energy.
Don’t forget about food sources. Berry bushes, edible plants, and fishing spots nearby can keep you nourished. Can you spot these resources easily from your shelter? If not, you might want to pick a different location.
Types Of Primitive Shelters
Surviving in the wild requires skill and resourcefulness. Building a primitive shelter is crucial for protection against the elements. Different types of shelters cater to various needs and environments. Let’s explore some common types.
Lean-to
The lean-to is a simple and effective shelter. It requires minimal materials and time. Find a sturdy branch or pole to use as a ridgepole. Lean branches against it at an angle. Cover with leaves or debris for insulation. Ideal for quick builds and mild weather.
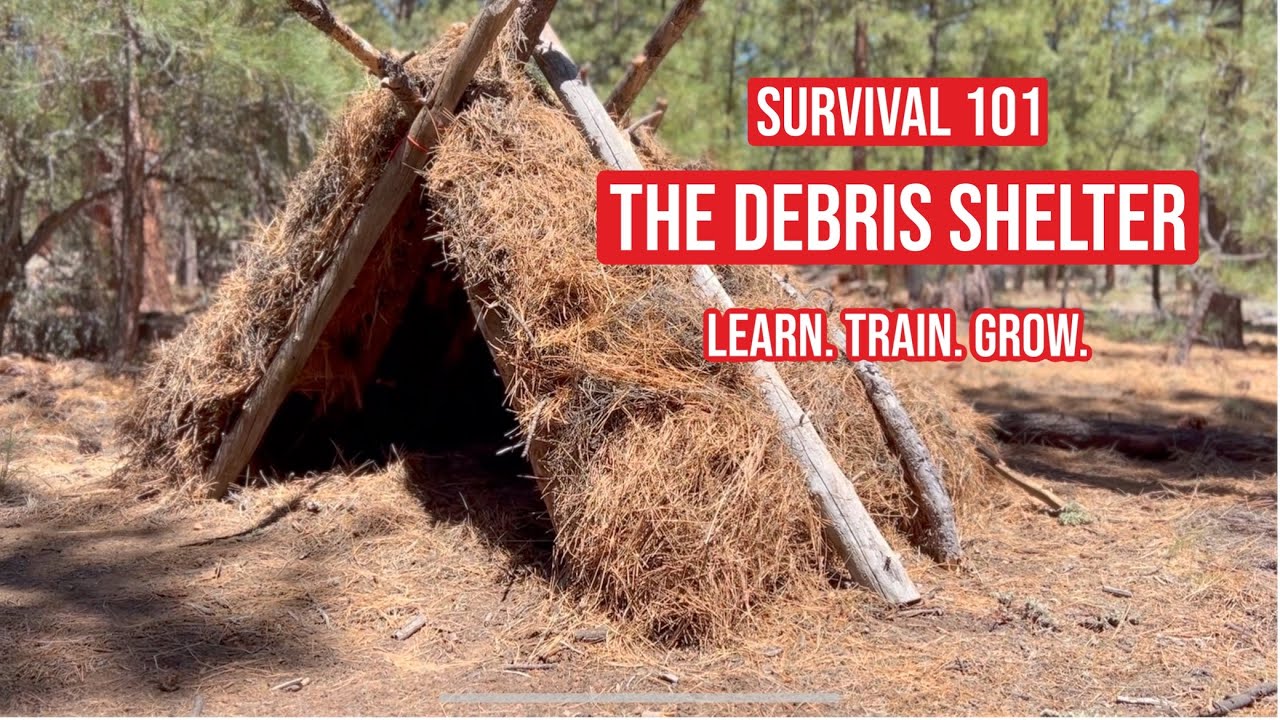
Debris Hut
The debris hut offers great insulation and protection. Start with a ridgepole supported by two strong branches. Pile leaves, grass, and sticks on both sides. Ensure the layer is thick for warmth. This shelter is excellent for cold nights.
A-frame
The A-frame is stable and robust. Construct by placing two branches in an “A” shape. Use another branch as a ridgepole on top. Lean smaller sticks against both sides. Cover with foliage or bark for insulation. Suitable for windy conditions.
Tarp Shelter
The tarp shelter is versatile and quick. Use a tarp or large piece of waterproof fabric. Tie it to trees or poles to create a roof. Adjust the height and angle for better protection. Perfect for rainy weather and quick setups.
Gathering Materials Fast
Gathering materials fast is crucial for building a survival shelter. Time is limited in the wild. Collecting the right resources quickly keeps you safe and dry. Focus on items that are nearby and easy to handle. Prioritize materials that offer strength and insulation. Using simple tools or items at hand speeds up the process. Being efficient reduces exposure to the elements.
Wood Selection
Choose strong, straight wood for the shelter frame. Dead branches on the ground work well. Avoid wood that is wet or rotten. Look for flexible branches for tying or weaving. Pine and cedar are good choices if available. Cut wood into manageable sizes before building. Collect extra wood for repairs or firewood later.
Natural Insulation
Use leaves, grass, or moss to insulate your shelter. These materials trap air and keep warmth inside. Dry leaves work better than wet ones. Gather soft, thick layers for walls and roof. Pine needles also provide good insulation. Avoid plants that cause irritation or allergies. Layer insulation evenly for best protection.
Tools And Improvisation
Carry simple tools like a knife or hatchet if possible. These make cutting and shaping wood faster. Use sharp stones if tools are unavailable. Rope or vines help secure your shelter parts. Torn clothing or strips of bark can tie things tightly. Improvise with what nature provides. Creativity and resourcefulness save time and effort.
Step-by-step Shelter Construction
Building a survival shelter quickly demands clear focus and efficient use of materials. You need a plan that moves fast but still stands firm against the elements. Breaking the process into clear steps helps you stay organized and confident as you work.
Setting The Framework
Start by choosing a strong, straight tree branch or sapling for the main ridgepole. It should be sturdy enough to hold the weight of your shelter’s roof. Secure it between two supports, like forked sticks or existing trees, to create the backbone of your shelter.
Next, lean smaller branches or poles against the ridgepole at a consistent angle. These form the ribs that will support your walls and roof. Make sure they are evenly spaced to create a balanced structure.
Adding Walls And Roof
Cover the frame with available materials such as leafy branches, pine boughs, or grass. Layer them thickly to block wind and rain. You want to overlap materials like shingles on a house to prevent water from seeping through.
Remember, the roof should extend beyond the walls to keep the shelter dry inside. If you’re near water, use larger leaves or bark for better coverage. How can you use what’s around you to improve this step?
Insulating And Waterproofing
Insulation keeps you warm and prevents heat loss. Pile dry leaves, moss, or grass inside the shelter on the floor and between walls for extra protection. This natural insulation traps air and adds comfort.
To waterproof your shelter, add another layer of waterproof material if possible. Bark strips, large leaves, or even a tarp can help here. Test your shelter by sprinkling water on it—any leaks mean you need to add more layers or adjust your covering.

Credit: www.youtube.com
Maximizing Shelter Efficiency
Maximizing the efficiency of a primitive survival shelter is essential for comfort and safety. A well-built shelter conserves heat, allows fresh air, and keeps unwanted animals away. Small adjustments make a big difference in harsh outdoor conditions.
Focus on air flow to avoid moisture and stale air inside. Retain warmth with natural materials and smart design. Protect yourself from wildlife with simple barriers and awareness. These factors improve shelter function and increase chances of survival.
Ventilation Tips
- Create small vents near the top of the shelter to let hot air escape.
- Place openings opposite each other for cross-ventilation.
- Use leaves or fabric to cover vents, allowing air but blocking rain.
- Keep the entrance slightly open if safe to improve airflow.
- Avoid sealing the shelter completely; trapped moisture causes discomfort.
Heat Retention Tricks
- Use dry leaves, grass, or pine needles as insulation on the floor.
- Build a low roof to reduce air space and retain body heat.
- Line walls with bark or thick branches to block wind.
- Position the shelter facing the sun to gain natural warmth.
- Cover the shelter with branches and foliage to trap heat inside.
Protecting From Wildlife
- Clear the area around the shelter to remove animal trails.
- Use thorny branches or rocks as a natural barrier.
- Keep food stored away and out of sight to avoid attracting animals.
- Make noise or use simple alarms to scare off nearby animals.
- Stay alert and avoid building near water sources where animals gather.
Common Mistakes To Avoid
Building a primitive survival shelter fast is essential in emergencies. Avoiding common mistakes can save time and increase safety. These errors often cause shelters to fail or waste energy. Knowing what to avoid helps build a strong, reliable shelter quickly.
Choosing The Wrong Location
Picking a poor site wastes effort and risks safety. Avoid low spots where water collects. Stay away from areas with loose rocks or dead trees. Look for dry, flat ground with natural wind protection.
Using Inadequate Materials
Thin branches or wet leaves do not provide good shelter. Use sturdy wood for the frame and dry leaves or grass for insulation. Avoid materials that break easily or let in cold air.
Ignoring Shelter Size
Building a shelter too big or small causes problems. Too large shelters are hard to keep warm. Too small ones don’t give enough space to rest. Aim for a size that fits your body comfortably.
Failing To Insulate Properly
Poor insulation leads to heat loss and discomfort. Layer leaves, grass, or moss thickly to trap warmth. Don’t leave gaps where cold air can enter. Cover the shelter well to keep dry and warm.
Not Securing The Shelter Firmly
Loose frames collapse in wind or rain. Tie or wedge branches tightly to hold the structure. Test the shelter’s strength before using it. A stable shelter lasts longer and feels safer.
Quick Shelter Hacks For Emergencies
Quick shelter hacks help save time in emergencies. These simple tricks use common items or nature to create safe, fast shelters. Knowing these hacks boosts chances of staying dry and warm. They work well in many situations and need little skill.
Using Tarps And Emergency Blankets
Tarps and emergency blankets offer instant shelter options. They are light and easy to carry in a backpack. Use trees or sticks to tie a tarp into a lean-to shape. This blocks wind and rain quickly.
Emergency blankets reflect body heat. Wrap yourself in one to stay warm. You can also hang it to create a windbreaker or roof cover. These items take minimal space but provide great protection.
- Secure tarps with rocks or cords to keep steady
- Use emergency blankets under sleeping bags for extra warmth
- Create a simple A-frame shelter with two poles and a tarp
Natural Formations As Shelter
Natural formations can serve as ready-made shelters in emergencies. Look for caves, rock overhangs, or fallen trees for quick refuge. These spots provide cover without needing much building.
Check the area for signs of stability and safety. Clear debris and add leaves or pine needles for comfort. Natural shelters offer protection from rain, wind, and sun.
- Inspect caves for wildlife or dangerous conditions
- Use fallen logs as windbreaks or seating areas
- Dig shallow trenches near rock walls for drainage

Credit: www.youtube.com
Frequently Asked Questions
What Materials Are Best For Primitive Survival Shelters?
Natural materials like branches, leaves, and bark work best. Use sturdy wood for frames and large leaves for insulation. Avoid wet or rotten materials to ensure durability and protection from elements. Always gather materials from the surrounding environment sustainably.
How Long Does It Take To Build A Survival Shelter?
A basic primitive shelter can be built within 1 to 3 hours. Time depends on shelter complexity, material availability, and skill level. Practice and preparation can help speed up the process significantly.
Where Is The Safest Place To Build A Survival Shelter?
Choose a dry, flat area away from hazards like rivers and unstable slopes. Look for natural windbreaks such as trees or rocks. Avoid animal trails and flood-prone zones to ensure safety and comfort.
How Can I Insulate A Primitive Shelter Effectively?
Use layers of leaves, grass, or moss inside the shelter walls and roof. These materials trap heat and provide cushioning. Adding a thick bedding layer of dry leaves or pine needles improves warmth and comfort.
Conclusion
Building a primitive survival shelter does not take long. Use natural materials around you. Choose a safe and dry spot first. Create a simple frame and cover it well. Keep practicing these steps to improve. Shelter keeps you warm and protected.
Stay calm and act fast in emergencies. Your safety depends on quick, smart choices. Remember, a good shelter helps you survive. Try these tips next time you go outdoors.