Imagine having a safe place above the ground when the unexpected happens. Building a survival shelter in a tree can keep you protected from harsh weather, wild animals, and wet conditions.
You might think it’s complicated, but with the right steps, you can create a sturdy, reliable shelter using materials around you. This guide will show you exactly how to do it—step by step. By the end, you’ll have the skills to stay safe and comfortable, no matter where you are.
Ready to learn how to build your own tree shelter? Let’s dive in.
Choosing The Right Tree
Choosing the right tree is the first step in building a safe and sturdy survival shelter. The tree must support your weight and protect you from weather. Picking a strong, healthy tree ensures your shelter lasts longer and keeps you secure. Not all trees work well for shelter building. Consider the tree type, health, and location carefully.
Tree Types For Shelter
Some tree species provide better support and protection. Look for trees with thick trunks and strong branches. Oak, pine, and cedar trees are good choices. These trees have sturdy wood that holds weight well. Avoid trees with thin or brittle branches. Trees with rough bark help anchor ropes and shelter materials.
Assessing Tree Health
Check the tree for signs of decay or damage. Avoid trees with dead branches or hollow trunks. Look for healthy leaves and firm bark. A healthy tree is less likely to fall or break. Test branches by gently shaking them. Strong branches do not bend or snap easily. Stay away from trees with visible fungus or insect damage.
Location Considerations
Pick a tree in a safe, accessible spot. Avoid areas prone to flooding or strong winds. A tree near water can be useful but may attract insects. Look for trees with natural shelter from wind and rain. Consider the sun’s path to keep the shelter warm. Avoid trees near cliffs or unstable ground for safety.
Essential Tools And Materials
Building a survival shelter in a tree requires the right tools and materials. These essentials make the process easier and safer. Choosing the right items helps create a strong and comfortable shelter. Preparation with proper tools and materials saves time and effort.
Basic Tools Needed
- Sharp knife for cutting branches and ropes
- Handsaw for trimming larger wood pieces
- Hatchet or small axe for chopping and splitting wood
- Rope or paracord for tying and securing shelter parts
- Hammer or mallet for driving stakes and nails
- Measuring tape for accurate cuts and placements
Natural Materials To Use
- Strong branches for the frame and supports
- Leaves and pine needles for insulation and roofing
- Bark strips for binding or covering gaps
- Moss or grass to fill gaps and add comfort
- Vines for tying and securing natural materials
- Tree limbs that are dry and sturdy
Safety Gear
- Sturdy gloves to protect your hands
- Helmet to guard against falling debris
- Safety harness for secure climbing
- Non-slip boots for strong footing
- Eye protection against branches and wood chips
- First aid kit for minor injuries
Planning Your Shelter Design
Choosing the right tree is essential for a strong and safe shelter. Consider height, branch strength, and nearby resources before building. Planning helps protect you from weather and wildlife while keeping you secure above ground.
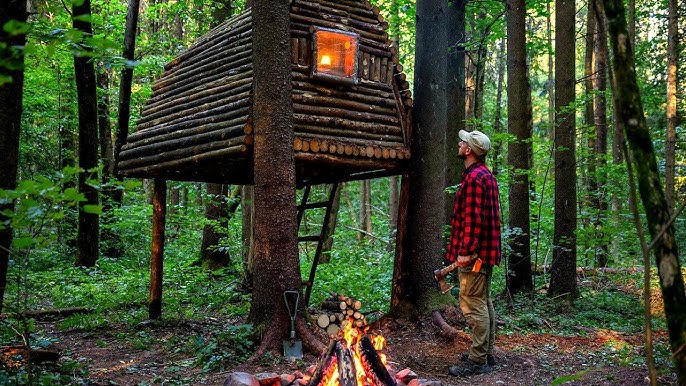
Planning your shelter design is a crucial step in building a survival shelter in a tree. The design determines the safety, comfort, and durability of your shelter. Think about your needs and the environment to decide the best approach.Platform Styles
Building a stable platform is your first priority. Consider the size and shape based on the tree’s branches. A rectangular platform offers more space, while a triangular one might fit better in tighter spots. Use strong materials like sturdy planks or logs. Securely lash them to the branches using ropes or other binding materials. Make sure the platform is balanced and can hold your weight.Roof Structures
A good roof keeps you dry and sheltered from the elements. Choose materials like tarps, leaves, or even branches. Make sure the roof is angled to allow rainwater to run off easily. Experiment with different structures like a slanted roof or a simple A-frame. Each has its own benefits depending on your environment. Always ensure the roof is well-secured and doesn’t sag.Securing The Shelter
Safety is paramount, so securing your shelter is a must. Double-check all your knots and bindings to ensure they are tight. Use additional support like ropes tied to sturdy branches to add stability. Consider adding railings or barriers around your platform to prevent accidental falls. Regularly inspect your shelter for wear and tear, especially after harsh weather. Would you trust your shelter to keep you safe in a storm?
Credit: www.youtube.com
Building The Platform
Building the platform is a crucial part of creating a survival shelter in a tree. It sets the foundation for your entire structure and ensures you have a safe, comfortable space above ground. A well-built platform supports your weight and withstands weather conditions, so focusing on its strength and stability is essential.
Creating A Stable Base
Start by selecting strong, healthy branches or a fork in the tree that can support the platform’s weight. Use sturdy, straight wood for the frame—branches about 3 to 4 inches thick work well. Arrange the wood in a square or rectangle shape, ensuring the frame fits securely around the tree.
Don’t forget to clear away loose bark or moss from the contact points to prevent slipping. If possible, add diagonal braces between the frame pieces to reduce sway. Think about how you’ll distribute your weight evenly so no single branch carries too much load.
Fastening Techniques
Tie the frame securely using strong rope, paracord, or straps. Wrap the binding material multiple times around the wood and tree branches to create tension and hold everything tightly in place. Knots like the clove hitch or bowline provide reliable strength and are easy to adjust if needed.
In some cases, using nails or screws can add extra security, but be cautious not to damage the tree too much. Remember, you want the shelter to be stable but also minimize harm to your natural support. Combining both rope and fasteners often gives the best balance.
Testing Stability
Before settling in, test the platform’s strength by applying pressure gradually. Press down with your hands, then carefully put your weight on it while holding nearby branches for balance. Listen for creaks or signs of movement that indicate weak points.
Shake the platform gently to check for wobbling or loose connections. If it feels unstable, reinforce the frame with extra braces or tighten the bindings. Would you trust this platform to hold you through a windy night? If not, keep improving it until you do.
Constructing The Roof
Constructing the roof of your tree survival shelter is a crucial step to ensure protection from the elements. A well-built roof keeps you dry, warm, and safe from wind, making your shelter a reliable refuge. You need to focus on the right materials, proper waterproofing, and solid wind protection to make your roof effective.
Choosing Roofing Materials
Your roofing materials should be lightweight yet strong enough to shield you from rain and debris. Leaves, branches, and bark are natural options you can find around you. Adding layers helps create insulation and blocks out water better.
Think about using large leaves like palm or broadleaf plants, which shed water quickly. You can also tie together smaller branches to form a frame, then cover them with bark strips. This combination keeps the roof sturdy without adding too much weight.
Waterproofing Methods
Waterproofing your shelter roof is essential to stay dry during rain. You can overlap leaves or bark like shingles, allowing water to run off instead of seeping inside. Make sure each layer covers the one below it thoroughly.
Another simple trick is to add a layer of moss or dry grass underneath the outer leaves to absorb any moisture that gets through. Tight packing reduces gaps where water might leak. Have you checked how water flows off your roof design before settling in?
Wind Protection
Wind can quickly turn a shelter into a chilly trap. To protect against gusts, secure the roofing materials tightly to the frame using vines or strips of cloth. Loose materials might blow away or let cold air in.
Building the roof at a slight angle helps wind pass over instead of hitting it directly. Position your shelter so the roof faces away from prevailing winds if possible. Adding extra layers on the windward side strengthens the shield against cold drafts.
Adding Safety Features
Adding safety features to your tree survival shelter is essential for protecting yourself from potential hazards. A secure shelter not only keeps you safe from the elements but also prevents accidents during entry and exit. Let’s focus on practical ways to enhance your shelter’s safety through careful climbing, secure entry points, and having a reliable emergency escape plan.
Safe Climbing Methods
Climbing a tree can be risky without the right techniques. Use a sturdy rope system or climbing harness to reduce the chance of slipping. Test each branch for strength before putting your full weight on it.
Wear gloves to protect your hands from rough bark and sharp edges. If possible, attach fixed ropes or ladders to make your climb steady and repeatable. Think about how often you’ll be climbing—adding permanent climbing aids can save you energy and reduce risk over time.
Securing Entry Points
Your shelter’s entrance should be easy to access but secure enough to keep out unwanted animals and strong winds. Use a flap made of waterproof material that you can fasten tightly.
Add a locking mechanism or tie-down system using ropes or cords. This prevents accidental openings during storms or strong gusts. Consider placing a small platform or sturdy step below the entry to give you firm footing while entering or exiting.
Emergency Escape Plans
What if the main entry is blocked or damaged? Always plan an alternate exit route for emergencies. This could be a simple rope ladder or a secondary opening on another side of the shelter.
Practice using your escape route so it feels familiar and quick to navigate. Keep essential tools like a knife or signaling device within reach. Your safety depends on being ready for unexpected situations.
Maintaining Your Tree Shelter
Maintaining your tree shelter is vital for safety and comfort. A well-kept shelter lasts longer and protects you better. Check it often to spot small problems early. This care helps avoid big repairs or hazards later.
Regular Inspections
Look over your shelter every week. Check for loose branches or weak ropes. Watch for signs of wear on the platform and walls. Make sure the shelter stays stable and secure. Keep an eye on tree health too. A dying tree can be dangerous.
Repairing Damages
Fix problems as soon as you find them. Replace broken branches or torn fabric quickly. Tighten ropes and nails that have loosened. Use strong, weatherproof materials for repairs. Patch holes to keep out wind and rain. Small fixes prevent bigger damage.
Seasonal Adjustments
Change your shelter setup with the seasons. Add insulation or wind barriers in cold weather. Remove extra coverings to stay cool in summer. Clear snow and debris during winter. Adjust ropes and supports as trees grow. Seasonal care keeps your shelter safe year-round.

Credit: www.youtube.com
Survival Tips While In A Tree Shelter
Living in a tree shelter requires careful planning and smart habits. Staying safe and comfortable means paying attention to key survival tips. These tips help you stay warm, keep your food safe, and handle any wildlife nearby.
Staying Warm And Dry
Keep your shelter tight to block wind and rain. Use leaves, branches, or a tarp as a roof. Layer clothes to trap heat. Avoid sweating by removing layers when active. Insulate the floor with dry leaves or pine needles. Stay off the wet ground below to avoid cold.
Food And Water Storage
Store food in sealed containers to keep it dry and safe. Hang food bags away from the shelter to avoid attracting animals. Use clean containers for water and collect rainwater if possible. Boil water before drinking to kill germs. Keep water containers closed to prevent insects or dirt from entering.
Dealing With Wildlife
Make noise to avoid surprising animals. Keep your shelter clean to prevent odors that attract wildlife. Store food high up and far from your sleeping area. Avoid bright lights or strong smells near your shelter. Know local animals and their habits to stay prepared.

Credit: www.youtube.com
Frequently Asked Questions
What Materials Are Best For Building A Tree Survival Shelter?
Use lightweight, durable materials like tarp, rope, and wooden planks. Natural items like branches and leaves help for insulation and camouflage. Prioritize waterproof and sturdy options to protect against weather and wildlife.
How Do I Safely Climb A Tree For Shelter Building?
Use a sturdy rope and secure harness for safety. Choose a healthy, strong tree with thick branches. Always climb slowly, testing each hold, and avoid climbing in wet or windy conditions.
How Long Does It Take To Build A Tree Survival Shelter?
Building a basic shelter can take 1 to 3 hours. Complexity and available materials affect time. Practice and preparation speed up the process significantly.
Can A Tree Shelter Protect Against Harsh Weather?
Yes, if properly constructed with waterproof materials and insulation. Position the shelter to block wind and rain. Add layers of leaves or moss for extra warmth.
Conclusion
Building a survival shelter in a tree takes patience and care. Choose a strong tree and gather sturdy materials. Secure your shelter tightly to stay safe and dry. Keep it simple and focus on comfort. Practice these steps before you need them.
Stay calm and think clearly in emergencies. A tree shelter can protect you from rain and wind. Trust your skills and stay alert. Survival is about using what you have wisely. Keep learning and stay ready for any situation.

