Imagine having a safe place hidden beneath the ground, protecting you from harsh weather and unexpected dangers. Building an underground survival shelter might sound complicated, but with the right steps, you can create a secure hideaway that keeps you and your loved ones safe.
In this guide, you’ll discover simple techniques and practical tips to build your own shelter, even if you’ve never done anything like this before. Stay with me, and by the end, you’ll feel confident to start digging and creating a strong, reliable refuge underground.
Your safety is worth every effort—let’s get started!
Choosing The Right Location
Choosing the right location is vital for building a safe underground survival shelter. It affects the shelter’s strength, dryness, and ease of access. Picking a spot with good soil, natural cover, and low flood risk increases your shelter’s chances of lasting through tough conditions.
Assessing Soil Types
Soil type determines how stable and easy it is to dig your shelter. Sandy soil drains well but can collapse easily. Clay soil holds shape but may trap water. Loamy soil offers a good balance of drainage and stability.
Test soil by digging a small hole. Observe how it holds together and how fast water drains. Choose firm, well-draining soil that won’t cave in during excavation.
Avoiding Flood Zones
Flooding is a major risk for underground shelters. Water can flood your shelter and ruin supplies. Avoid low-lying areas near rivers, lakes, or swamps.
Look for higher ground with natural drainage. Check local flood maps or observe where water pools after rain. A dry site keeps your shelter safe and livable.
Considering Natural Cover
Natural cover helps hide your shelter from view and protects it from weather. Trees, bushes, and rocks can break wind and reduce erosion.
Choose a spot near dense vegetation or under tree canopies. This cover blends your shelter into the environment and offers extra insulation.
Gathering Essential Tools And Materials
Building a survival shelter underground requires careful preparation. Gathering the right tools and materials is a crucial first step. Proper equipment makes digging easier and ensures the shelter is safe and sturdy. Without the right supplies, the project can become difficult or even dangerous.
Basic Excavation Tools
- Shovel – for digging and moving soil
- Pickaxe – to break hard ground and rocks
- Mattock – useful for loosening compacted dirt
- Hand trowel – for detailed digging in tight spaces
- Wheelbarrow – to carry soil away efficiently
Building Materials
- Wood planks or boards – for framing and support
- Tarps or heavy-duty plastic – to create waterproof layers
- Ropes and stakes – to secure materials in place
- Sandbags – to reinforce walls and prevent collapse
- Insulation materials – to maintain temperature inside
Safety Gear
- Gloves – to protect hands from cuts and blisters
- Helmet – to guard against falling debris
- Safety goggles – to shield eyes from dust and dirt
- Dust mask – to avoid inhaling soil particles
- Sturdy boots – for strong foot protection
Designing Your Shelter Layout
Designing the layout of your underground survival shelter is crucial. A well-thought-out plan ensures safety and comfort. This process involves considering size, shape, ventilation, and access points. Each element plays a vital role in the effectiveness of your shelter.
Size And Shape Considerations
Decide on the size based on the number of occupants. More people need more space. Opt for a rectangular shape for easy construction. A rectangular layout maximizes space and storage. Ensure enough room for sleeping, storing supplies, and moving around. Use simple measurements to plan your space efficiently.
Ventilation Planning
Proper ventilation is essential for survival. Fresh air prevents suffocation. Plan for at least two vents in your shelter. Use PVC pipes as air ducts. Position one vent near the floor and another near the ceiling. This setup encourages air circulation. Keep vents clear of debris to maintain airflow. Consider adding a small fan for better air movement.
Entrances And Exits
Plan multiple entry and exit points for safety. Two exits ensure an escape route during emergencies. Use sturdy doors that seal well. This prevents water and unwanted visitors. Camouflage entrances with natural materials. Keep them concealed for security. Ensure entrances are easy to access but hidden from plain sight.

Credit: www.youtube.com
Excavation Techniques
Excavation is a key part of building an underground survival shelter. Proper digging creates a safe and stable space. Using the right techniques saves time and effort. It also helps protect against cave-ins and water damage. Understanding how to handle soil and reinforce walls ensures a durable shelter.
Digging Efficiently
Start by marking the shelter’s outline clearly. Use a sharp shovel or spade for clean cuts. Dig in layers, removing soil evenly from the edges. This prevents collapse of the walls. Work in a steady rhythm to avoid exhaustion. Keep the hole slightly larger than the shelter’s size. This allows room for wall supports and insulation.
Handling Soil Disposal
Place excavated soil away from the edge of the hole. Piling it too close can cause dirt to fall back in. Use tarps or plastic sheets to keep soil dry. Save some soil for backfilling after construction. If space is limited, spread soil thinly around the site. Avoid blocking access or creating hazards. Proper soil management keeps the site clean and safe.
Reinforcing Walls
Strong walls prevent collapse and protect from moisture. Use wooden planks, logs, or metal sheets to brace the walls. Place supports vertically and horizontally for extra strength. Cover walls with plastic or waterproof material to stop leaks. Regularly check supports for signs of movement. Reinforcement keeps the shelter stable through weather changes.
Waterproofing And Insulation
Waterproofing and insulation are key to a safe underground survival shelter. These two factors protect you from moisture and extreme temperatures. Proper techniques keep the shelter dry and comfortable. This section covers ways to stop water entry and maintain heat using natural materials.
Preventing Water Ingress
Water can damage your shelter and make it unsafe. Create a barrier between soil and shelter walls. Use heavy plastic sheets or tarps to block moisture. Add gravel or crushed stone layers under the floor to improve drainage.
Seal all cracks with clay or mud. Shape the roof with a slight slope to direct rainwater away. Build a small trench around the shelter to divert water flow.
Insulating For Temperature Control
Insulation keeps warmth inside during cold weather. It also stops heat from entering in summer. Line walls and ceiling with insulating materials like straw or dry leaves. Pack these materials tightly to trap air.
Cover the floor with thick layers of pine boughs or moss. Use blankets or foam pads for extra comfort and warmth. Proper insulation reduces energy needed to stay warm or cool.
Using Natural Materials
Natural materials work well for both waterproofing and insulation. Clay is excellent for sealing leaks. Straw mixed with mud forms a strong, insulating wall layer.
- Leaves and moss absorb moisture and add warmth.
- Wood can build frames and supports.
- Gravel improves drainage around the shelter.
These materials are easy to find and eco-friendly. They blend with the environment and reduce shelter visibility.

Credit: www.youtube.com
Securing Structural Stability
Building a survival shelter underground needs strong support to keep it safe. The earth above presses down. Without good structure, the shelter may collapse. Securing structural stability means making the shelter sturdy and safe. This keeps you protected from weight and weather outside. Use strong materials and smart design to hold the space well.
Support Beams And Frames
Support beams hold up the walls and roof. Use wood or metal beams for strength. Place beams evenly to spread weight. Frames shape the shelter and hold it steady. Build a frame first before adding walls. Check all beams for cracks or weak spots. Strong beams stop the shelter from caving in.
Roof Construction
Build the roof to hold soil and rain above. Use thick wood or metal sheets for the roof base. Add layers like waterproof tarps or plastic sheets. Shape the roof to let water flow off easily. Avoid flat roofs that collect water. Secure the roof tightly to the beams below.
Ground Reinforcement
The ground under the shelter must be firm and stable. Remove loose soil and rocks. Compact the soil by pressing it down hard. Use gravel or sand layers for better drainage. Line the floor with wood planks or concrete slabs. This stops water and mud from seeping inside.
Ensuring Proper Ventilation
Proper ventilation is key to a safe underground survival shelter. Without fresh air, the shelter can become dangerous quickly. Stale air, carbon dioxide, and harmful gases build up fast. A good ventilation system keeps air moving and fresh. It helps everyone inside breathe easily and stay healthy.
Airflow Systems
Create airflow by installing intake and exhaust vents. Place the intake vent low to bring cool air inside. Put the exhaust vent higher to release warm, stale air. Use pipes or tubes made from durable materials. Ensure vents are covered with mesh to keep bugs out. Natural airflow works best with vents placed at different heights.
Smoke And Gas Removal
Any fire or cooking inside produces smoke and harmful gases. Install a chimney or flue to remove these safely. The chimney should extend above ground level for proper smoke exit. Use airtight seals around pipes to prevent leaks. Regularly check for blockages or damage. Smoke and gas removal protects you from suffocation and poisoning.
Maintaining Fresh Air
Fresh air is vital for comfort and health underground. Use manual or battery-powered fans to boost airflow if needed. Open vents periodically to allow outside air in. Keep vegetation around the shelter to improve air quality naturally. Avoid sealing the shelter completely; some air exchange is necessary. Monitor air quality often and adjust ventilation as needed.

Credit: www.youtube.com
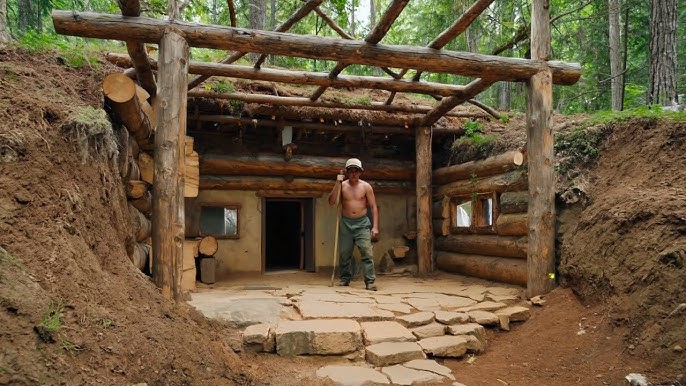
Setting Up Entry And Exit Points
Setting up entry and exit points in your underground survival shelter is crucial for both safety and stealth. These access points must blend seamlessly with the environment while allowing easy movement in and out. Careful planning here can mean the difference between staying hidden and being exposed.
Concealed Entrances
Your entrance should be hidden to avoid unwanted attention. Use natural features like rocks, bushes, or fallen logs to disguise the opening. Cover it with a lightweight but sturdy material that matches the surroundings.
Think about how you approach the shelter. Is there a clear path that could give away your location? You might want to create a false trail or use a camouflaged hatch that blends with the ground.
Emergency Exits
Always have an emergency exit to avoid being trapped. This secondary opening should be far enough from the main entrance to provide a safe escape route. It can be hidden under dense vegetation or behind a movable wall.
Consider how you would use this exit in a crisis. Can you reach it quickly without making noise? Planning this well can save your life when every second counts.
Doors And Covers
Choose doors and covers that are durable but easy to operate from inside. Metal or reinforced wood work well and can be fitted with secure latches. Make sure they seal tightly to keep out moisture, pests, and unwanted visitors.
Don’t forget to add handles or pull cords inside your shelter for quick access. You want to avoid fumbling in the dark when time is critical. Have you tested how fast and quiet you can open and close these doors?
Furnishing And Organizing The Interior
Furnishing and organizing the interior of an underground survival shelter requires careful thought. Space is limited, so every item must have a purpose. Comfort and efficiency improve the shelter’s livability. Planning ahead helps maintain order and safety inside the shelter.
Sleeping Areas
Choose sleeping spots that maximize space and comfort. Bunk beds save floor space and provide more sleeping places. Use sturdy, moisture-resistant mattresses or sleeping pads. Arrange beds away from the entrance to reduce noise and drafts. Keep blankets and pillows in easy reach for warmth and comfort.
Storage Solutions
Organize supplies with shelves and storage bins to prevent clutter. Use stackable containers to save space and keep items dry. Label containers clearly for quick access. Hang tools on walls using hooks or pegboards. Keep food and water in sealed, airtight containers for freshness and safety.
Lighting Options
Choose lighting that is energy-efficient and safe for underground use. LED lights consume less power and last longer. Use battery-powered lanterns as backup during power failures. Install light switches near entrances for easy control. Consider solar chargers or hand-crank generators to recharge batteries.
Safety Measures And Maintenance
Ensure proper ventilation to avoid harmful gases inside the shelter. Regularly check for water leaks and reinforce walls to prevent collapse. Keep the entrance clear and secure for quick access and safety.
Building a survival shelter underground is an exciting project. Safety and maintenance are crucial for long-term success. Regular checks keep your shelter in top condition. Proper safety measures protect you and your family. Maintenance ensures your shelter remains a reliable refuge.Regular Inspections
Regular inspections are vital for shelter safety. Check the structure for signs of wear. Look for cracks in walls or ceilings. Ensure ventilation systems work efficiently. Test emergency equipment regularly. Keep records of all inspections. Address issues immediately to prevent bigger problems.Pest Control
Pest control is crucial for underground shelters. Seal all entry points to keep pests out. Use traps and natural repellents. Store food securely in airtight containers. Regularly clean the shelter to remove food crumbs. Conduct routine checks for signs of infestation.Emergency Preparedness
Being prepared for emergencies is essential. Keep a stock of emergency supplies. Include food, water, and first aid kits. Ensure flashlights and radios have fresh batteries. Create an evacuation plan for quick exits. Regularly update your emergency contact list. Practice emergency drills with all family members.Frequently Asked Questions
What Materials Are Best For Building An Underground Shelter?
Use durable materials like wood, concrete, and metal for structure. Waterproof liners and insulation improve safety and comfort underground. Choose materials that resist moisture and provide strength to withstand soil pressure.
How Deep Should An Underground Survival Shelter Be?
A depth of 6 to 8 feet is ideal for protection. This depth shields from weather, predators, and temperature extremes. Ensure the shelter is deep enough to stay stable and insulated.
How Do You Ventilate An Underground Survival Shelter?
Install air vents or pipes to allow fresh air flow. Use screened openings to prevent insects and debris from entering. Proper ventilation prevents suffocation and maintains air quality inside.
Can You Build An Underground Shelter Without Heavy Machinery?
Yes, with manual tools like shovels and pickaxes, it’s possible. Plan for extra time and labor when digging by hand. Use natural materials and simple designs to reduce complexity.
Conclusion
Building an underground survival shelter takes time and care. Choose a safe spot with good soil and drainage. Use strong materials to protect against weather and animals. Keep the shelter dry and ventilated for comfort. Remember to plan for light and emergency supplies inside.
Practice building before you need it. Stay calm and prepared to stay safe underground. A good shelter can protect you in tough times. Start simple, improve as you go. Your safety depends on your effort and planning.

