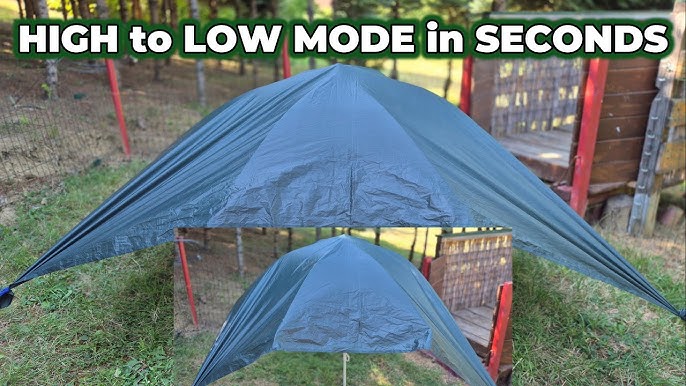
Imagine finding yourself in the wild, with nothing but a tarp and your instincts to keep you safe. Knowing how to make a survival shelter with a tarp can be the difference between staying warm and dry or facing the harsh elements unprotected.
This simple skill is powerful—it gives you control when nature feels unpredictable. In this guide, you’ll learn easy, step-by-step ways to build a shelter that shields you from rain, wind, and cold. Ready to turn a basic tarp into your lifesaver?
Keep reading, and you’ll be prepared to create your own safe haven wherever you are.
Choosing The Right Tarp
Choosing the right tarp is the foundation of building a reliable survival shelter. Your tarp will be your shield against the elements, so picking one that fits your needs can make all the difference. Think about where you’ll be using it and what conditions you might face—this will guide your decision.
Material And Size
The material of your tarp affects its strength and comfort. Common materials include polyethylene, nylon, and canvas. Polyethylene tarps are affordable and water-resistant but can tear easily. Nylon tarps are lighter and stronger, making them ideal for backpacking. Canvas tarps are durable and breathable but heavier.
Size matters too. A tarp that’s too small won’t provide enough coverage, while one that’s too large can be bulky to carry. A good rule of thumb is to choose a tarp that’s at least 8×10 feet for basic shelter needs. This size gives you enough room to protect yourself and your gear.
Weight And Durability
If you’re hiking to your shelter spot, weight becomes a crucial factor. Lighter tarps are easier to carry but may sacrifice durability. Heavier tarps offer better protection but can slow you down.
Look for reinforced corners and sturdy grommets to prevent tears. Ripstop nylon is a popular choice because it resists ripping while staying lightweight. Ask yourself: would you rather carry a few extra ounces for peace of mind or risk damage to your shelter at a critical moment?
Waterproof Features
Your tarp must keep water out, especially during heavy rain. Check if the tarp has a waterproof coating like polyurethane or silicone. These coatings enhance water resistance and prolong tarp life.
Seam sealing is another important feature. Unsealed seams can let water seep through, so a tarp with sealed or taped seams offers better protection. Don’t overlook how the tarp handles water pooling—some have a slight texture or design to encourage drainage.
Selecting The Shelter Location
Choosing the right spot to set up your tarp shelter can make a huge difference in your comfort and safety. The location affects everything—from protection against the elements to how well you can rest. Paying attention to the environment around you will help you avoid problems before they even start.
Avoiding Hazards
Look around carefully for any dangers like dead branches hanging overhead or unstable rocks nearby. These can fall or shift without warning, putting you at risk. Also, steer clear of low spots that might flood if it rains—wet feet won’t keep you warm or comfortable.
Ask yourself: Is there anything above or around this spot that could harm me? Clearing these hazards first can save you from unexpected trouble.
Finding Natural Windbreaks
Wind can turn a chilly night into a miserable one. Position your tarp near natural barriers like dense bushes, rock formations, or clusters of trees to block the wind. These natural shields reduce the wind’s impact, helping you conserve body heat.
Think about the usual wind direction in the area. Placing your shelter so the tarp faces away from prevailing winds adds extra protection. Have you noticed how your surroundings can act like a shield if you pay attention?
Considering Ground Conditions
Check the soil before laying your tarp down. Firm, dry ground is ideal because it provides stability and keeps moisture away. Avoid sandy or loose soil that might cause your shelter to collapse or let moisture seep in.
Also, look for flat spots to prevent sliding or discomfort while resting. Small adjustments in your location can make a huge difference in how well you sleep and stay dry overnight.
Basic Tarp Shelter Types
Tarp shelters come in various shapes like A-frame, lean-to, and diamond. Each type offers quick, simple protection from wind and rain. Choosing the right style depends on available materials and weather conditions.
Creating a survival shelter with a tarp is a practical skill that can save your life in the wilderness. Understanding the basic tarp shelter types is crucial for adapting to various environments and weather conditions. Each shelter type has its own strengths, and knowing which one to use can make your outdoor experience more comfortable and safe.A-frame Shelter
The A-Frame shelter is a classic choice, offering great protection from wind and rain. It’s simple to set up and provides stability. To build it, tie a cord between two trees, then drape the tarp over the cord to form a triangle or “A” shape. Secure the tarp’s corners to the ground with stakes or heavy rocks. This design creates a peak that allows rain to run off. It’s particularly effective in forested areas where trees are plentiful.Lean-to Shelter
The Lean-To shelter is perfect when you need quick coverage. This type of shelter is excellent for blocking wind and reflects heat from a campfire. To set it up, tie one edge of the tarp to a tree branch or trunk, leaving the opposite edge loose to extend outwards. Stake the loose end to the ground, creating a slanted roof. It’s important to face the open side away from the wind. This setup is a great choice when time and resources are limited.Flat Roof Shelter
The Flat Roof shelter is ideal for fair weather or when you need a simple shade. It’s a straightforward setup, requiring minimal effort. Start by tying all four corners of the tarp to trees or poles at an even height, creating a flat canopy. Ensure the tarp is taut to prevent sagging, which can collect rainwater. This shelter type is excellent for open spaces where tree coverage is sparse, providing a comfortable area for rest or cooking. Choosing the right tarp shelter can make your outdoor adventure much more enjoyable. Which shelter type will you try next time you’re out in nature?
Credit: www.youtube.com
Setting Up An A-frame Shelter
Setting up an A-frame shelter is a simple and effective way to create a safe space using a tarp. This type of shelter offers good protection from wind and rain while allowing airflow. It is quick to build and uses minimal materials, making it ideal for survival situations.
Gathering Support Materials
Start by finding two sturdy trees about 6 to 8 feet apart. If trees are not available, use strong poles or branches. Collect some rope or cord to tie the ridgeline. Have stakes or rocks ready to secure the tarp edges. Make sure the tarp is large enough to cover the space between the supports.
Tying The Ridgeline
Take the rope and tie it tightly between the two trees or poles. This rope will act as the ridgeline of your shelter. Ensure it is strong and secure to hold the tarp weight. The ridgeline should be about waist height for easy access and comfort inside the shelter.
Securing The Tarp
Drape the tarp evenly over the ridgeline so both sides hang down. Use stakes or rocks to anchor the tarp corners to the ground. Pull the tarp edges tight to avoid sagging and water pooling. Check all attachment points to keep the shelter stable in wind or rain.
Building A Lean-to Shelter
Building a lean-to shelter with a tarp is a simple and effective way to create a protective space outdoors. This shelter uses a single tarp and a solid support, like a tree, to provide cover from wind, rain, and sun. It is quick to set up and requires minimal tools, making it ideal for survival situations or camping.
The lean-to design allows one side to remain open for ventilation and easy access. Proper setup ensures stability and protection. Follow these key steps to build a strong lean-to shelter.
Positioning The Tarp
Start by selecting a spot with a sturdy tree or structure. Lay the tarp so one edge aligns with the tree. The tarp should slope downward to let rain run off. Make sure the open side faces away from the wind. Position the tarp high enough to allow comfortable sitting or sleeping space underneath.
Anchoring To A Tree
Tie a rope or paracord tightly between two trees or around one tree. Secure the tarp’s top edge to this rope using knots or clips. Ensure the tarp is pulled tight to avoid sagging. Tight tension helps shed water and keeps the shelter stable in wind. Use strong knots like a taut-line hitch for easy adjustments.
Securing The Open Side
Stake the tarp’s bottom edges to the ground on the open side. Use tent stakes, rocks, or heavy branches to keep the tarp in place. Angle the stakes away from the shelter to hold the tarp firmly. Create a small opening for ventilation but keep most of the side covered. This prevents rain and wind from entering the shelter.

Credit: www.youtube.com
Creating A Flat Roof Shelter
Creating a flat roof shelter with a tarp is a simple yet effective way to protect yourself from the elements during a survival situation. This style of shelter provides solid overhead coverage while being quick to set up. Let’s break down the key steps to build a reliable flat roof shelter that keeps you dry and safe.
Choosing Anchor Points
Anchor points are the foundation of your tarp shelter. Look for sturdy trees, rocks, or fixed objects that won’t shift or break under tension. If natural anchors aren’t available, you can create your own by driving stakes into the ground.
Make sure the points are spaced wide enough to stretch the tarp fully flat. This prevents sagging and pooling of water later on. Always test the strength of your anchor points before securing the tarp.
Stretching The Tarp
Once your anchor points are set, start stretching the tarp tightly between them. Pull the tarp taut to minimize movement caused by wind. Loose tarps can flap loudly and may wear out faster.
Use ropes or paracord to tie down the tarp securely. Adjust the tension on each corner evenly to maintain a flat surface. A flat, tight tarp is easier to manage and more effective at shedding rain.
Ensuring Water Drainage
Water drainage is crucial to avoid leaks and collapse. Slightly angle your tarp by lowering one side a few inches. This encourages water to run off instead of collecting on top.
Check the tarp regularly during rain to ensure no water is pooling. Small adjustments to the tension or anchor points can improve drainage and keep your shelter dry. Have you ever been caught in a storm under a sagging tarp? Avoid that discomfort by planning drainage from the start.
Securing The Shelter
Securing your tarp shelter is crucial to ensure it withstands wind, rain, and other elements. Without proper anchoring and tension, your shelter can collapse or let in unwanted drafts. Let’s look at how you can firmly secure your shelter using simple tools and techniques you likely already have.
Using Stakes And Ropes
Stakes and ropes are your best friends for anchoring a tarp shelter. Drive stakes into the ground at an angle away from your shelter to maximize holding power.
Attach ropes to the tarp’s grommets or reinforced holes, then tie them tightly to the stakes. Using adjustable knots like the taut-line hitch lets you quickly tighten or loosen the ropes as needed.
If you don’t have stakes, sturdy branches or heavy rocks can work as anchors in a pinch. Have you ever tried using paracord? It’s lightweight, strong, and perfect for securing your shelter.
Tension Techniques
Proper tension keeps your tarp smooth and prevents flapping noise that can disturb your rest. Pull the tarp taut between anchor points but avoid overstretching, which can cause tears.
Start with the ridgeline tension—this is the line running over the top of your shelter. Tighten it first before working on the sides.
Use a combination of tensioning knots and twisting the ropes slightly to increase hold. Think of how a tight drum skin stays firm—your tarp should feel similarly stretched.
Reinforcing Edges
Edges are the weakest points prone to tearing, especially under strong winds. Reinforce these areas by folding the tarp edges over the rope or cord before tying.
You can also add extra strips of duct tape or fabric patches to strengthen corners and sides. This simple step can save your shelter from damage and extends its usability.
Have you noticed how small tears often start at the edges? Taking time to reinforce them can prevent bigger problems while you rely on your shelter for protection.
Insulating And Weatherproofing
Insulating and weatherproofing your tarp shelter is key to staying warm and dry in the wild. Without proper protection, cold ground, wind, and moisture can quickly sap your energy and make survival difficult. Let’s look at how you can improve comfort and safety with a few simple adjustments.
Adding Ground Cover
Placing a ground cover beneath your shelter creates a barrier between you and the cold, damp earth. Use materials like a foam pad, leaves, pine needles, or even a second tarp. These layers trap air and reduce heat loss from your body.
Think about how much heat you lose through direct contact with the ground. Have you ever felt chilly after sitting on cold soil? Adding this simple layer can make a surprising difference in your comfort level.
Wind Protection Tips
Wind can turn your shelter into a cold trap if you don’t block it effectively. Position your tarp so the narrowest side faces the prevailing wind direction. Anchor the edges tightly with stakes or heavy rocks to prevent flapping.
- Use natural windbreaks like bushes or fallen trees nearby.
- Lower the tarp’s profile by angling it closer to the ground.
- Consider adding a secondary tarp wall or wind flap for extra defense.
Have you noticed how a slight change in tarp angle can drastically reduce wind chill? Experiment with setup angles to find the most sheltered position.
Rain And Snow Considerations
Water is the enemy of warmth. Make sure your tarp shelter has enough slope to shed rain and snow quickly. A steep angle prevents pooling and leaks.
Secure the tarp edges well above the ground to avoid splashback. If snow is expected, clear the area regularly to prevent buildup that can collapse your shelter.
- Use guy lines to keep the tarp taut under heavy snow load.
- Check for any gaps where water could enter and cover them with extra fabric or natural materials.
What’s your plan if a sudden storm hits? Being proactive in weatherproofing can keep you dry and alive when conditions worsen fast.
Safety And Comfort Tips
Creating a survival shelter with a tarp needs more than just setting it up. Safety and comfort are key. A well-made shelter protects from weather and keeps you safe from risks. Follow these tips to keep your shelter breathable, safe from fire, and tidy for better rest and efficiency.
Maintaining Ventilation
Good airflow stops moisture and keeps air fresh inside your shelter. Without ventilation, condensation forms, making things damp and cold. Leave small gaps at the top or sides of the tarp. Use natural openings or slightly lift one side. Avoid sealing the shelter fully tight. This helps you breathe better and reduces mold risks.
Fire Safety Around Shelter
Fires warm you but can be dangerous near a tarp. Keep any fire at least 10 feet away from the shelter. Clear dry leaves, grass, and twigs around the fire area. Use a fire ring or stones to contain flames. Never leave a fire unattended. Always have water or dirt nearby to put out flames quickly.
Organizing Shelter Interior
Keep your shelter neat for comfort and safety. Store gear in one corner to avoid clutter. Use a small groundsheet or tarp inside to keep your sleeping area dry. Arrange items so you can move easily without tripping. Keep sharp tools away from sleeping spots. A tidy shelter reduces stress and helps you rest better.
Essential Tools And Supplies
Creating a survival shelter with a tarp requires specific tools and supplies. These essentials ensure your shelter is sturdy and reliable. Proper tools make the process smooth and efficient. Gather these items before heading into the wild. Let’s explore the vital tools and supplies you need.
Knives And Cordage
A good knife is crucial for cutting and shaping materials. Choose a durable knife with a sharp blade. It helps in trimming branches and cutting rope. Cordage is equally essential for tying and securing the tarp. Paracord is a popular choice for its strength and flexibility. Having enough cordage ensures your shelter stays intact.
Stakes And Poles
Stakes and poles provide the foundation for your tarp shelter. Use sturdy stakes to secure the tarp to the ground. Metal or heavy-duty plastic stakes work well. Poles or branches help elevate the tarp, creating a roof. Adjust the height for better protection against the elements. Ensure the poles are strong and stable.
Additional Accessories
Extra accessories enhance the functionality of your shelter. Tarpaulin clips or clamps can secure the tarp without tearing. Bungee cords provide flexibility and tension. Ground sheets offer extra insulation from the cold. A small hammer aids in driving stakes into hard ground. These items improve comfort and stability.

Credit: www.youtube.com
Frequently Asked Questions
What Materials Do I Need For A Tarp Survival Shelter?
You need a durable tarp, sturdy ropes or paracord, and strong stakes or branches. These materials provide reliable shelter and stability in various weather conditions.
How Do I Secure A Tarp To Build A Shelter?
Use ropes to tie tarp corners to trees or poles. Secure edges with stakes in the ground for firm anchoring and wind resistance.
What Is The Best Tarp Shelter Design For Beginners?
The A-frame design is simple and effective. It offers good protection from rain and wind while being easy to set up quickly.
Can I Use Any Tarp Size For Shelter Building?
Choose a tarp size based on the number of people and shelter purpose. Larger tarps offer more coverage but need more support.
Conclusion
Building a survival shelter with a tarp is simple and useful. It keeps you dry and safe in bad weather. You only need a few tools and some practice. Try different shapes and setups to find what works best. Always check the tarp for holes or weak spots.
Stay calm and think clearly. Shelter can make a big difference in survival situations. Keep learning and practicing these skills often. You will feel more ready for outdoor adventures or emergencies.