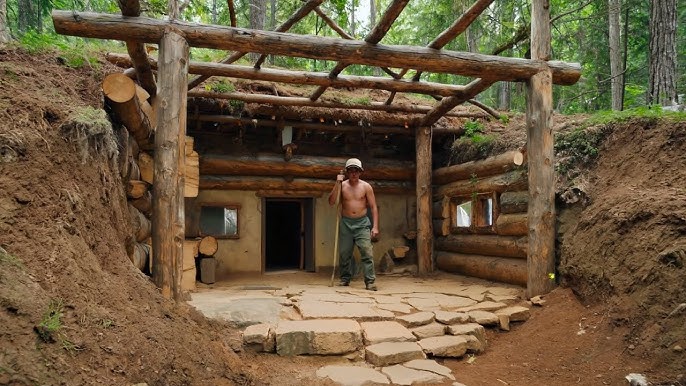
Imagine finding yourself in the wild with no safe place to rest. Your comfort, safety, and even survival depend on having a shelter that keeps you off the cold, wet ground.
Building a survival shelter off the ground isn’t just smart—it can be a lifesaver. In this guide, you’ll discover simple, practical steps to create a sturdy, elevated shelter using materials around you. By the end, you’ll feel confident to protect yourself from the elements and stay dry, warm, and secure no matter where you are.
Ready to learn how to build your own off-the-ground refuge? Let’s dive in.

Credit: www.youtube.com
Choosing The Right Location
Choosing the right location for your off-the-ground survival shelter can make all the difference between comfort and disaster. It’s about more than just finding a flat spot—your choice affects safety, stability, and how well you can withstand weather challenges. Let’s break down what to look for so your shelter stands strong and keeps you secure.
Assessing Terrain And Environment
Look for solid, stable ground that won’t flood or erode easily. Avoid loose soil or sandy areas where your shelter’s supports might sink or shift over time.
Check the surrounding vegetation. Thick bushes or trees can provide natural windbreaks but might also pose risks if branches fall. Balance protection with safety.
Think about accessibility. Can you easily reach water, firewood, or escape routes from your spot? Your shelter should support your survival needs, not complicate them.
Avoiding Hazards
Stay clear of obvious dangers like animal trails or insect nests, which could disrupt your shelter or threaten your safety.
Watch out for overhead risks such as dead branches, leaning trees, or power lines. Falling debris can cause serious injury.
Consider nearby water sources carefully. While close water is convenient, avoid low-lying areas prone to flash floods or stagnant water that attracts insects.
Considering Weather Conditions
Wind direction matters. Position your shelter so the entrance faces away from prevailing winds to reduce cold drafts and debris blowing inside.
Think about sun exposure. A spot with morning sun can warm your shelter early, while afternoon shade helps keep it cool.
Reflect on seasonal changes. Will rain runoff affect your location? Is there enough natural cover to shield against snow or heavy rain? Your shelter must stand up to the local climate.

Credit: sgtknots.com
Selecting Shelter Types
Choosing the right type of shelter to build off the ground can make a big difference in your survival situation. You want something sturdy, safe, and suitable for your environment. Think about where you are, the materials available, and how much time you can spend building before deciding.
Elevated Platforms
Elevated platforms keep you off the damp ground, protecting you from moisture and insects. They are usually built with logs or sturdy branches and supported by strong legs or stilts.
One time, I built a simple platform using fallen wood and vines after a heavy rain. It stayed dry and comfortable all night, proving how effective this type of shelter can be.
Elevated platforms work well in flat areas where you can find strong materials to support the structure. They also give you a good view of your surroundings, which can be helpful for spotting danger.
Tree Shelters
Tree shelters take advantage of natural height and protection. You can create a small platform nestled among branches or secure a hammock between two trees.
When I camped in a forest, setting up a tree shelter kept me safe from ground animals and provided excellent airflow. But you must ensure the branches are strong enough to hold your weight safely.
Look for trees with thick, healthy limbs and make sure you can securely tie your shelter. This type keeps you off the ground and away from many common hazards.
Raised Lean-tos
A raised lean-to combines a traditional lean-to shape with an elevated platform. This design gives you shelter from rain and wind while keeping you above wet or uneven ground.
Building one requires fewer materials than a full platform and can be quicker to assemble. I once built a raised lean-to using green branches for the frame and leaves for the roof, and it kept me dry during a sudden storm.
This type is ideal for areas with plenty of branches and leaves nearby. It offers good protection and is relatively simple to build, making it a solid choice in many survival scenarios.
Gathering Materials
Collect strong, dry wood and sturdy branches to create a stable frame. Gather leaves, grass, or moss for insulation and waterproofing. Choose materials that are easy to carry and found nearby for quick shelter building.
Gathering materials for a survival shelter off the ground is a critical first step that sets the foundation for your entire shelter-building experience. Whether you’re deep in the forest or on a mountaintop, knowing what to collect and how to use it can mean the difference between a cozy night under the stars or a damp, chilly evening. Let’s dive into the essentials you need to gather to construct a sturdy and comfortable shelter.Natural Resources
Start by looking around you. Nature often provides what you need. Sturdy branches, fallen logs, and large leaves are excellent for constructing your shelter’s frame and roof. Consider the types of trees in your area. Pine branches, for example, offer excellent insulation and can be used to cover the structure. Use rocks to anchor parts of your shelter or as a makeshift platform. Remember, the best materials are often those closest to your location, minimizing the energy you expend gathering them.Tools And Equipment
A few simple tools can make your shelter-building process more efficient. A good quality knife or multi-tool is invaluable for cutting branches and ropes. If you have a small hand axe, it can be extremely helpful in shaping larger logs or trimming branches. Rope or cordage is also essential for tying and securing the structure. If you don’t have cordage, learn basic knot skills using vines or strips of bark as natural alternatives.Insulating Materials
Insulation is key to keeping warm, especially if temperatures drop at night. Collect leaves, pine needles, or grass to create a soft layer inside your shelter. Consider building your shelter with an air gap between the ground and your sleeping area. This prevents cold from seeping in from below. If you’re in a snowy environment, use snow itself to insulate the walls of your shelter—it’s surprisingly effective at trapping heat. As you gather these materials, think about how they will work together. How will your choices affect your comfort and safety? The right materials can make a huge difference in your survival experience.
Credit: www.youtube.com
Building The Foundation
Building a strong foundation is key to a safe survival shelter off the ground. It supports the entire structure and keeps it stable. The foundation should handle weight and resist movement from wind or animals. Selecting the right materials and technique makes the shelter durable and secure.
Creating Stable Supports
Start by choosing firm, level ground for your shelter base. Dig small holes for the supports to anchor them deeply. Use sturdy sticks or poles that can hold weight without bending. Place supports evenly to balance the shelter’s load. Test each support by pressing down to check firmness.
Using Logs And Poles
Logs and poles form the main frame of the foundation. Select straight, thick logs that are free of cracks or rot. Lay them across the supports to create a platform. Use poles to connect the logs, adding strength and preventing shifting. Cut poles to fit snugly between logs for tight joints.
Securing The Base
Fasten logs and poles with rope, vines, or strong cord. Wrap tightly around joints and tie secure knots. Use stakes driven into the ground to anchor the base in windy areas. Check all connections to ensure nothing moves or loosens easily. A secure base stops the shelter from collapsing or sliding.
Constructing The Frame
Constructing the frame is a crucial step in building a survival shelter off the ground. It forms the backbone that holds everything together and keeps you safe from the elements. Getting this part right means your shelter will be sturdy and reliable when you need it most.
Joining Techniques
How you join the pieces of wood can make or break your shelter’s strength. Simple lashings using rope or paracord work well if you don’t have nails or screws. Square lashings are especially strong for connecting poles at right angles.
Try to avoid loose knots that might slip under pressure. Tighten your lashings firmly and double-knot them for extra security. If you have tools, consider using screws or bolts for a more permanent hold.
Ensuring Structural Integrity
Your frame must withstand wind, rain, and even the weight of snow. Position vertical supports firmly into the ground or tie them securely to sturdy trees. Check each joint by applying pressure to see if it shifts or creaks.
Imagine you’re building this shelter to last through a stormy night—would your frame stay solid? If not, reinforce weak points with extra lashings or braces. Small adjustments now save big trouble later.
Adding Cross Beams
Cross beams spread the load evenly and prevent your frame from twisting. Place them horizontally across vertical supports to create a stable grid. This also gives you a solid base to rest your flooring or sleeping platform on.
Use thicker wood for cross beams to handle more weight. Space them evenly for balanced support—typically every 18 to 24 inches works well. Don’t forget to secure each cross beam tightly to avoid wobbling under pressure.
Creating The Floor
Creating a solid floor for your survival shelter is a key step that often gets overlooked. A well-built floor keeps you off the cold, damp ground and protects you from insects and small animals. It also provides a comfortable and clean space to rest, cook, and store your gear.
Elevated Flooring Methods
Raising your shelter’s floor off the ground helps prevent moisture buildup and improves air circulation. You can use sturdy branches or logs as a base, laying them parallel and close together to form a strong platform.
Another option is to build a frame from saplings or wooden poles, then cover it with flat boards, bark, or even large leaves. Remember, the goal is to create a stable and level surface that won’t collapse under weight.
Adding Insulation
Insulation is crucial to keep you warm, especially in cold environments. Layer natural materials like dry leaves, pine needles, or grass on top of your elevated floor to create a soft, insulating barrier.
This layer traps air and reduces heat loss to the ground below. You might be surprised how much difference a few inches of natural insulation can make during chilly nights.
Waterproofing Tips
Waterproofing your floor prevents moisture from seeping up and soaking your gear or bedding. Start by placing a tarp, plastic sheet, or large leaves under the insulation layer to act as a moisture barrier.
If plastic isn’t available, thick bark or layers of broad leaves tightly woven together can help shed water. Check the edges regularly to make sure water isn’t pooling or creeping beneath your floor.
Building The Roof And Walls
Building the roof and walls of your off-the-ground survival shelter is crucial for protection against the elements. These components not only provide shelter but also contribute to the structure’s stability and comfort. Your choices here can make the difference between a safe refuge and an uncomfortable, unsafe space.
Choosing Roofing Materials
Your roof must keep rain, snow, and wind out while being lightweight enough for easy construction. Natural materials like large leaves, bark, or branches are great if you’re in a forested area. They provide decent insulation but might need layering to prevent leaks.
If you have access to tarps or plastic sheeting, these create excellent waterproof barriers. Secure them tightly to prevent flapping in strong winds, which can damage your shelter. Think about how each material handles water—will it absorb moisture or repel it?
Wall Construction Options
Walls should block wind and provide insulation without making the shelter heavy or difficult to build. Woven branches or sticks create a sturdy framework that lets you add mud, leaves, or moss for insulation. This method is quick and uses materials you likely already have around.
Another option is stacking logs or stones if you need more solid protection. This approach is time-consuming but offers excellent durability and warmth retention. Ask yourself what materials are easiest to gather and assemble given your location and time constraints.
Sealing Gaps
Even small gaps in your walls or roof let in cold air, rain, or insects. Use moss, grass, mud, or cloth scraps to fill these spaces tightly. Press the material firmly to avoid loose patches that could fall out over time.
Check your shelter regularly for new gaps, especially after bad weather. A well-sealed shelter stays warmer and safer, making your survival experience much more manageable. How much time are you willing to spend maintaining your shelter daily?
Enhancing Shelter Comfort
Building a survival shelter off the ground is a smart move, but comfort matters just as much as safety. A well-designed shelter should keep you dry, warm, and protected from annoyances that can disrupt your rest. Enhancing comfort can make a huge difference in how well you recover and stay alert in the wild.
Ventilation Strategies
Good airflow prevents moisture buildup and keeps your shelter feeling fresh. Without ventilation, condensation can soak your bedding and clothes, making cold nights even harder. You can create small gaps near the roof or use breathable materials like tarp with mesh panels to allow air to flow while keeping rain out.
Think about the direction of the wind when setting up your shelter. Positioning openings on the leeward side helps control airflow and reduces drafts. Have you noticed how a stuffy tent can ruin a night’s sleep? Proper ventilation solves that problem effectively.
Protecting From Insects
Insects can turn a restful night into a nightmare. Use fine mesh screens or netting around your shelter’s entry points to keep bugs out without blocking airflow. Pinning mosquito nets under the shelter floor or wrapping around the sleeping area adds an extra layer of defense.
Natural repellents like sage or lavender can also help deter insects nearby. Have you ever woken up with itchy bites? Taking a few extra steps to protect yourself can prevent that discomfort and reduce the risk of insect-borne diseases.
Adding Entryways
Entryways should balance easy access with protection from the elements and wildlife. A flap or door made from waterproof fabric can shield you from rain and wind while allowing quick entry. Consider adding a vestibule area to store gear outside your sleeping space but still under cover.
Think about how you’ll enter and exit during the night without letting cold air rush in. A double-layered entry, with an outer flap and inner mesh door, works well. Have you planned your shelter’s entry to keep warmth in and pests out?
Safety And Maintenance
Building a survival shelter off the ground is only the first step. Keeping it safe and well-maintained ensures it lasts through tough conditions. Regular care helps avoid hazards and keeps the shelter reliable.
Regular Inspections
Check the shelter often for signs of wear or damage. Look at the supports, floor, and walls carefully. Make sure the structure is stable and secure. Remove debris and check for insect or animal damage. Frequent inspections catch problems early before they grow worse.
Weatherproofing Updates
Weatherproofing protects your shelter from rain, wind, and cold. Refresh waterproof coatings or tarps as needed. Seal any gaps where water or wind might enter. Replace worn-out materials to keep the shelter dry and warm. Staying ahead of weather damage keeps your shelter safe and comfortable.
Repairing Damages
Fix any broken parts immediately to prevent accidents. Replace cracked wood, torn fabric, or loose nails. Use strong materials that match the original structure. Repairing damage quickly extends the life of your shelter. Always carry basic tools and repair supplies with you.
Tips For Survival Shelter Success
Building a shelter off the ground keeps you dry and safe from insects and animals. Use sturdy branches and strong ties to create a stable base. Adding leaves or blankets on top helps trap warmth and protect against wind.
Building a survival shelter off the ground is an essential skill for any outdoor enthusiast. But success doesn’t just hinge on having the right materials; it’s about using those materials wisely and adapting to your surroundings. Here are some key tips to ensure your survival shelter is both effective and efficient.Time Management
Time is crucial when constructing a shelter. The more time you spend building, the less time you have for other essential survival tasks like gathering food and water. Set a clear timeline for each stage of construction. Prioritize the essentials first—like a sturdy floor and roof—before adding extra features. If you’re racing against nightfall, focus on creating a basic structure that can be improved later.Resource Conservation
Maximize your available resources by utilizing what’s around you. Use fallen branches and leaves to avoid cutting down live trees unnecessarily. This not only helps conserve the environment but also saves your energy. Think about materials that serve multiple purposes. A tarp can be both a roof and a rainwater collector. This dual-use approach ensures you don’t waste anything valuable.Adapting To Environment
Your shelter must be tailored to the environment you’re in. In a forested area, use tree cover for natural insulation. In a desert, prioritize shade and ventilation. Consider the terrain and weather conditions as you build. Stay observant and flexible. If strong winds come up, adjust your design to anchor more securely. What unique challenges does your environment present, and how can you creatively solve them? By focusing on these critical areas, you can build a shelter that not only protects you but also respects the environment around you.Frequently Asked Questions
What Materials Are Best For Building An Off-ground Shelter?
Use lightweight, durable materials like wood pallets, tarps, and rope. These provide stability and weather resistance. Avoid heavy or weak items that can collapse or rot quickly. Prioritize materials you can easily carry or find in the wild.
How High Should A Survival Shelter Be Off The Ground?
Build your shelter at least 1 to 2 feet above ground. This height keeps you safe from flooding, insects, and cold dampness. It also improves ventilation and keeps your shelter dry during rain.
How Can I Insulate An Off-ground Survival Shelter?
Use natural materials like leaves, grass, or moss for insulation. Layer these between shelter walls and flooring to trap warmth. You can also use emergency blankets or foam pads if available to improve heat retention.
How Do I Secure A Survival Shelter From Wind?
Anchor your shelter firmly using stakes, rocks, or heavy logs. Build a windbreak with natural barriers like bushes or rocks on the windward side. Ensure your shelter’s roof and walls are tightly fastened to avoid damage.
Conclusion
Building a shelter off the ground keeps you safe and dry. It protects from bugs, moisture, and cold earth. Use strong materials and secure your shelter well. Keep it simple but sturdy for best results. Practice these steps before you need them.
Stay prepared and confident in any outdoor situation. Your shelter will be a reliable place to rest. Safety and comfort matter most in survival.