
Imagine being caught in the cold wilderness with nothing but snow all around you. Your survival depends on staying warm and protected.
Knowing how to build a snow shelter can make the difference between discomfort and safety. In this guide, you will learn simple, effective steps to create your own snow shelter, even if you have no prior experience. By the end, you’ll feel confident and ready to face winter challenges head-on.
Keep reading—your safety and comfort in the wild could depend on what you discover here.
Choosing The Right Location
Choosing the right location for your snow shelter is crucial to staying safe and comfortable in the wilderness. The spot you pick affects how well your shelter holds up against the elements and how warm you’ll stay inside. Think about the snow quality, natural features, and potential dangers around you before you start building.
Assessing Snow Conditions
Not all snow is created equal for building a shelter. You want firm, compact snow that can support weight without collapsing. Soft, powdery snow might look inviting but won’t hold up well when you start digging or shaping your shelter.
Test the snow by pressing your hand down or gently jumping on it. If it compacts into a solid block, you’re in good shape. Avoid areas where the snow is crusty on top but loose underneath — that can cause your shelter to cave in unexpectedly.
Finding Natural Windbreaks
Wind can quickly drain your body heat, so look for natural features that block strong gusts. Trees, large rocks, or even a small hill can protect your shelter from the worst of the wind. Position your shelter on the leeward side, where the wind is weakest.
During one trip, I found a spot behind a cluster of pine trees that cut the wind drastically. It made a huge difference in keeping the shelter warm and stable. Could your next shelter benefit from a similar natural shield?
Avoiding Hazards
Safety matters most. Steer clear of avalanche-prone slopes, unstable snowbanks, and areas below overhanging branches heavy with snow. These spots can turn dangerous quickly and ruin your shelter.
Also, avoid low spots where cold air settles or where melting snow could flood your shelter. Look around carefully and listen to the sounds of the environment — sometimes subtle signs point to hidden dangers.

Credit: www.youtube.com
Essential Tools And Materials
Building a snow shelter in the wilderness demands more than just know-how; having the right tools and materials is crucial for your safety and success. Without them, your efforts can quickly turn exhausting or even dangerous. What essential items should you prioritize to ensure your shelter stands firm and keeps you warm?
Survival Knife And Shovel
A strong survival knife is your most versatile tool. It helps you cut blocks of snow, carve notches, and prepare kindling for a fire. Choose one with a sturdy, sharp blade and a comfortable grip to avoid hand fatigue.
A compact, durable shovel makes shaping your shelter much easier. It allows you to dig out your shelter area and move snow efficiently. I once tried building a snow cave without a shovel, and it took double the time and effort—don’t make that mistake.
Insulating Materials
Snow itself provides insulation, but adding extra layers can make a big difference. Use a foam sleeping pad or branches inside your shelter floor to create a barrier between you and the cold ground. This prevents heat loss and keeps you more comfortable.
Don’t forget a tarp or a sturdy groundsheet to block moisture. Even a thick layer of pine boughs can add insulation. What other natural materials can you find around you to add warmth?
Safety Gear
Protecting yourself while building and sheltering is key. Always wear gloves to avoid frostbite and insulated boots to keep your feet dry. Carry a whistle and a headlamp; they can be lifesavers if you get stuck in low visibility or need to signal for help.
Remember, your shelter is only as safe as the precautions you take. Checking weather forecasts and informing someone about your plans are simple steps that can save your life. What safety measures will you prioritize before heading out?
Types Of Snow Shelters
Building a wilderness survival snow shelter involves creating structures like igloos, quinzhees, or snow caves. Each type offers protection from harsh weather. Proper construction ensures warmth and safety in cold environments.
In the wilderness, snow shelters can be lifesavers. Knowing the right type to build can mean the difference between comfort and a freezing night. Let’s explore three essential types of snow shelters that can offer protection and warmth.Quinzhee
A Quinzhee is essentially a pile of snow that you hollow out. It’s simpler than an igloo, but still effective. You start by piling snow into a large mound, then letting it settle for a couple of hours. Once the snow has compacted, you dig out the inside, leaving a thick wall for insulation. Remember to make a small entrance and a ventilation hole to ensure airflow. The beauty of a Quinzhee is its simplicity—anyone with a shovel can make one.Snow Cave
Building a snow cave requires more effort but offers excellent protection. You need a deep snowdrift or a slope to dig into. Start by carving out a tunnel that leads to a larger chamber. Ensure the ceiling is curved to prevent drips, and always create a small ventilation hole. Once, while on a winter hike, I discovered how crucial it is to mark your cave entrance with a stick. This prevents accidental collapse when snow covers your trail.Igloo
The igloo is the most iconic snow shelter, known for its impressive strength and insulation. To build one, you’ll need hard-packed snow to cut into blocks. Arrange the blocks in a spiral, leaning them inward to form the dome. It requires skill and patience, but the effort pays off with a cozy shelter. Consider the time and energy you have before choosing this option. Do you have the skills, or is it better to stick with a simpler structure like a Quinzhee? Each shelter type has its strengths and challenges. Assess your situation, available resources, and your comfort with building techniques. Whatever you choose, ensure it offers safety and warmth for your wilderness adventure.Building A Quinzhee
Building a quinzhee offers excellent shelter in snowy wilderness areas. This type of snow shelter uses piled snow that you hollow out, creating a warm, insulated space. It is simpler to build than an igloo and uses available snow efficiently. Follow these key steps for a sturdy, safe quinzhee.
Gathering And Piling Snow
Find a deep area with soft, loose snow. Avoid icy or crusty snow because it is hard to shape. Use a shovel or your hands to pile snow into a mound.
- Make a mound about 4 to 6 feet wide.
- Shape it roughly like a dome or rounded hill.
- Pack the snow lightly to avoid it being too dense.
Leave the mound loose to allow air pockets inside. This helps with insulation later.
Allowing Snow To Settle
Let the snow mound sit for 1 to 2 hours after piling. This time lets the snow settle and bond. Settling makes the snow stronger and safer to hollow.
- Cover the mound with a tarp or blanket if windy.
- Check the snow hardness before hollowing.
- Snow should feel firm but not frozen solid.
Hollowing Out The Interior
Start by marking a low entrance on one side of the mound. Use a shovel or your hands to dig inside carefully. Hollow out a dome-shaped interior, about 3 feet wide.
- Remove snow in thin layers to avoid collapse.
- Keep the roof at least 12 inches thick.
- Shape walls smoothly to distribute weight evenly.
Place a small ventilation hole at the top to allow air flow. This prevents carbon dioxide build-up inside the shelter.
Constructing A Snow Cave
Constructing a snow cave provides excellent shelter from cold winds and snowstorms. Snow caves trap body heat and offer insulation against freezing temperatures. Building one requires careful planning and effort, but the result is a safe, warm refuge in the wilderness.
Selecting A Suitable Snow Drift
Choose a deep snow drift with firm, compact snow. Soft or loose snow can collapse easily. Look for a drift at least 4 feet deep to allow enough space inside. Avoid areas near trees or rocks that may cause snow to fall. A sheltered spot protected from wind is best.
Digging The Entrance
Start by digging a small tunnel into the snow drift. Make the entrance low to reduce heat loss. The tunnel should slope slightly upward to the main chamber to keep cold air out. Use a snow saw, shovel, or hands to clear the snow carefully. Keep the entrance narrow but big enough to crawl through.
Carving The Living Space
Inside, carve out a dome-shaped chamber. The dome shape helps distribute weight and prevents collapse. Make the ceiling high enough to sit but low enough to conserve heat. Smooth walls reduce dripping condensation. Build a raised sleeping platform above the entrance level to stay warm.
Crafting An Igloo
Crafting an igloo is both an art and a practical skill that can keep you warm and safe in harsh winter conditions. It uses the unique insulating properties of compacted snow to create a shelter that blocks wind and retains heat. Let’s break down how you can build one yourself, even if you’re new to snow survival techniques.
Cutting Snow Blocks
Start by finding firm, compact snow that holds its shape when cut. Use a snow saw or a sturdy knife to cut rectangular blocks about 2 feet long, 1 foot high, and 6 inches thick.
Make sure each block is uniform in size for easier stacking. Cutting blocks on a flat, stable surface helps maintain even edges. Have you checked your knife’s sharpness? A dull blade will make this task frustrating and slow.
Stacking Blocks In A Spiral
Place your first block flat on the ground to form the base. Then stack subsequent blocks slightly angled inward, spiraling upward in a circular pattern.
This inward tilt is crucial—it creates a dome shape that supports itself without collapsing. Use snow from the ground as mortar to fill gaps between blocks. Notice how the spiral method reduces gaps and strengthens the structure?
Creating Ventilation
Don’t forget to add a small ventilation hole near the top of your igloo. This hole allows fresh air to circulate and prevents carbon dioxide buildup inside.
Make the hole about the size of a fist, and keep it clear of snow debris. You might not realize how vital this tiny opening is until you feel the difference in air quality inside your shelter.
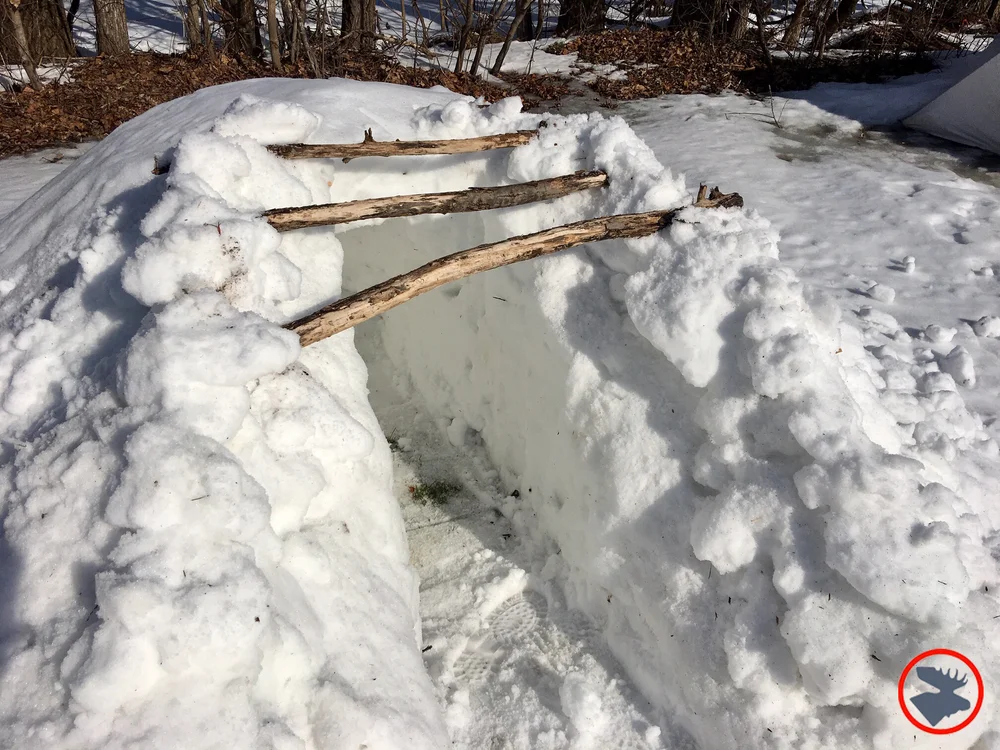
Ventilation And Safety Measures
Ventilation and safety are key when building a snow shelter in the wild. Proper airflow keeps fresh air inside while removing harmful gases. Safety measures protect you from accidents and health risks. Focus on these points to stay safe and comfortable.
Creating Air Holes
Air holes let fresh air enter the shelter. They prevent the space from becoming stuffy. Use a stick or a small tool to poke holes near the top and bottom walls. Keep holes small but enough for steady airflow. Check holes often to keep them clear of snow.
Preventing Carbon Monoxide Buildup
Carbon monoxide is a deadly gas from stoves or fires. Never block ventilation holes or close the shelter tightly. Use only small, controlled fires or portable stoves made for enclosed spaces. Always allow smoke and gas to escape. Avoid sleeping with a fire burning inside.
Monitoring Structural Integrity
Snow shelters can weaken over time. Check walls and roof for cracks or sagging. Remove heavy snow buildup on top to prevent collapse. Press walls gently to test firmness. Fix weak spots by adding more snow or packing it tighter. Stay alert to any changes in shelter stability.
Credit: www.bullmoosepatrol.com
Maintaining Warmth Inside
Keeping warm inside your snow shelter is crucial for survival and comfort. The cold outside can quickly seep in, but with the right approach, you can create a cozy space that retains heat effectively. Let’s look at practical ways to maintain warmth while you’re tucked away in the snow.
Using Insulating Layers
Snow itself is a natural insulator, but adding layers inside your shelter makes a big difference. Start by lining the floor with branches, pine boughs, or even your backpack to create a barrier between you and the cold ground.
Then, place a thick layer of clothing or sleeping pads on top. These materials trap air, which helps keep heat in. Have you ever noticed how your insulated jacket feels warmer than just a single shirt? The same principle applies inside your shelter.
Body Heat Management
Your body is your best heat source. Wearing dry clothes and covering your head with a hat can prevent heat loss. Try to stay still but avoid prolonged immobility, which can cause your body temperature to drop.
Sharing the shelter with another person also conserves heat. If you’re alone, curling up into a ball reduces the surface area exposed to the cold. Do you pay attention to how your body reacts to the cold? Adjusting your position and clothing can make a significant difference.
Avoiding Moisture Build-up
Moisture inside a snow shelter can quickly sap heat and make conditions dangerous. Avoid breathing directly onto the walls or ceiling to prevent condensation. Ventilation is essential; create a small air hole to allow moisture to escape.
Keep wet clothes outside or wring them out before entering your shelter. Have you ever felt colder after sweating? Moisture reduces insulation, so staying dry is key to maintaining warmth.
Emergency Tips And Tricks
Surviving in the wilderness during winter requires quick thinking and smart actions. Knowing emergency tips can save lives and keep you safe. These tips focus on signaling for help, managing supplies, and creating fast shelters. Each skill increases your chance of rescue and comfort.
Signal Techniques
Signals help rescuers find you faster. Use bright colors or reflective objects to catch attention. Create large symbols in the snow, like an SOS or an arrow. Use a whistle or shout in short bursts to avoid losing energy. If you have a mirror or phone screen, flash sunlight toward rescuers or aircraft.
Emergency Supplies
Carry essential items that support survival. Pack a small first aid kit, firestarter, and extra food. Keep a space blanket or emergency bivvy to stay warm. A reliable knife and cord can help build shelter and tools. Always keep water purification tablets or a filter ready to avoid sickness.
Quick Shelter Alternatives
Sometimes building a full snow shelter is impossible. Use natural features like rock overhangs or dense trees for protection. Dig shallow snow trenches and cover them with branches or tarps. Lean branches against a fallen log to create a simple windbreak. These quick shelters block wind and retain some heat until help arrives.

Credit: www.bullmoosepatrol.com
Frequently Asked Questions
What Materials Are Essential For A Snow Shelter?
You need compacted snow blocks, a shovel, and an insulated sleeping pad. Natural materials like branches help reinforce the structure. Proper tools make construction easier and faster in the wilderness.
How Long Does It Take To Build A Snow Shelter?
Building a basic snow shelter usually takes 1 to 2 hours. Time depends on snow conditions, skill level, and available tools. Efficient planning speeds up the process.
Can Snow Shelters Keep You Warm In Winter?
Yes, snow shelters trap body heat and block wind effectively. Snow acts as an insulator, maintaining temperatures close to freezing inside. Proper ventilation prevents moisture buildup, keeping you dry and warm.
What Are Common Mistakes When Building Snow Shelters?
Common errors include poor ventilation, thin walls, and unstable blocks. Avoid building in avalanche-prone areas or under weak snow. Planning and proper technique ensure safety and warmth.
Conclusion
Building a snow shelter can save your life in cold wilderness. It takes patience and care to create a safe space. Use the right tools and follow the steps carefully. Stay warm, dry, and protected from wind and snow. Practice this skill before you need it for real.
Trust yourself and stay calm during the process. Your shelter will give you comfort and safety in harsh conditions. Keep learning and improving your survival skills. This knowledge can make a big difference outdoors.

