
Imagine you’re caught outdoors with no shelter in sight. Your body starts to feel the chill, and you know you need protection—fast.
Knowing how to make a quick survival shelter could be the difference between staying safe and facing serious danger. You’ll discover simple, effective steps to build a shelter using materials you can find around you right now. Whether you’re an outdoor enthusiast or just want to be prepared, learning this skill will give you confidence when it matters most.
Keep reading to find out exactly what to do when time is ticking.
Choosing The Right Location
Choosing the right location for your survival shelter is one of the most important decisions you’ll make. Your choice can affect your safety, comfort, and even your chances of being found. Picking the right spot requires careful observation and quick judgment.
Assessing Terrain And Environment
Look for flat ground that won’t flood if it rains. Avoid low spots where water collects or steep slopes that might collapse or be hard to access.
Check the soil—soft, dry earth is easier to dig into and build on. Hard or rocky ground can slow you down and make shelter construction more difficult.
Think about exposure. A location shielded from strong winds or extreme sun will make your shelter more comfortable and reduce energy loss.
Avoiding Hazards
Keep away from dead trees or branches that could fall on your shelter. Look up and scan the canopy carefully before settling in.
Steer clear of animal trails and insect nests. Setting up near these can lead to unwanted encounters or bites.
Also, avoid areas near cliffs, loose rocks, or unstable ground. Your shelter should be safe from natural dangers, not expose you to them.
Finding Natural Resources
Water is critical. Try to set up within a reasonable distance from a clean water source but not too close to avoid flooding and insects.
Look for nearby trees and bushes that can provide materials for shelter walls, insulation, or firewood. You don’t want to carry everything with you.
Also, consider the availability of natural windbreaks, like dense shrubs or rock formations, to give your shelter extra protection.
Credit: www.pewpewtactical.com
Gathering Essential Materials
Gathering the right materials is the foundation of building a quick survival shelter. The quality and type of materials you choose can make a huge difference in how well your shelter protects you from the elements. Think about what’s immediately around you and how you can use it to your advantage.
Collecting Branches And Leaves
Start by looking for sturdy branches that can form the frame of your shelter. Aim for branches that are about the thickness of your wrist—they’re strong but still manageable to carry and position. Avoid dead or brittle wood, as it might snap under pressure.
Leaves are your best natural roofing material. Gather large, broad leaves to layer over your frame for protection against rain and wind. Dry leaves add insulation, helping to keep warmth inside your shelter.
Using Available Tools
Even basic tools like a knife, hatchet, or multitool can speed up your material collection dramatically. Use your knife to cut branches to size or strip bark for kindling. If you don’t have tools, sharp stones or even broken glass can serve as cutting implements.
Remember, tools aren’t just for cutting; they help you shape and prepare materials to fit together more securely. Have you ever tried to break a branch by hand? Tools save you energy and time, both precious in survival situations.
Utilizing Natural Insulators
Insulation is key to staying warm. Moss, pine needles, and dry grass make excellent natural insulators you can stuff between branches or inside your shelter walls. These materials trap heat and block cold drafts effectively.
Look around carefully—sometimes the best insulation is right under your feet. Adding a thick layer inside your shelter can make the difference between shivering all night and staying comfortable.
Building Basic Shelter Types
Quick survival shelters protect from wind and rain using simple materials like branches and leaves. Choosing the right basic shelter type saves time and energy in emergencies. Building a sturdy shelter helps keep you safe and warm outdoors.
Building a survival shelter is a crucial skill. In emergency situations, shelters provide protection and warmth. They help conserve energy and maintain body temperature. Below are some basic types of shelters you can build quickly.Lean-to Shelter
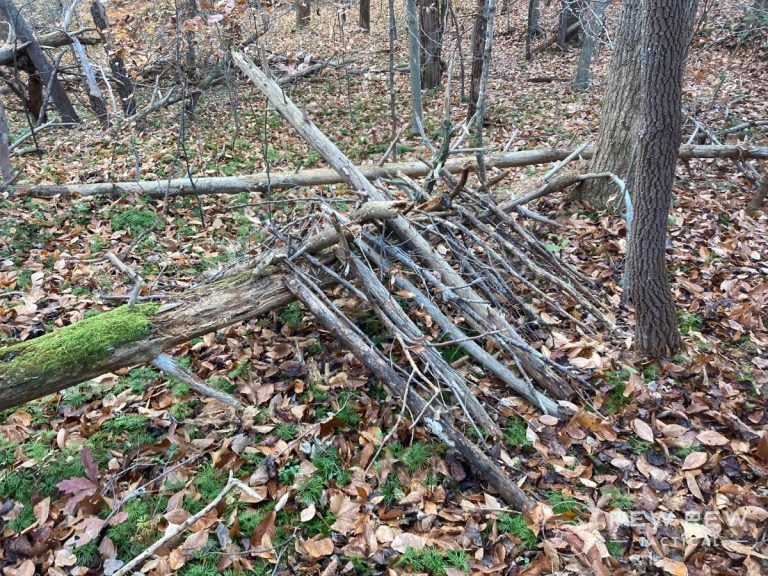
A Lean-To Shelter is simple and effective. Find a sturdy branch or log. Lean it against a tree at an angle. Cover the sloping side with branches or leaves. This structure blocks wind and rain. It is easy to build and requires minimal resources.Debris Hut
A Debris Hut is great for cold weather. Start by creating a ridge using a long branch. Support it with two shorter branches at each end. Pile leaves, grass, and other debris over the structure. Ensure it’s thick for insulation. Leave a small entryway. This shelter keeps you warm by trapping body heat.A-frame Shelter
An A-Frame Shelter offers good coverage. Use two sturdy branches to form a triangle. Secure them firmly at the top. Place more branches along the sides. Cover with leaves or pine needles. This shelter protects from rain and wind. It is sturdy and provides ample space inside.
Credit: www.youtube.com
Step-by-step Construction Tips
Building a survival shelter quickly requires focus and clear steps. Each phase plays a key role in creating a safe, sturdy space. Follow these construction tips to make your shelter strong and warm.
Laying The Foundation
Choose a flat, dry spot for your shelter. Clear away rocks, sticks, and leaves. Use large branches or logs to form a base. This keeps the shelter off the wet ground. Lay these materials tightly to stop sinking.
Mark the shelter’s size with sticks or stones. Make sure it fits your body comfortably. A solid foundation keeps the whole structure stable and dry.
Assembling The Frame
Find long, sturdy branches to build the frame. Lean them against each other or tie them at the top. Create a triangular or A-shape frame for strength. Tie branches with vines, rope, or strips of cloth.
Check the frame for gaps and weak spots. Add extra branches to support the structure. A tight frame holds the shelter’s shape during wind or rain.
Adding Insulation And Cover
Cover the frame with leaves, grass, or pine needles. Layer these materials thickly to keep out wind and rain. Use bark or a tarp for extra protection if available.
Add dry leaves or moss inside for warmth. Block any holes to stop cold air from entering. This layer keeps the inside dry and cozy.
Enhancing Shelter For Comfort
Enhancing your survival shelter makes it safer and more comfortable. Comfort helps you stay calm and focused. Small improvements can make a big difference in tough conditions. Focus on keeping dry, breathing fresh air, and staying warm. These elements improve your rest and energy.
Waterproofing Techniques
Keep water out to avoid cold and sickness. Use natural materials like large leaves or bark. Layer them tightly on the roof and walls. If you have plastic sheets or a tarp, secure them well. Make sure water runs off and does not pool. Seal gaps with mud or moss to block wind and rain.
Improving Ventilation
Fresh air prevents moisture and carbon dioxide build-up. Create small openings near the top of the shelter. Cover them with mesh or leaves to keep bugs out. Avoid big gaps that let cold wind inside. Proper airflow reduces condensation and keeps air fresh. Check ventilation often and adjust if needed.
Creating A Warm Sleeping Area
Insulate the floor to keep cold from the ground. Use dry leaves, pine needles, or grass as a bed. Add extra layers for softness and warmth. Use clothing or blankets for covering. Position your sleeping spot away from wind paths. Close the shelter entrance at night to trap heat inside.
Safety And Maintenance
Building a quick survival shelter is only the first step. Keeping it safe and well-maintained is just as important. A shelter must stay strong against weather and animals. It should also be easy to fix or improve over time. Safety and maintenance ensure the shelter protects you effectively in any situation.
Checking For Structural Stability
Look over the shelter every day. Check if walls or roof parts are loose. Shake branches and supports gently to test strength. Fix or replace anything that moves too much. Clear away extra snow, leaves, or debris that weigh down the shelter. Make sure the shelter does not lean or sag.
Protecting Against Wildlife
Keep food stored away from the shelter. Use sealed containers or hang food in trees. Avoid strong smells inside the shelter to not attract animals. Create a small barrier using sticks or rocks around the entrance. Make noise or light a small fire nearby to scare animals. Always stay alert to animal signs around the shelter.
Regular Upkeep
Remove fallen branches and dry leaves regularly. Repair broken parts with fresh sticks or materials. Tighten bindings using rope, vines, or strips of cloth. Check for water leaks after rain and fix them quickly. Keep the ground inside clean and dry. Regular care keeps the shelter ready for any emergency.

Credit: sgtknots.com
Frequently Asked Questions
What Materials Are Best For A Quick Survival Shelter?
Natural materials like branches, leaves, and bark work well. Use a tarp or poncho if available. These materials provide insulation and protection from wind and rain.
How Do I Choose The Best Location For A Shelter?
Pick a dry, flat area away from hazards like falling branches. Avoid low spots prone to flooding. Find a spot near natural resources like water and firewood.
How Long Does It Take To Build A Quick Survival Shelter?
A simple shelter can be built in 30 to 60 minutes. Time depends on available materials and complexity. Focus on speed and effectiveness in emergencies.
How Can I Insulate My Survival Shelter Quickly?
Use leaves, pine needles, or grass to line the shelter floor. Add layers of natural debris on walls for extra insulation. This helps retain body heat and stay warm.
Conclusion
Building a quick survival shelter can save your life in tough situations. Use natural materials around you to stay warm and dry. Keep your shelter small to hold heat better. Practice these steps before you need them. Stay calm and think clearly when building.
A good shelter gives you safety and comfort outdoors. Remember, simple shelters can work well if done right. Prepare yourself by learning and trying these tips today.

