
Imagine being caught outdoors with no shelter, facing cold, rain, or wind. Knowing how to make a survival shelter step by step can be the difference between staying safe and struggling to survive.
This guide will walk you through simple, clear instructions that anyone can follow, even if you have no prior experience. By the end, you’ll feel confident to build your own shelter quickly and effectively whenever you need it. Keep reading, because your safety and comfort could depend on what you learn here.

Credit: www.youtube.com
Choosing The Right Location
Choosing the right location for your survival shelter is crucial. The spot you pick affects your safety, comfort, and ability to stay warm and dry. A good location protects you from weather and keeps you hidden from dangers. Consider the environment carefully before starting to build.
Assessing Terrain And Shelter Needs
Look for flat ground to build your shelter. Uneven or rocky surfaces make construction difficult and uncomfortable. Check the soil type; soft soil is easier to dig but may flood. Hard soil offers stability but is tough to work with.
Think about your shelter’s purpose. For warmth, choose a spot near natural windbreaks like trees or rocks. For water access, stay close but not too near to avoid flooding. For camouflage, pick an area with natural cover.
Avoiding Hazards And Exposure
Stay away from low-lying areas where water collects. Flooding can destroy your shelter and gear. Avoid spots under dead branches or unstable trees. They can fall and cause injury.
Watch for animal trails and insect nests. These can bring trouble or bites. Stay clear of open ridges and hilltops exposed to strong winds. Shield yourself with natural barriers or build your shelter behind them.
Gathering Essential Materials
Gathering the right materials is the foundation of building a reliable survival shelter. Without proper resources, your shelter could fail to protect you from the elements. Knowing what to collect and how to use it can save you time and energy when every moment counts.
Natural Resources To Use
Look around for sturdy branches and sticks. These will form the skeleton of your shelter. Deadwood is often easier to break and shape, but make sure it’s strong enough to hold weight.
Leaves, pine needles, and grass are excellent for insulation. They trap heat and keep the cold air out. Don’t forget moss or bark strips—they add extra waterproofing when layered properly.
Rocks can serve as anchors or be used to create a barrier against wind. If you find clay or mud, it can be used to seal gaps. Have you checked the ground for soft soil? It can be helpful for digging trenches or securing posts.
Tools For Building
Having a sharp knife or multi-tool makes a big difference. It helps in cutting branches cleanly and shaping materials. Even a sturdy stick can work as a digging tool when nothing else is available.
Rope, paracord, or even strips of cloth are essential for tying your structure together. Without them, your shelter may collapse in strong winds. If you don’t have rope, think about weaving vines or flexible green branches.
A small hatchet or saw speeds up the process of gathering wood. But remember, in a pinch, you can use rocks to break or shape sticks. The key is to be resourceful and adapt to what you have.
Selecting Shelter Types
Choosing the right shelter type depends on weather, materials, and available time. Simple designs like lean-tos or debris huts offer quick protection. Consider durability and ease of building to stay safe and comfortable outdoors.
Selecting the right type of survival shelter is crucial. Each environment and situation demands a different approach. Understanding various shelter types helps you stay protected. Let’s explore three popular shelter types.Lean-to Shelters
Lean-to shelters are simple and effective. They require minimal materials. Find a sturdy structure like a tree. Use branches and leaves to create a slanted roof. This design shields you from wind and rain. It’s perfect for open areas.Debris Huts
Debris huts are great for colder climates. They offer good insulation. Start with a strong frame from sticks. Cover it with leaves and branches. Make the walls thick to trap heat. This shelter keeps you warm and dry.Tarp Shelters
Tarp shelters are versatile and quick to set up. Use a tarp or plastic sheet. Tie it between two trees. Make sure it slopes to let water run off. It’s lightweight and easy to carry. Perfect for wet environments.Building The Shelter Frame
Building the shelter frame sets the foundation for your entire survival shelter. It needs to be strong, stable, and well-designed to protect you from the elements. Taking your time during this phase will pay off in comfort and safety later on.
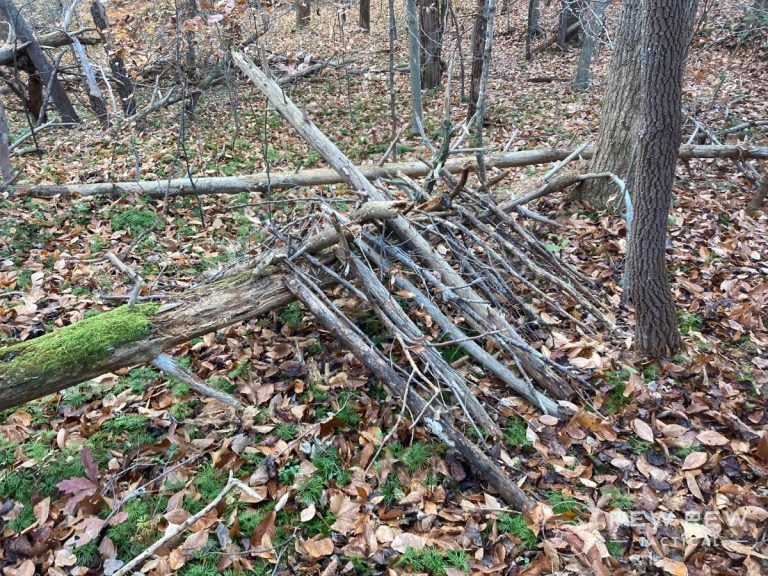
Constructing Support Structures
Start by selecting sturdy branches or poles that can hold weight without bending or breaking. Look for wood that is straight and thick enough to support the roof and walls. You want your frame to resist wind and weather, so don’t cut corners here.
Begin by placing two vertical supports firmly into the ground, spaced to fit your shelter size. Connect these with a horizontal beam at the top, creating a basic doorway or frame shape. This setup acts like the skeleton of your shelter, so make sure everything feels solid when you push or pull on it.
Have you ever tried to build something shaky that collapsed quickly? That experience highlights why a strong frame is critical. Think about how much time and energy you’ll save by getting the support right from the start.
Securing Framework
Once the main supports are in place, tie them together tightly using rope, paracord, or even strips of bark. Knots like the square knot or clove hitch work well to keep joints secure under tension. Loose connections can cause your shelter to fall apart in bad weather.
If you don’t have rope, flexible vines or strips of fabric can also work in a pinch. Wrap the binding material several times around the joints to prevent slipping. Test each connection by shaking or pressing on the frame—if it moves, tighten your knots.
Consider adding diagonal braces between vertical and horizontal beams. These braces add extra stability and stop the frame from wobbling sideways. Have you noticed how a simple triangle shape can make structures much stronger? Applying this principle can save your shelter from collapsing.
Adding Insulation And Protection
Adding insulation and protection to your survival shelter is crucial for staying warm and dry. Without this layer, even a well-built frame can leave you exposed to cold winds and rain. You want to create a barrier that traps heat and keeps moisture out, making your shelter a safe haven in harsh conditions.
Layering With Leaves And Branches
Start by gathering dry leaves, pine needles, and small branches. These natural materials act like a thick blanket, trapping air and providing insulation.
Layer them densely over the roof and walls of your shelter. The thicker the layer, the better it will hold heat and block wind.
Don’t forget to add extra layers on the ground inside your shelter. Lying on cold soil can drain your body heat quickly.
Weatherproofing Techniques
Once insulation is in place, focus on making your shelter weatherproof. Use large leaves, bark, or tarps to cover the outer layers.
Overlap these materials like shingles on a roof to direct rainwater away from your shelter. This prevents leaks and keeps you dry.
Seal gaps with mud or snow if available. It’s surprising how a little mud can act as a natural sealant against wind and rain.
Have you ever noticed how animals build nests? Mimicking their layering and sealing tactics can improve your shelter’s protection remarkably.
Credit: www.pewpewtactical.com
Creating A Comfortable Interior
Creating a comfortable interior in your survival shelter is crucial to maintaining morale and physical well-being. Comfort isn’t just about luxury; it’s about making your space livable and safe for the time you’ll spend inside. Small details in the interior can make a big difference in how you cope with challenging conditions.
Flooring Options
Choosing the right flooring can keep you warm and dry. Dirt floors are common, but adding layers can improve comfort significantly.
- Leaves and Pine Needles:These natural materials add insulation and cushion. They are easy to gather and can be replaced regularly.
- Wooden Planks or Branches:If you have access to wood, lay planks or tightly packed branches to create a sturdy base. This keeps you off the cold, damp ground.
- Tarp or Plastic Sheets:If you carry a tarp, place it under your bedding to block moisture.
Think about how the floor feels after a day outside. Does it protect you from cold and dampness? Your choice impacts how rested you feel each night.
Ventilation Considerations
Airflow is essential to avoid moisture buildup and to ensure fresh air inside your shelter. Poor ventilation can lead to condensation, making your shelter damp and uncomfortable.
- Position Vents Strategically:Create small openings near the top and bottom of your shelter to allow air to circulate naturally. Warm air escapes from the top while fresh air enters from below.
- Use Natural Gaps:If you’re using branches or logs, leave slight gaps for airflow without compromising warmth.
- Avoid Smoke Build-up:If you plan to have a fire inside or near your shelter, ensure there is an outlet for smoke to escape safely.
Have you noticed how stale air can make you feel sluggish? Proper ventilation keeps your mind sharp and your body comfortable, even in tight spaces.
Maintaining And Improving Shelter
Building a survival shelter is only half the battle; keeping it safe and functional over time is just as important. Your shelter faces weather changes, wildlife, and natural wear. Staying on top of maintenance can mean the difference between safety and discomfort.
Regular Inspections
Check your shelter every day if possible. Look for signs of damage like broken branches, leaks, or unstable walls. Small problems can become big issues quickly, especially after a storm or heavy wind.
Pay special attention to the roof and floor. Is water seeping in? Are any parts sagging or loose? Catching these early helps you fix them before they get worse.
Ask yourself: Are there new gaps where cold air or insects could enter? Your shelter needs to stay sealed to protect you from the elements and bugs.
Reinforcing Weak Spots
Once you spot weak areas, it’s time to strengthen them. Use extra branches, leaves, or any available materials to patch holes and add support. Don’t hesitate to use rocks or mud for added stability if they’re at hand.
If a wall leans or a support feels shaky, add more braces or tie it tighter with vines or cordage. Your shelter should feel solid and secure when you lean against it.
Consider layering materials for better insulation. Adding dry leaves or moss can fill gaps and keep warmth inside. Think about your comfort—how can you make your shelter safer and warmer right now?

Credit: www.youtube.com
Safety Tips And Best Practices
Building a survival shelter is only part of staying safe in the wild. Paying close attention to safety tips and best practices can make the difference between comfort and danger. You want your shelter to protect you, not put you at risk.
Fire Safety Near Shelter
Fire is essential for warmth and cooking, but it can easily become a hazard. Keep your fire at least 10 feet away from the shelter to prevent accidental sparks from igniting your structure.
Clear the area around the fire pit of dry leaves, twigs, and other flammable materials. Always have water or dirt nearby to quickly put out flames if needed.
- Build a small, contained fire rather than a large blaze.
- Never leave the fire unattended, even for a few minutes.
- Extinguish the fire completely before sleeping or leaving the site.
Have you ever underestimated how quickly a small spark can turn into a disaster? Staying cautious with fire could save your shelter—and your life.
Wildlife Awareness
Your shelter is your refuge, but it can also attract curious or dangerous animals. Store food away from your shelter and hang it high in a tree or keep it in a sealed container.
Make noise when moving around your shelter to avoid surprising any wildlife. Animals often avoid humans if they know you’re nearby.
- Inspect the area for signs of animal activity before setting up your shelter.
- Keep your shelter clean to minimize odors that attract animals.
- Know what wildlife is common in your area and how to react if you encounter them.
Have you considered how your presence changes the local wildlife’s behavior? Staying aware and respecting their space helps you stay safer and reduces conflicts.
Frequently Asked Questions
What Materials Are Best For A Survival Shelter?
Natural materials like branches, leaves, and bark work well. Use waterproof items like tarps if available. Choose materials that provide insulation and protection from wind and rain.
How Do I Choose A Safe Location For Shelter?
Pick flat ground away from hazards like flooding or falling branches. Look for natural windbreaks and proximity to water sources. Avoid animal trails and unstable terrain.
How Long Does It Take To Build A Survival Shelter?
A basic shelter can take 1 to 3 hours. Time varies with materials, tools, and experience. Prioritize speed and functionality over aesthetics to ensure safety.
How Can I Keep Warm Inside A Survival Shelter?
Insulate with leaves, pine needles, or grass on the floor. Block wind with sturdy walls. Use body heat and a small, safe fire outside for warmth.
Conclusion
Building a survival shelter takes careful steps and patience. Choose a safe spot, gather materials, and follow the guide closely. A strong shelter keeps you warm and dry in tough conditions. Practice these skills often to feel ready for emergencies.
Stay calm and use what nature provides. Remember, simple shelters can save your life. Keep learning and stay prepared for any situation. Your safety depends on quick, smart actions. Try building a shelter before you need one. It makes all the difference.

