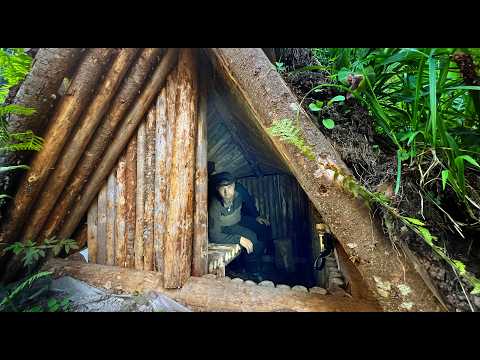
Imagine finding yourself in the wild with no shelter to protect you from the elements. What would you do?
Knowing how to make a survival shelter could be the difference between staying safe and facing serious danger. You will learn simple, step-by-step methods to build a shelter using materials around you. Whether you’re an outdoor enthusiast or just want to be prepared, mastering this skill will give you confidence and peace of mind.
Keep reading, and by the end, you’ll know exactly how to create a shelter that can keep you warm, dry, and secure when it matters most.
Choosing The Right Location
Choosing the right location is the first key to building a strong survival shelter. A good spot keeps you safe, dry, and comfortable. It also helps in staying hidden and conserving energy. The right place makes all survival tasks easier.
Assessing Terrain And Environment
Look for flat ground to set your shelter. Avoid slopes that can cause water to run inside. Check the soil type; firm soil is best for stability. Steer clear of areas with loose rocks or sand. Notice the surrounding trees and plants. They offer shade and wind protection but watch for dead branches above.
Avoiding Hazards And Risks
Keep away from places prone to flooding or water pooling. Do not build near cliffs or steep drop-offs. Avoid animal trails or nests to reduce encounters. Watch for signs of insects or snakes. Stay clear of areas with strong winds or frequent storms. Think about fire safety; avoid dry grass or brush nearby.
Proximity To Resources
Pick a spot near water but not too close to avoid bugs and flooding. Find areas with easy access to firewood and building materials. Look for food sources like plants or animals. Being close to resources saves time and energy. Plan a route to collect what you need safely and quickly.
Gathering Materials
Gathering materials is the first critical step in building a survival shelter. The right materials make your shelter sturdy, weather-resistant, and comfortable enough to protect you from the elements. Knowing where and how to collect these resources can save you time and effort, which matters a lot in an emergency.
Natural Resources To Use
Look around your environment carefully. Trees, branches, leaves, and rocks are your best friends here. Fallen branches can form the frame, while leaves and pine needles make excellent insulation.
Don’t overlook mud or clay; they can be used to seal gaps and add stability. Moss and grass are great for padding your shelter floor, keeping you warmer and drier. Have you ever tried using bark strips to tie materials together? It’s surprisingly effective when you don’t have rope.
Tools For Construction
If you carry a knife or multi-tool, it drastically speeds up the gathering and shaping of materials. A sturdy knife helps you cut branches and carve notches for better fitting joints. Even a simple hatchet or axe can be a game-changer when clearing and trimming wood.
But what if you don’t have these tools? You might find sharp stones or broken glass that can serve as cutting tools in a pinch. Remember, sharp edges make a big difference when you’re working against time and weather.
Improvised Materials
Sometimes nature doesn’t provide everything you need. Look around for abandoned materials like plastic sheets, tarps, or even large leaves from plants like banana or palm. These can act as waterproof layers or windbreakers.
Old clothes, ropes, or cords you carry can be repurposed as lashings to bind your shelter. Even shoelaces can work! Think about what you have on hand and how it might help enhance your shelter’s durability and comfort.
Building Basic Shelter Types
Basic shelters protect from rain, wind, and cold using simple materials found in nature. Choosing the right type depends on the environment and available resources. Building quickly and securely increases chances of survival in the wild.
Building a survival shelter is a vital skill in the wilderness. Shelter provides protection from harsh weather and wildlife. Mastering basic shelter types ensures safety and comfort outdoors. Below, we explore three simple and effective shelter types.Lean-to Shelters
A lean-to shelter is quick to build. It offers basic protection from wind and rain. Find two sturdy trees. Place a long branch between them as a support beam. Lean shorter branches against the beam at an angle. Cover with leaves, bark, or other natural materials. This creates a roof.Debris Huts
Debris huts are warm and insulating. Start with a strong ridgepole between two trees. Lean sticks against the pole to form a triangle. Pile leaves, grass, and moss over the structure. The thicker the layer, the better the insulation. Entrance should face away from the wind.A-frame Shelters
A-frame shelters are stable and easy to construct. Find a long branch for the ridgepole. Rest its ends on two forked sticks. Angle more branches along each side, forming an A shape. Cover with leaves or debris for weatherproofing. Ensure the entrance is wide enough to crawl through.
Credit: www.youtube.com
Improving Shelter Insulation
Improving the insulation of a survival shelter is key to staying warm and safe. Good insulation keeps cold air out and traps body heat inside. This makes the shelter more comfortable and helps prevent hypothermia. Simple materials found in nature can boost your shelter’s insulation quickly.
Using Leaves And Branches
Leaves and branches are natural insulators. Pile dry leaves thickly on the floor to create a soft, warm layer. Use branches to build a frame or cover the shelter walls. Layering leaves and branches adds extra protection against cold air. Avoid wet or green leaves, as they hold moisture and reduce warmth.
Creating Windbreaks
Wind can strip heat from your shelter fast. Build windbreaks around your shelter to block cold gusts. Use rocks, logs, or tightly packed branches to form a barrier. Position the windbreak on the side where wind blows strongest. This simple barrier cuts wind chill and keeps your shelter warmer.
Waterproofing Techniques
Water soaks insulation and lowers warmth. Use bark, large leaves, or a tarp to create a waterproof roof. Layer materials to stop rain from dripping inside. Angle the roof so water runs off easily. Protecting your shelter from water keeps insulation dry and heat trapped.
Ensuring Shelter Stability
Ensuring the stability of your survival shelter is crucial for safety and comfort. A shaky structure can collapse, leaving you exposed to the elements or worse. Focus on making your shelter strong enough to withstand wind, rain, and the weight of snow if needed.
Securing Structural Supports
Your shelter’s frame is its backbone. Use sturdy branches or poles that won’t easily snap under pressure. Drive supports firmly into the ground or tie them tightly together to prevent shifting.
Look for natural anchor points like large rocks or trees to add extra stability. Have you tested how much force your supports can handle before building around them? It’s better to find weak spots early.
Reinforcing With Natural Materials
After setting the frame, reinforce it with materials like leaves, grass, or bark. These not only add insulation but also help hold the structure together. Layering these materials thickly creates a buffer that absorbs wind and rain.
Use vines or flexible branches to weave around the frame. This weaving acts like natural rope, tightening the shelter’s structure. Don’t underestimate the strength of these natural ties—they can make a huge difference.
Testing For Durability
Once your shelter is built, test it before settling in. Gently shake or push on different parts to check for weak spots. If it moves too much, reinforce those areas immediately.
Consider how your shelter will hold up overnight or during bad weather. Ask yourself: Would it protect you if the wind picked up suddenly? Taking time to test your shelter’s durability can save you from surprises.
Optimizing Shelter For Safety
Optimizing a survival shelter for safety is essential to protect yourself from dangers in the wild. Safety measures reduce risks from weather, animals, and unwanted attention. A well-planned shelter helps maintain warmth and security, increasing your chances of survival.
Camouflaging The Shelter
Camouflage helps keep your shelter hidden from animals and people. Use natural materials like leaves, branches, and grass to cover the shelter. Avoid bright colors or unnatural shapes that stand out. Blend your shelter with the surrounding environment to stay unnoticed.
Safe Entry And Exit Points
Design entry and exit points for quick and safe access. Keep openings small to retain heat and keep insects out. Position the entrance away from wind direction to prevent cold air from blowing inside. Clear a path free of obstacles for easy movement in emergencies.
Fire Safety Considerations
Place any fire a safe distance from the shelter. Use rocks or a fire ring to contain flames. Avoid building a fire under low branches or near dry leaves. Always have water or dirt nearby to quickly put out the fire if needed.
Maintaining And Repairing Shelter
Keeping your survival shelter in good shape is crucial for your safety and comfort. Regular maintenance and timely repairs can prevent small issues from turning into big problems. This section helps you understand how to keep your shelter sturdy and ready for any situation.
Regular Inspections
Make it a habit to check your shelter every day or after harsh weather. Look for signs of wear like broken branches, torn tarps, or shifting supports. Catching these early saves you from bigger repairs later.
Use a checklist to cover all parts: roof, walls, floor, and entrance. Don’t forget to check the ground around your shelter for water pooling or erosion. Have you noticed any new gaps or leaks since your last check?
Quick Fixes In Emergencies
Sometimes, you won’t have time for a full repair. Keep basic tools and materials handy for fast fixes. Items like duct tape, rope, and extra leaves or tarp pieces can seal holes or reinforce weak spots quickly.
If a branch falls or your shelter collapses partially, act fast to stabilize it. Even a temporary fix that holds until you can rebuild fully can protect you from the elements. What emergency fix could you prepare for right now?
Adapting To Weather Changes
Your shelter should evolve as the weather changes. In cold weather, add more insulation with leaves or pine boughs to keep warmth in. For rain, increase waterproofing by adding extra tarp layers or mud to seal gaps.
Windy days might require stronger anchors or windbreaks. Watch how the weather affects your shelter and adjust accordingly. How will you prepare your shelter if a sudden storm hits?

Credit: www.youtube.com

Credit: www.youtube.com
Frequently Asked Questions
What Materials Are Best For Building A Survival Shelter?
Natural materials like branches, leaves, and bark work well. You can also use tarps or emergency blankets. Choose materials that provide insulation and protection from wind and rain.
How Long Does It Take To Build A Survival Shelter?
Building a basic survival shelter typically takes 1 to 3 hours. Time depends on available materials, shelter type, and weather conditions. Practice helps speed up the process.
Where Should I Build A Survival Shelter?
Build your shelter in a dry, flat area away from hazards. Avoid low spots prone to flooding and windy ridges. Look for natural windbreaks and access to water.
How Do I Keep Warm Inside A Survival Shelter?
Use insulation like leaves, pine needles, or grass inside the shelter. Build a small fire outside, safely away from the shelter. Wear dry clothing and stay dry to retain body heat.
Conclusion
Building a survival shelter can save your life in tough situations. Use natural materials found nearby to stay warm and dry. Keep your shelter small to hold in heat better. Remember, safety and comfort come first. Practice these skills before you need them.
Stay calm, think clearly, and act quickly. Being prepared makes a big difference outdoors. Your shelter can protect you from rain, wind, and cold. With simple steps, you can create a safe place anywhere. Survival depends on your knowledge and action.
Keep learning and stay ready.