Imagine the ground shaking beneath your feet. You might only have minutes—or even seconds—to act.
Are you prepared to protect yourself and your loved ones when an earthquake strikes? Making your own earthquake survival kit is one of the smartest steps you can take right now. In this guide, you’ll discover exactly what to include, how to assemble it quickly, and why each item is essential for your safety.
Keep reading to take control of your safety and be ready when it matters most.
Credit: www.nbcnews.com
Essentials For An Earthquake Kit
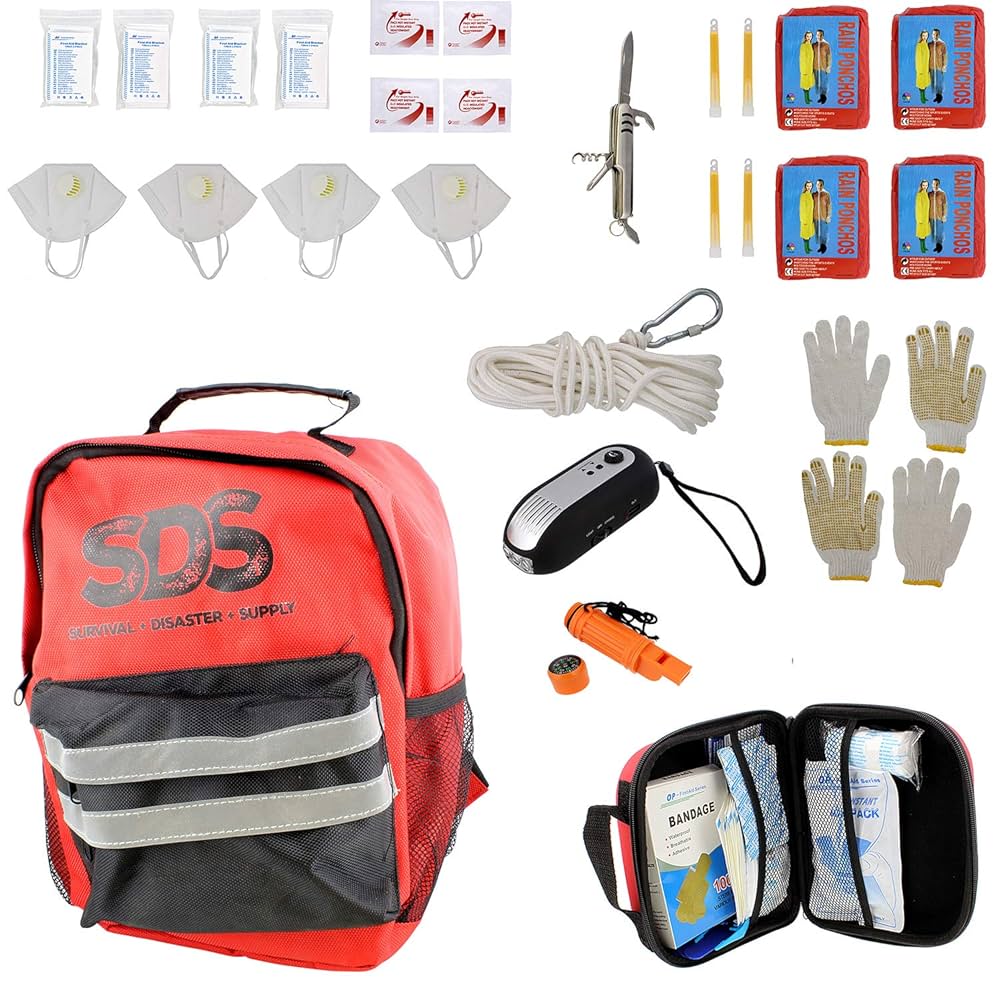
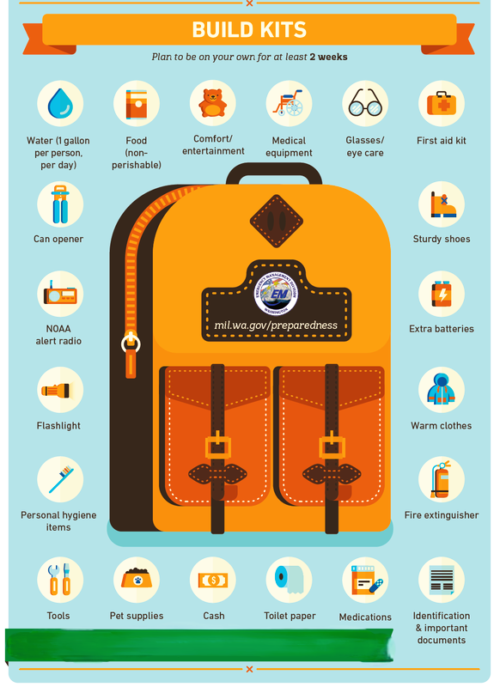
Building an earthquake survival kit means being ready for unexpected moments. Your kit should have items that cover your basic needs and help you stay safe. Choosing the right essentials can make a big difference in how you handle the first 72 hours after a quake.
Water And Food Supplies
Water is your top priority. Aim for at least one gallon per person per day, enough for drinking and hygiene. Pack bottled water or clean water in sealed containers.
For food, select non-perishable items that need no cooking. Think canned beans, energy bars, dried fruits, and nuts. Don’t forget a manual can opener to access canned goods easily.
Have you considered dietary needs or preferences? Include items like baby formula, gluten-free snacks, or high-energy foods if needed.
First Aid Items
Your kit should have a complete first aid kit that includes bandages, antiseptic wipes, gauze, and adhesive tape. Add pain relievers, allergy medicine, and any prescription medications you use regularly.
Include scissors, tweezers, and gloves for handling injuries safely. If you know basic first aid, these tools become even more valuable.
Can you imagine how critical it is to stop bleeding quickly or treat minor wounds when emergency help is not immediately available?
Tools And Safety Gear
Basic tools like a flashlight with extra batteries, a multi-tool, and sturdy gloves protect you during and after a quake. A dust mask can help you breathe in smoky or dusty conditions.
Wear comfortable, durable shoes to avoid injury from broken glass or debris. A whistle can signal for help if you’re trapped or need to attract attention.
Think about what you would need to move safely through a damaged building or debris field.
Communication Devices
Stay connected with a battery-powered or hand-crank radio to receive emergency updates. A fully charged power bank helps keep your phone alive when power is out.
Consider walkie-talkies for short-distance communication if cell networks fail. Write down emergency contacts and important information on paper, just in case devices stop working.
How will you get vital news or reach loved ones if cell towers go down? Having backup communication tools ensures you’re not left in the dark.
Credit: www.cresa.wa.gov
Choosing The Right Container
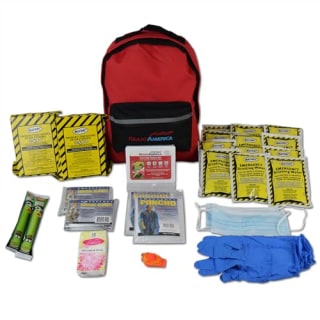
Choosing the right container for your earthquake survival kit is a crucial step that often gets overlooked. The container protects your supplies and keeps everything organized so you can access what you need quickly during an emergency. Picking a container that fits your lifestyle and environment can make a real difference when seconds count.
Durable And Portable Options
Your container needs to withstand rough conditions. Look for materials like hard plastic, metal, or heavy-duty fabric that won’t crack or tear easily.
Consider portability as well. You want something lightweight enough to carry or grab in a hurry but sturdy enough to hold all your essentials without breaking.
- Backpack-style kits offer easy transport and hands-free carrying.
- Hard plastic boxes protect against impacts and can be stacked for storage.
- Metal containers resist crushing and can double as a cooking or heating vessel in some cases.
Have you thought about where you’ll keep your kit daily? If it’s in your car, a compact, secure box might work best. For home use, something larger but still portable makes sense.
Waterproof And Sealable Features
Water damage can ruin your supplies fast. A waterproof container ensures your food, medicine, and documents stay dry even if your kit gets exposed to rain or leaks.
Look for containers with airtight seals or lids that lock securely. This keeps moisture, dust, and pests out.
- Plastic containers with rubber gasket seals offer a tight barrier against water.
- Dry bags are lightweight, flexible, and perfect for protecting smaller items inside your kit.
- Heavy-duty ziplock bags can add an extra layer of protection for documents and electronics.
Do you have items in your kit that are especially sensitive to moisture? Protecting these can save you from replacing critical gear after an emergency.
Personalizing Your Kit
Personalizing your earthquake survival kit ensures it fits your unique needs. Each person has different health requirements, important papers, and clothing preferences. Tailoring your kit improves safety and comfort during emergencies.
Medications And Prescriptions
Include all essential medications in your kit. Pack enough for at least three days. Store them in a waterproof container to keep them safe. Don’t forget prescription glasses or contact lenses. Keep a list of your medications and dosages. This helps emergency responders assist you quickly.
Important Documents And Cash
Gather vital documents like ID cards, insurance papers, and medical records. Use a waterproof folder or pouch to protect them. Include some cash in small bills. Credit cards or electronic payments might not work after a disaster. Having cash ensures you can buy necessities immediately.
Clothing And Bedding
Choose comfortable, weather-appropriate clothing for your kit. Pack extra socks, underwear, and a warm layer. Consider adding a compact blanket or sleeping bag. These items help you stay warm and dry. They also improve rest during chaotic times.
Maintaining And Updating Supplies
Keeping your earthquake survival kit ready is just as important as assembling it. Supplies can expire, get damaged, or simply become outdated. Regular maintenance ensures that when disaster strikes, your kit will be reliable and effective.
Regular Checks And Replacements
Set a reminder every few months to review your kit. Check expiration dates on food, water, and medications. Replace any items that are close to or past their expiry.
Inspect batteries, flashlights, and radios to ensure they still work. Even unopened items can degrade over time. Don’t forget to check the condition of packaging — torn or wet containers might compromise the contents.
Ask yourself: would these supplies still support you in an emergency today? If the answer is no, it’s time to update.
Adapting To Seasonal Changes
Your survival needs change with the seasons. Swap out clothing for warmer layers in winter and lighter fabrics in summer. Add sunscreen and insect repellent during warmer months to protect your skin.
Adjust your water supply as well. In hot weather, you might need more hydration options or electrolyte replacements. In cold weather, include hand warmers or thermal blankets.
Think about your family’s changing needs too. If you have children, their requirements might shift with the seasons. Updating your kit regularly means you’re prepared for whatever the weather throws at you.
Storing Your Kit Safely
Storing your earthquake survival kit properly ensures quick access during emergencies. The kit must be in a safe spot that you can reach without delay. It should also protect the contents from damage or loss. Organizing your kit carefully helps you stay prepared and calm.
Accessible Locations At Home
Keep your kit in a place everyone knows about. Choose a spot near the main exit or an emergency meeting area. Avoid high shelves that might be hard to reach after a quake. Use a sturdy, waterproof container to protect supplies from water and dust. Check the kit regularly and replace expired items.
Workplace And Vehicle Kits
Store a smaller kit at work for unexpected situations. Keep it in your desk drawer or locker for easy access. In your car, place a kit in the glove compartment or trunk. Ensure it fits well and does not block visibility or movement. These kits can help if you get stuck away from home.
Preparing Family Members
Preparing family members is crucial for earthquake safety. Everyone should know what to do before, during, and after an earthquake. Clear roles and communication help reduce panic and confusion. Practice builds confidence and ensures quick, safe responses.
Emergency Roles And Responsibilities
Assign specific tasks to each family member. This helps cover all important actions during an earthquake. For example:
- One person checks on everyone’s safety.
- Another gathers emergency supplies.
- Someone else communicates with outside contacts.
- One member handles first aid if needed.
Keep roles simple and suited to each person’s age and ability. Write down responsibilities and post them where everyone can see.
Practice Drills And Communication Plans
Regular drills make sure everyone remembers their roles. Practice different scenarios to prepare for changes in situations. Include steps like:
- Finding safe spots indoors.
- Evacuating to a pre-agreed location.
- Using emergency kits effectively.
Create a communication plan with backup methods. Teach children how to call for help. Decide on meeting points if family members get separated. Update the plan as needed to keep it clear and easy to follow.

Credit: moreprepared.com
Frequently Asked Questions
What Items Are Essential In An Earthquake Survival Kit?
Essential items include water, non-perishable food, flashlight, batteries, first aid kit, whistle, and a multi-tool. These supplies help you survive immediate needs after an earthquake.
How Much Water Should I Store For Emergencies?
Store at least one gallon of water per person per day. Aim for a three-day supply to cover drinking and sanitation needs.
Where Should I Keep My Earthquake Survival Kit?
Keep your kit in an easily accessible, sturdy container near your home’s exit. Ensure all family members know its location for quick access.
How Often Should I Update My Survival Kit Supplies?
Check and update your kit every six months. Replace expired food, batteries, and medications to keep your kit ready for emergencies.
Conclusion
Creating your own earthquake survival kit is essential. It ensures safety during unexpected events. Gather items like water, food, and first-aid supplies. Don’t forget a flashlight and batteries. Personalize your kit to fit your family’s needs. Check your kit regularly.
Replace expired items promptly. Preparation boosts your confidence in emergencies. Teach your family how to use the kit. Practice drills for better readiness. A well-stocked kit can save lives. Stay informed about local emergency plans. Protect yourself and your loved ones.
Safety starts with preparedness. Keep your kit accessible. Stay calm and ready for anything.