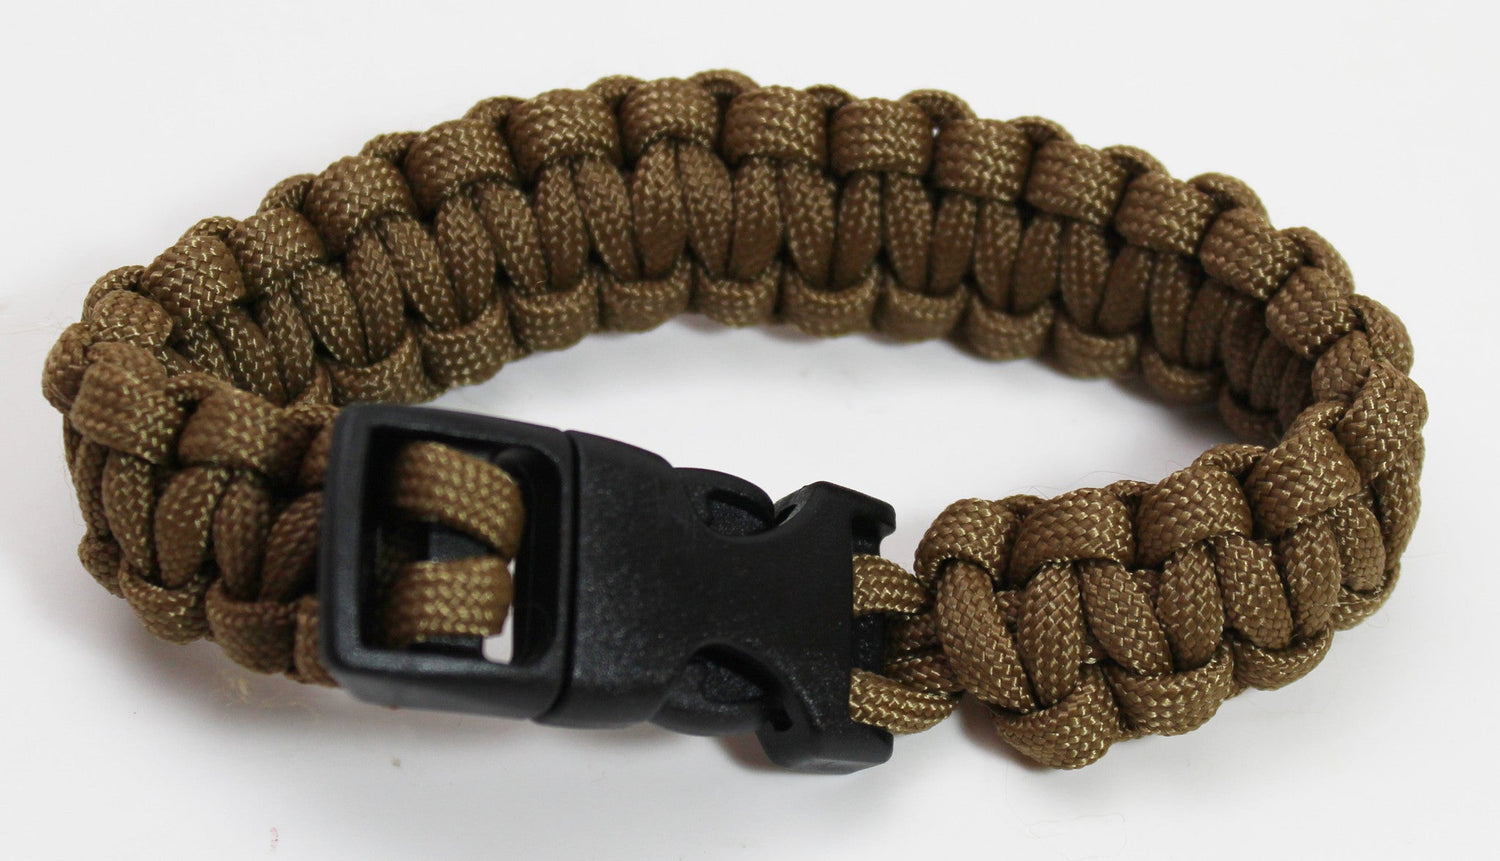
Imagine having a tool on your wrist that could help you in an emergency. A paracord survival kit bracelet does exactly that.
It’s more than just a cool accessory—you can unravel it to use the strong cord for shelter, fishing, or first aid. If you want to be ready for anything, making your own paracord survival kit bracelet is easier than you think.
In this guide, you’ll learn simple steps to create a bracelet that’s both practical and stylish. Keep reading, and you’ll have your own lifesaver right on your arm in no time.

Credit: m.youtube.com
Choosing Paracord And Tools
Choosing the right paracord and tools is key to making a strong survival kit bracelet. The paracord must be durable and reliable. The tools should be simple but effective. Picking the right items ensures your bracelet will hold up in tough situations. This section explains the types of paracord and the essential tools you will need.
Types Of Paracord
Paracord comes in different types, each with its own strength and uses. The most common choice is Type III, also called 550 paracord. It holds up to 550 pounds and has seven inner strands. These strands can be removed and used for fishing line or sewing thread.
Type I and Type II paracords are thinner and less strong. They are not the best for survival kits. Type IV paracord is heavier and stronger but harder to work with for bracelets.
- Type III (550 paracord): Strong and versatile
- Type I & II: Lightweight but less durable
- Type IV: Heavy-duty but bulky
Choose a color that suits your style or environment. Solid colors hide dirt better. Camouflage colors blend in outdoors.
Essential Tools Needed
Having the right tools makes bracelet-making easier and faster. You will need a sharp knife or scissors to cut the paracord cleanly. A lighter or matches help seal the ends to prevent fraying.
A ruler or measuring tape ensures the bracelet fits well. Some people use a fid or marlinspike to weave the cord tightly. A small safety pin can also help manage loose ends.
- Sharp knife or scissors
- Lighter or matches
- Ruler or measuring tape
- Fid, marlinspike, or safety pin (optional)
These simple tools are enough to make a neat and strong paracord survival bracelet.
Preparing Your Materials
Getting your materials ready is the first real step to crafting a paracord survival kit bracelet that works. Having the right supplies on hand saves time and prevents frustration during the process. It also ensures your bracelet will be durable and practical when you need it most.
Measuring And Cutting Paracord
Start by deciding how long you want your bracelet to be. Measure your wrist with a tape or string, then add a few extra inches for knots and weaving. A typical survival bracelet uses about 8 to 12 feet of paracord, but your wrist size and the weave style affect this.
Cut your paracord cleanly with sharp scissors to avoid fraying. Some people like to seal the ends by briefly melting them with a lighter—this stops the cord from unraveling. Have you checked if your scissors are sharp enough? Dull scissors can make cutting frustrating and messy.
Selecting Buckles And Accessories
Your buckle holds the bracelet securely, so choose one that fits your style and needs. Plastic side-release buckles are common and lightweight, but metal buckles add extra strength. Think about whether you want a quick-release feature or something more secure.
Besides buckles, you can add practical accessories like a small compass, fire starter, or whistle. These extras can turn your bracelet into a multi-tool for survival situations. What survival tools do you find most useful to carry every day?
Gather your materials in one place before you start. This simple step keeps your workspace organized and your mind clear. Ready materials make the weaving process smoother and more enjoyable.
Basic Knot Techniques
Mastering basic knot techniques is essential for creating a durable and functional paracord survival kit bracelet. These knots not only hold the bracelet together but also ensure it can be quickly unraveled in an emergency. Getting comfortable with these knots will boost your confidence and make your bracelet both stylish and practical.
Square Knot
The square knot is a simple yet strong knot that forms the foundation of many paracord projects. It ties two ends of paracord together securely without slipping, making it perfect for bracelets you can rely on. If you’ve ever struggled with knots that come undone, you’ll appreciate how the square knot stays put under tension.
To tie it:
- Cross the right cord over the left cord and tuck it under.
- Then, cross the left cord over the right cord and tuck it under.
- Tighten both ends to secure the knot firmly.
This knot is easy to adjust, so you can customize your bracelet’s size as you go. Have you noticed how a good knot changes the whole feel of a handmade item? That’s the power of the square knot.
Cobra Weave
The cobra weave creates a thick, sturdy pattern that adds both strength and style to your bracelet. It’s one of the most popular weaves for survival bracelets because it’s easy to learn and looks impressive. Once you get the rhythm of the cobra weave, it becomes almost meditative to create.
Here’s how to start:
- Lay your base cords parallel and hold them tight.
- Take one working cord and loop it over the base cords to create a half knot.
- Repeat the process with the other side, alternating left and right loops.
As you continue, the weave will build a solid band that can unravel quickly in an emergency. What would it mean to you to have a piece of gear that’s both a fashion statement and a survival tool? The cobra weave answers that perfectly.

Credit: www.youtube.com
Step-by-step Bracelet Weaving
Creating a paracord survival kit bracelet involves a simple weaving process. This step-by-step guide helps you weave the bracelet with ease. Follow each part carefully for a neat and strong bracelet.
Starting The Bracelet
Begin by measuring your wrist for the right bracelet length. Cut two pieces of paracord; one longer for weaving, one shorter for the core. Fold the longer cord in half to find its center. Attach the shorter cord to the middle of the longer cord using a simple knot. Secure the cords to a flat surface with tape or a clip to keep them steady.
Adding The Weave
Take the right working strand and cross it over the core cords. Bring the left strand over the right strand. Pass the left strand under the core cords and up through the loop on the right side. Pull both strands tight to form the first knot. Repeat this process, alternating sides. Keep the knots tight and even for a clean look.
Securing The Ends
After reaching the desired length, hold the bracelet firmly. Use a lighter to carefully melt the ends of the paracord. Press the melted ends with a flat surface to seal them. Trim any excess cord close to the melted ends. Attach a buckle or tie a secure knot to finish your bracelet.
Incorporating Survival Tools
Incorporating survival tools into a paracord survival kit bracelet boosts its usefulness. These small additions can make a big difference in emergencies. Choose tools that are compact and fit well within the bracelet’s design. Each tool should be easy to access without unraveling the entire bracelet.
Attaching Fire Starters
Fire starters are vital for warmth and cooking. Use small ferro rods or magnesium blocks that attach securely to the bracelet. Wrap the paracord around the fire starter or use a small pouch to hold it in place. Make sure the striker is also easy to reach for quick use.
Including Small Blades
Small blades are useful for cutting rope, preparing food, or crafting. Select a blade with a protective sheath to avoid injury. Attach it along the bracelet’s edge or weave it into the paracord. Ensure the blade stays secure and does not move around during wear.
Adding Whistles And Compasses
Whistles help signal for help and compasses aid in navigation. Pick compact models designed for survival gear. Attach the whistle near the clasp or integrate it into the weave for easy blowing. Secure the compass firmly so it stays visible and functional on your wrist.
Testing And Adjusting Fit
Getting the fit right on your paracord survival kit bracelet is crucial. A bracelet that’s too tight can be uncomfortable, while one that’s too loose might snag or fall off when you need it most. Testing and adjusting the fit ensures your bracelet stays secure and ready for action.
Sizing Tips
Start by measuring your wrist with a flexible tape or a piece of string. Wrap it snugly but not too tight—remember, you’ll want a bit of extra room for comfort and for the paracord to expand when in use.
Keep in mind that your wrist size can change throughout the day due to heat or activity. Try sizing the bracelet at the end of the day when your wrist is likely at its largest. This simple step helps avoid a bracelet that feels perfect in the morning but tight by afternoon.
- Measure your wrist and add about 1/4 to 1/2 inch for comfort.
- Consider the thickness of the paracord and any knots or clasps that add bulk.
- Test the fit by wearing the bracelet for a few hours before finalizing.
Adjustable Designs
Not all bracelets have to be fixed in size. Including adjustable features can make your bracelet more versatile and comfortable. Sliding knots or buckles allow you to tweak the fit on the fly, which is especially useful if your wrist size changes or you’re layering it over other gear.
I once made a bracelet with a simple sliding knot and found it perfect for quick adjustments during outdoor trips. It saved me from cutting the paracord or making a new bracelet when my wrist swelled after hiking.
| Adjustable Feature | Pros | Cons |
|---|---|---|
| Sliding Knot | Easy to adjust, no tools needed | Can loosen unintentionally if not tied properly |
| Buckle with Multiple Holes | Secure fit, quick adjustment | Less flexible, limited size options |
| Paracord Loop and Toggle | Simple, lightweight, adjustable | May require practice to secure firmly |
Think about how you will use your bracelet daily. Would an adjustable design help you stay comfortable and prepared? Testing your bracelet in real situations will show you if your fit is just right or needs tweaking.
Caring For Your Bracelet
Caring for your paracord survival kit bracelet ensures it stays strong and ready for action whenever you need it. A well-maintained bracelet not only looks good but also lasts longer, which is crucial during outdoor adventures. Let’s dive into practical ways to keep your bracelet in top shape.
Cleaning Methods
Cleaning your paracord bracelet is simple and doesn’t require special products. Use mild soap and warm water to gently scrub the bracelet with a soft brush or cloth. This removes dirt and sweat that can weaken the fibers over time.
If your bracelet gets really dirty, soak it in soapy water for about 10-15 minutes before scrubbing. Avoid harsh chemicals or bleach as they can damage the cord’s strength and color. After cleaning, rinse thoroughly and let it air dry completely before wearing it again.
Maintenance Tips
Regularly check your bracelet for signs of wear, such as fraying or loose knots. If you spot any weak points, consider retying or replacing the paracord to keep it reliable. Even small damages can affect the bracelet’s performance in survival situations.
Store your bracelet in a cool, dry place when you’re not wearing it to prevent mold or mildew. Avoid exposing it to direct sunlight for long periods, as UV rays can weaken the fibers. Have you noticed how a small effort in maintenance can extend your gear’s life? Try it and see how much longer your bracelet serves you well.

Credit: www.amazon.ca
Creative Variations
Creative variations make your paracord survival kit bracelet unique and personal. You can change colors and patterns to match your style. These variations also improve the bracelet’s look and function. Experimenting with different designs keeps the project fun and interesting.
Color Combinations
Choosing the right colors can enhance your bracelet’s appeal. Combine bright colors for a bold look. Use earth tones for a natural, outdoor feel. Pair contrasting colors to make patterns stand out clearly.
- Mix neon green with black for high visibility.
- Use camouflage shades for a tactical style.
- Try two-tone colors for a simple yet striking effect.
Color choices can also signal different uses or themes. For example, red and white may represent first aid. Blue and white might symbolize water or emergency signals.
Custom Patterns
Custom patterns add personality and creativity to your bracelet. Try weaving techniques like cobra, fishtail, or king cobra knots. Combine several knot styles to create a unique texture.
- Cobra weave offers durability and classic style.
- Fishtail weave creates a sleek and tight design.
- King cobra adds thickness and strength.
Use patterns to tell a story or show your skills. You can also embed small survival tools or beads in the weave for extra function. Custom patterns make each bracelet one of a kind.
Frequently Asked Questions
What Materials Do I Need For A Paracord Bracelet?
You need paracord, a buckle or clasp, a lighter, and scissors. These basics help you create a durable survival bracelet quickly.
How Long Should My Paracord Bracelet Be?
Measure your wrist and add 1-2 inches for comfort. This ensures the bracelet fits well and holds enough cord for survival use.
Can A Paracord Bracelet Be Used In Emergencies?
Yes, it can unravel into strong cord for shelter, traps, or first aid. It’s a versatile survival tool in outdoor situations.
How Do I Finish The Ends Of The Paracord?
Use a lighter to melt and seal the ends. This prevents fraying and keeps the bracelet neat and durable.
Conclusion
Crafting a paracord survival kit bracelet is both fun and practical. With just a few steps, you can create a handy tool. Remember to choose durable materials for lasting use. Practice makes perfect, so don’t worry if the first try isn’t perfect.
You’ll soon have a reliable bracelet ready for any adventure. It’s a great skill to have, combining creativity with utility. So, gather your supplies and start crafting. Enjoy the process and be prepared for outdoor challenges. Your new bracelet might just come in handy one day.