Imagine having a small kit that could help you stay safe and prepared in any unexpected situation. You might think survival kits are bulky or complicated, but what if you could make your own mini survival kit that fits in your pocket?
This simple step can give you peace of mind and keep you ready for emergencies, no matter where you are. You’ll discover easy tips to create your own mini survival kit with just the essentials you truly need. By the end, you’ll have the confidence to face surprises calmly and smartly.
Keep reading to learn how to build your perfect mini survival kit today.

Credit: www.youtube.com
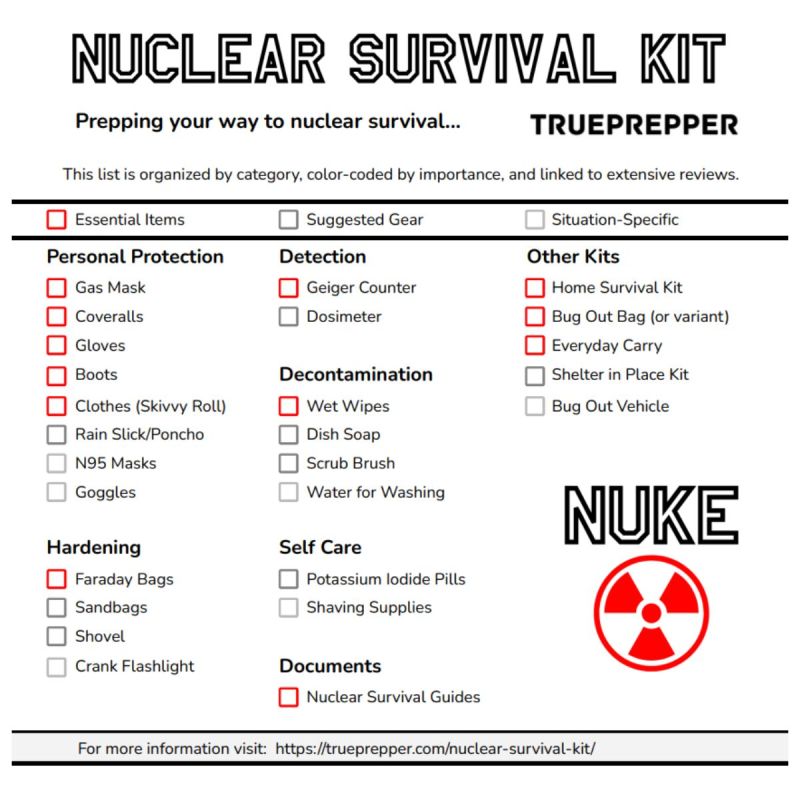
Essential Items For Mini Survival Kits
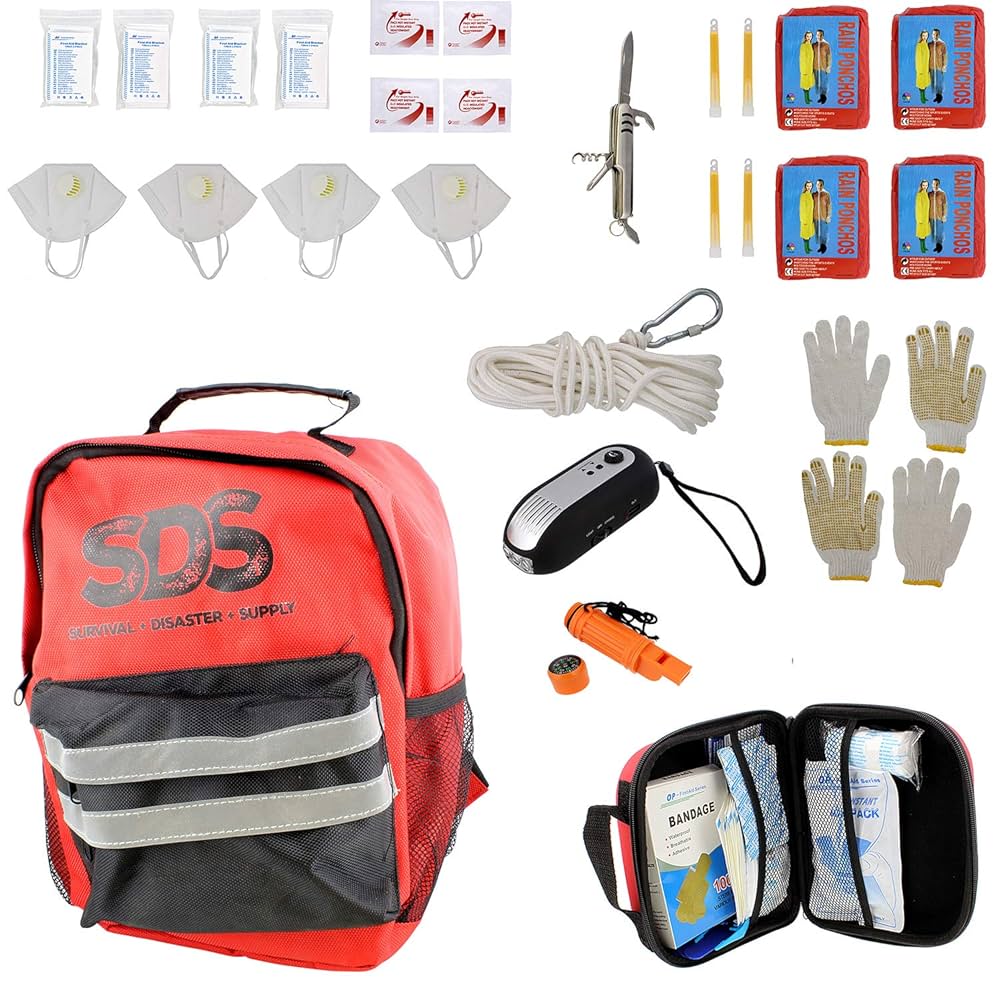
Building a mini survival kit means packing smart. You want to include essentials that cover your basic needs without making the kit bulky. Every item should serve a clear purpose to help you stay safe and comfortable in unexpected situations.
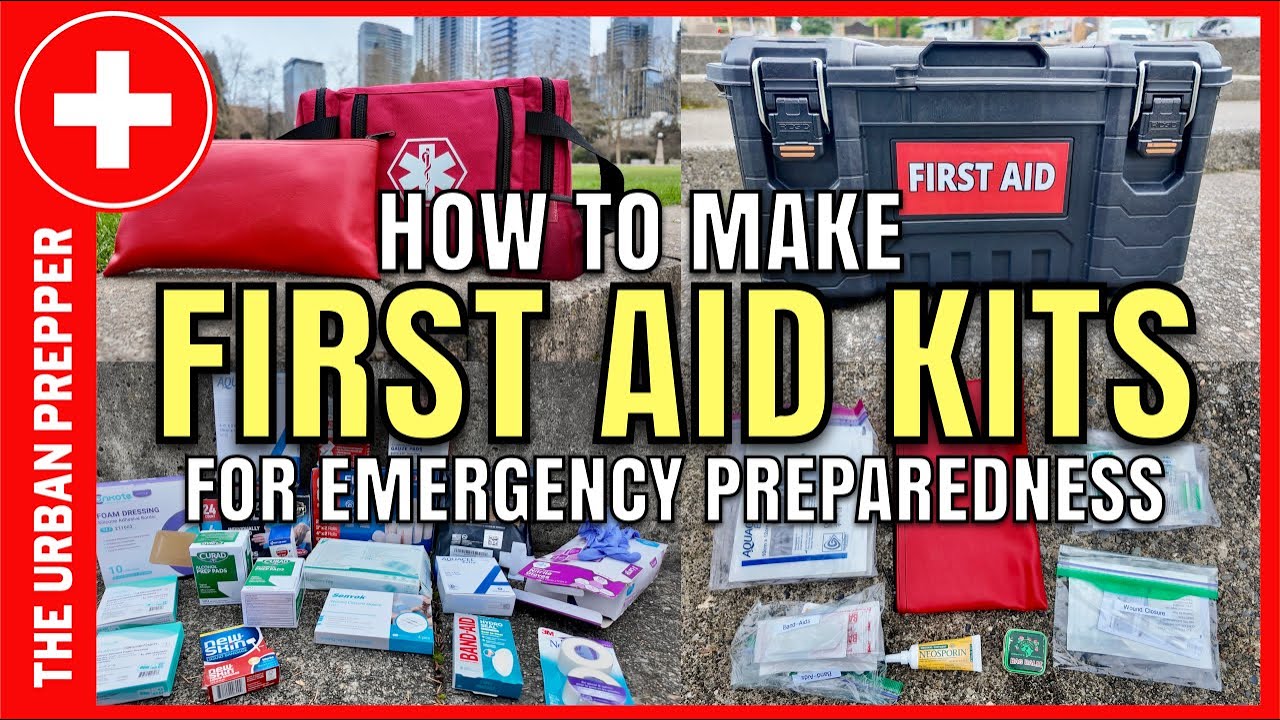
Basic First Aid Supplies
Your mini survival kit must have basic first aid supplies to handle minor injuries. Include adhesive bandages in various sizes, antiseptic wipes, and antibiotic ointment to prevent infection. A small roll of medical tape and a few gauze pads can help with cuts or scrapes.
Don’t forget tweezers for splinter removal and pain relievers like ibuprofen. These items are compact but can make a huge difference when you need quick care.
Tools For Shelter And Fire
Being able to create shelter and start a fire is crucial for survival. Pack a lightweight emergency blanket or a compact tarp to provide warmth and protection from the elements. A small, sturdy multi-tool with a knife blade can help you build shelter or cut materials.
Include waterproof matches or a reliable fire starter like a ferro rod. Fire not only keeps you warm but can signal for help and purify water. Have you ever tried starting a fire with damp matches? A fire starter saves you from that frustration.
Water And Food Essentials
Water is your top priority in a survival situation. Carry a small water bottle or collapsible pouch and add water purification tablets or a compact filter straw. These will ensure you can drink safely from natural sources.
Choose high-energy, non-perishable snacks like nuts, energy bars, or dried fruit. These items don’t take much space but provide necessary calories to keep your energy up. How long could you go without clean water? Having these items could be the difference.
Navigation And Communication Devices
Finding your way and calling for help are vital when you’re lost or in trouble. Include a compact compass and a detailed map of your area in your kit. Even if you have a phone, batteries can die or signal can disappear.
A whistle is a simple but effective tool to signal rescuers. Consider adding a small, solar-powered or hand-crank flashlight for visibility at night. Would you rely solely on your phone, or do you have backup navigation tools ready?
Credit: www.youtube.com
Choosing The Right Container
Choosing the right container is key for making a mini survival kit. It keeps your supplies safe, organized, and easy to carry. The container should protect your items from damage and the environment. It must fit all essentials without being bulky. Selecting the perfect container makes your kit practical and ready for any situation.
Compact And Durable Options
Compact containers save space and fit easily in bags or pockets. Look for small boxes or cases that hold all your items tightly. Durability matters for rough use outdoors. Metal tins, hard plastic cases, and sturdy pouches work well. They resist cracks, dents, and impacts. A strong container ensures your gear stays intact.
Waterproof And Lightweight Materials
Waterproof containers protect your supplies from rain, spills, and humidity. Materials like silicone, waterproof fabric, and sealed plastic keep moisture out. Lightweight containers reduce the weight you carry on hikes or trips. Avoid heavy metal boxes if you want to keep your kit light. Choose designs that balance waterproofing with easy carrying.
Customizing Kits For Different Emergencies
Customizing your mini survival kit is essential because every emergency is unique. The items you pack should match the environment you expect to face. Whether you are navigating city streets, exploring the wilderness, or stuck in your car, tailoring your kit improves your chances of handling the situation effectively.
Urban Survival Kits
Urban emergencies often involve power outages, crowded spaces, or getting stranded in traffic. Your kit should include items that help you stay safe, comfortable, and connected.
- Portable phone charger:Keeps your communication open when power is out.
- Face masks and hand sanitizer:Protects you in crowded or polluted areas.
- Emergency whistle:Helps signal for help in noisy environments.
- Cash and copies of important documents:Useful if electronic payment systems fail.
Imagine being stuck in a blackout with no way to contact loved ones or navigate the dark. Having these items can reduce panic and keep you connected.
Outdoor And Wilderness Kits
When you head into nature, survival depends on your ability to find shelter, food, and signal for rescue. Your mini kit needs to focus on these essentials.
- Water purification tablets:Ensure safe drinking water from natural sources.
- Compact multi-tool:Useful for building shelter or preparing food.
- Fire starter:Crucial for warmth and cooking.
- Emergency blanket:Provides insulation in cold conditions.
Have you ever found yourself in a situation where a simple fire starter made all the difference? Outdoor kits should be lightweight but packed with lifesaving gear.
Car Emergency Kits
Car troubles can happen anywhere, from flat tires to getting stuck in severe weather. Your kit should focus on safety and basic repairs.
- Jumper cables:To restart a dead battery.
- Reflective warning triangle:Alerts other drivers to your presence.
- Basic first aid supplies:For treating minor injuries on the spot.
- Non-perishable snacks and water:Keeps you nourished if help is delayed.
Think about the last time you experienced car trouble. Having these items within reach can turn a stressful event into a manageable one.
Packing Tips For Efficiency
Packing your mini survival kit efficiently can make a huge difference when you need quick access to essentials. It’s not just about what you pack, but how you pack it. Smart packing saves space, reduces weight, and ensures you can find what you need instantly.
Organizing Items By Priority
Start by sorting items based on how urgently you might need them. Place the most critical tools—like a whistle, firestarter, or first-aid supplies—at the top or in an easy-to-reach pocket. Lesser-used items can go deeper inside your kit.
Think about scenarios where your hands might be full or visibility is low. Would you be able to grab your essentials quickly? Organizing by priority isn’t just convenient—it can be life-saving.
- Keep frequently used items separate from backup gear.
- Use small, labeled pouches for categories like medical, food, and tools.
- Test your layout by simulating an emergency grab to see how fast you can access key items.
Using Space-saving Techniques
Maximize your kit’s capacity by rolling clothes or compressing soft items like bandages. Vacuum-seal bags or ziplock bags with the air squeezed out work wonders for reducing bulk.
Stack flat items, such as maps and emergency blankets, along the sides or bottom. Bulky items should be nestled in the center to maintain balance and shape.
| Space-Saving Technique | Example | Benefit |
|---|---|---|
| Rolling Clothes | Roll a bandana or small towel tightly | Reduces wrinkles and saves space |
| Vacuum-Sealing | Compress first-aid gauze in a vacuum bag | Makes bulky items compact |
| Layering Flat Items | Place maps or survival sheets flat at the bottom | Prevents damage and saves space |
Have you ever struggled to find a small item buried in your kit? Try these techniques and see how much smoother your packing and accessing become. Efficient packing isn’t just about fitting everything—it’s about fitting it smartly.
Maintaining And Updating Kits
Keeping your mini survival kit ready means you can rely on it when you really need it. Maintenance and updates ensure the contents stay effective and useful. Neglecting this can turn a lifesaver into a burden during an emergency.
Regular Inspections
Set a recurring date on your calendar to check your kit. Look for signs of wear, damage, or moisture, especially if your kit lives in a backpack or car. Even if you haven’t used it, some items can break down over time.
Check every item one by one. Are the batteries still tight in their compartments? Are the packaging seals intact? These small checks can prevent big disappointments later.
Ask yourself: would you be confident grabbing this kit right now? If not, it’s time for a refresh.
Replacing Expired Supplies
Expiration dates are not just suggestions. Food, medications, and batteries lose effectiveness after their expiration. Using expired supplies can be risky or even harmful.
Keep a list of items with expiration dates. Replace them proactively instead of waiting until the last minute. For example, swap out energy bars, water purification tablets, and first aid ointments yearly.
Consider keeping extras of critical items, so replacing doesn’t catch you off guard. What’s the point of a survival kit if it can’t survive the test of time?

Credit: premierbodyarmor.com
Budget-friendly Mini Survival Kits
Budget-friendly mini survival kits help you prepare without spending too much. You can gather essential items that fit your needs and wallet. These kits are small, easy to carry, and useful in many situations. Focus on basics to stay safe and ready.
Affordable Alternatives
Choose inexpensive items that serve multiple purposes. A small flashlight with extra batteries can replace costly lighting tools. Use a whistle to signal instead of expensive communication devices. Bandanas work as first aid, sun protection, or water filters. Simple items like waterproof matches and safety pins add value without high costs. Look for sales and discounts on survival gear. Buy in bulk for better prices on essentials like water purification tablets and energy bars.
Diy Vs Store-bought Kits
Making your own mini survival kit lets you pick only needed items. You control quality and cost. Store-bought kits save time but may include unnecessary gear. DIY kits often cost less and fit your style. Store kits offer convenience and tested combinations. Compare prices and contents before buying. Customize your kit to match your environment and skills. A DIY kit grows with your experience and budget.
Frequently Asked Questions
What Items Should A Mini Survival Kit Include?
A mini survival kit should include essential items like a multi-tool, waterproof matches, a compact flashlight, a whistle, a first aid kit, and high-energy snacks. These items ensure basic survival needs such as warmth, signaling for help, and treating minor injuries are covered.
How Do You Choose A Survival Kit Container?
Choose a durable, waterproof container that’s easy to carry. Consider size, weight, and ease of access. Compact tins, plastic boxes, or small pouches are ideal. Ensure it’s sturdy enough to protect contents but lightweight for portability.
Can Mini Survival Kits Fit In A Pocket?
Yes, mini survival kits can fit in a pocket if designed compactly. Use small, essential items and a compact container. This ensures portability without sacrificing essential survival tools. Prioritize lightweight and multipurpose items for space efficiency.
Why Are Mini Survival Kits Important?
Mini survival kits are important because they provide essential tools for emergencies. They ensure preparedness in unexpected situations. With basic items, you can address immediate survival needs like signaling, warmth, and minor injuries, enhancing your safety.
Conclusion
Creating mini survival kits takes just a little time and effort. They help you stay ready for small emergencies. Choose items that fit your needs and space. Keep your kit light but useful. Check and update it often to stay prepared.
A small kit can make a big difference. Stay safe, stay ready.