Imagine having everything you need to stay safe and prepared, all packed into a tiny kit that fits in your pocket. You never know when an unexpected situation might arise, and being ready can make all the difference.
Creating your own mini survival kit is easier than you think, and it puts control right in your hands. Keep reading, and you’ll discover simple steps to build a compact, powerful kit that you can rely on anytime, anywhere. Your peace of mind starts here.
Choosing The Right Container
Choosing the right container for your mini survival kit is vital. It protects your tools and keeps them organized. The container must fit your needs perfectly. It should be easy to carry and strong enough to last. Think about where and how you will use your kit. This helps to pick the best container for your situation.
Size And Portability
Pick a container small enough to carry comfortably. It should fit in your pocket, backpack, or glove box. Avoid containers that are too big or too heavy. A compact size makes it easy to take your kit anywhere. Portability ensures you always have your survival tools ready. Consider how much space your essential items need. Choose a container that holds everything without extra bulk.
Durability And Waterproofing
Your container must withstand rough conditions and protect contents. Strong materials like hard plastic or metal work well. Waterproof containers keep your items dry in rain or wet places. Look for tight seals or rubber gaskets to stop water entry. Durability means your kit stays safe in any environment. A solid container helps your survival tools last longer.

Credit: m.youtube.com
Essential Items For Survival
Building a mini survival kit means focusing on the essentials that truly increase your chances of staying safe and comfortable. You want items that cover your basic needs: warmth, hydration, health, and direction. These essentials aren’t just random—they work together to keep you prepared for unexpected situations.
Fire Starting Tools
Fire can be your best friend in survival. It provides warmth, a way to cook food, and a signal for help. Including a reliable fire starter like waterproof matches, a lighter, or a ferro rod is crucial.
I once relied on a simple ferro rod during a camping trip when my matches got wet. It saved me from a cold night and made me realize how essential fire tools are, no matter where you go.
Water Purification Methods
Water is life, but drinking untreated water can be dangerous. Your mini kit should include a compact water filter, purification tablets, or a small bottle of bleach for emergencies.
Even if you have access to water, can you be sure it’s safe? Carrying purification methods means you control your hydration quality, not chance or environment.
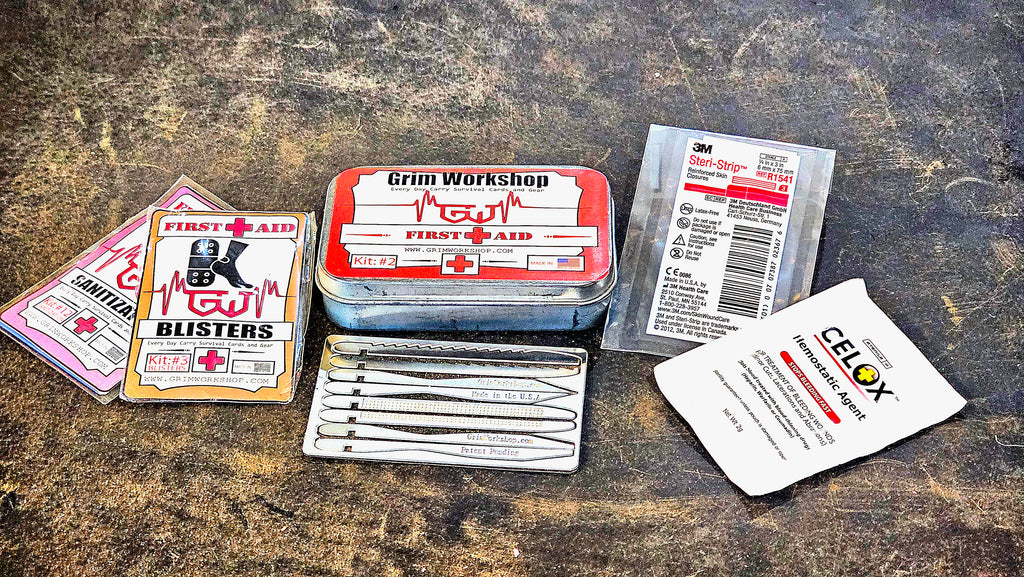
Basic First Aid Supplies
Injuries happen, and having first aid supplies on hand can prevent minor wounds from becoming major problems. Pack adhesive bandages, antiseptic wipes, pain relievers, and tweezers.
When I cut my finger during a hike, the simple bandages in my mini kit stopped the bleeding quickly. That quick response made all the difference in comfort and safety.
Navigation Tools
Knowing where you are and how to get back is vital. Include a small compass and a waterproof map of your area. A GPS device can be useful, but it shouldn’t replace basic navigation tools.
Have you ever been lost without a map or compass? It’s unsettling. These tools help you stay oriented, making your survival kit truly reliable.
Multipurpose Tools And Gadgets
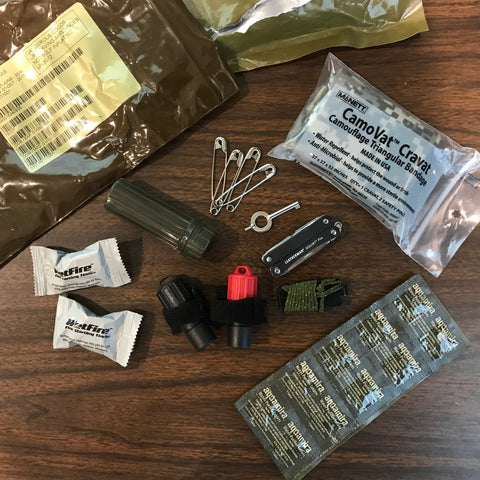
Multipurpose tools and gadgets are the heart of any mini survival kit. They save space while providing multiple functions, making them essential for unexpected situations. Including versatile items means you carry less but get more done, which can be a lifesaver in the wild or during emergencies.
Compact Multi-tools
A compact multi-tool combines several tools into one handy device. You can find models with pliers, knives, screwdrivers, scissors, and even small saws all packed tightly. Carrying one means you’re ready for various tasks like cutting rope, fixing gear, or opening cans without needing a bulky toolbox.
Think about the last time you struggled to open a package or tighten a loose screw. A multi-tool would have saved you time and frustration. Choose one with quality materials and a locking mechanism for safety. Some even come with extra features like a fire starter or mini flashlight, giving you even more value.
Emergency Whistle
An emergency whistle might seem simple, but its value in survival situations is huge. It can signal for help over long distances without draining your phone battery or voice. The piercing sound can alert rescuers or scare off wildlife.
Look for a whistle that’s loud and durable, preferably one that can attach easily to your keychain or backpack. Have you ever tried shouting for help in a noisy environment? A whistle carries your signal much farther and with less effort. It’s a small tool that can make a big difference when you need it most.
Credit: www.vnives.com
Lighting And Signaling Devices
Lighting and signaling devices are essential in a mini survival kit. They help you see clearly and alert others if you need help. These tools increase your safety in dark or dangerous situations. Choosing the right lighting and signaling devices can make a big difference.
Flashlights And Headlamps
Flashlights provide a focused beam of light to guide your way. They are compact and easy to carry in your kit. Choose LED flashlights for longer battery life and brighter light.
Headlamps free your hands while lighting your path. They are useful for setting up camp or doing tasks at night. Look for adjustable brightness levels and comfortable straps.
- Use spare batteries or rechargeable options.
- Pick lightweight and waterproof models.
- Test your lights before packing them.
Reflective Signals
Reflective signals help rescuers find you from a distance. They work by reflecting sunlight or flashlight beams. Include items like signal mirrors and reflective tape in your kit.
Signal mirrors are small and easy to use. Aim the mirror at a bright source to reflect light towards searchers.
- Attach reflective tape to your backpack or clothing.
- Use bright colors for better visibility.
- Practice signaling techniques to improve your chances.
Shelter And Warmth Essentials
Shelter and warmth are vital in any survival situation. They protect you from harsh weather and keep your body temperature stable. A mini survival kit should include items that provide quick and effective protection. These essentials take up little space but offer great comfort and safety.
Emergency Blankets
Emergency blankets are lightweight and compact. They reflect body heat to keep you warm in cold conditions. These blankets are made from durable, heat-retaining material. They also block wind and rain, adding extra protection.
Emergency blankets fit easily into any survival kit. Carry one to prevent hypothermia and heat loss. They can also serve as ground cover or a shelter roof in emergencies.
Compact Tents
Compact tents provide reliable shelter from rain, wind, and insects. These tents fold into small sizes, perfect for a mini kit. They set up quickly, offering instant protection.
Choose tents made from lightweight, waterproof materials. Look for easy-to-assemble designs that suit your needs. A compact tent gives you a safe space to rest and stay warm outdoors.
Food And Nutrition Supplies
Food and nutrition supplies are essential for any mini survival kit. They provide energy and keep you strong during emergencies. Choosing the right items helps you stay nourished without adding bulk to your kit.
Focus on items that last long and are easy to carry. Pack a mix of snacks and tools to prepare simple meals. This balance ensures you are ready for different situations.
Non-perishable Snacks
- Energy bars with nuts and dried fruits
- Trail mix with seeds and dried berries
- Jerky made from beef or turkey
- Peanut butter packets
- Crackers or rice cakes
- Instant oatmeal packets
- Powdered drink mixes for hydration
Choose snacks that do not need refrigeration or cooking. These provide quick energy and last for months. Keep variety to avoid taste fatigue and maintain morale.
Portable Cooking Tools
- Small camping stove or portable burner
- Lightweight, compact cooking pot
- Collapsible utensils and spork
- Windshield for stove to save fuel
- Water purification tablets or filter
- Matches or lighter stored in waterproof case
These tools help prepare hot meals or boil water. Select items that fit easily in your kit. They make food safer and more satisfying during tough times.
Personalizing Your Kit
Personalizing your mini survival kit ensures it fits your unique needs. A one-size-fits-all kit may lack essential items for your health or environment. Tailoring your kit boosts your chances of staying safe and comfortable. Think about your body, location, and daily activities. Make choices that suit your lifestyle and risks.
Special Needs Considerations
Include items for any medical conditions. Carry extra medications, inhalers, or allergy treatments. Pack supplies for vision or hearing aids if needed. Add personal hygiene products you use daily. Consider snacks or supplements that match your diet. Adjust the kit for children or elderly family members. Keep emergency contacts and medical information handy.
Local Environment Adaptations
Match your kit to the climate and terrain. In cold areas, add hand warmers and thermal blankets. For hot climates, pack sunscreen and extra water. Include insect repellent in places with bugs. Add waterproof gear for rainy regions. Think about natural hazards like floods or wildfires. Choose tools that work well in your surroundings. Customize food and water supplies based on local availability.

Credit: www.youtube.com
Maintaining And Updating The Kit
Keeping your mini survival kit ready means more than just packing it once. It requires regular care and thoughtful updates to ensure it works perfectly when you need it most. Neglecting this can turn your carefully prepared kit into a collection of expired or useless items.
Regular Checks And Replacements
Set a schedule to inspect your kit every few months. Check expiration dates on food, medicine, and batteries. Replace anything that’s past its prime or damaged.
Look for wear and tear on tools, packaging, and containers. Even small cracks or rust can make items unreliable. Don’t wait for an emergency to discover your kit isn’t up to the task.
Ask yourself: Would each item still perform if you needed it today? If the answer is no, it’s time to swap it out.
Seasonal Adjustments
Seasons change, and so should your kit. In winter, add extra warm items like hand warmers or thermal blankets. In summer, include sunscreen, insect repellent, and extra water purification tablets.
Think about the environment you’ll be in. Are you heading to a rainy region? Pack waterproof matches and a rain poncho. Going to a dry, hot area? Add electrolyte packets to prevent dehydration.
Adjusting your kit with the seasons keeps it practical and tailored to your specific needs. What seasonal hazard might catch you off guard if your kit stays the same year-round?
Frequently Asked Questions
What Essential Items Go Into A Mini Survival Kit?
A mini survival kit should include a small knife, waterproof matches, a whistle, a compact first aid kit, and a space blanket. These items cover basic needs like fire, signaling, and minor injuries, making the kit practical and lightweight for emergencies.
How Do I Keep My Mini Survival Kit Lightweight?
Choose multi-purpose tools and compact items to reduce weight. Opt for small-sized essentials like mini flashlights and travel-size first aid supplies. Prioritize lightweight materials and avoid redundant items to ensure your kit stays easy to carry without compromising functionality.
Where Should I Store My Mini Survival Kit For Easy Access?
Keep your mini survival kit in your backpack, glove compartment, or hiking belt pouch. Choose a dry, easily reachable spot to ensure quick access during emergencies. Regularly check the kit’s location to maintain readiness when you need it most.
How Often Should I Update My Mini Survival Kit?
Update your mini survival kit every six months or after use. Check expiration dates on food, medication, and batteries. Replace any used or outdated items to keep the kit reliable and effective for future emergencies.
Conclusion
Making a mini survival kit takes just a few steps. Choose small, useful items that fit your needs. Keep your kit light and easy to carry. Regularly check and update your supplies. A ready kit helps you stay safe in emergencies.
Start building your kit today for peace of mind. Simple preparation can make a big difference. Stay ready, stay safe.