Are you ready to take control of your safety and be prepared for anything? Building a homemade survival kit is one of the smartest steps you can take right now.
Imagine having everything you need, right at your fingertips, when an emergency strikes. In this guide, you’ll discover simple, practical tips to create a survival kit tailored just for you. By the end, you’ll feel confident and ready to face unexpected situations with ease.
Keep reading to learn how to protect yourself and your loved ones with a kit you build yourself.

Credit: grimworkshop.com
Choosing The Right Container
Choosing the right container for your homemade survival kit sets the foundation for its effectiveness. Your container must protect and organize your supplies while being easy to carry. Think about where you’ll keep it and how you’ll use it during an emergency.
Durability And Portability
Your container should be tough enough to handle rough conditions. Look for materials like hard plastic, metal, or heavy-duty fabric that won’t crack or tear easily. If you’re planning to carry your kit on hikes or in your car, consider a container that won’t add too much weight or bulk.
I once used a flimsy box that broke open during a camping trip, spilling my supplies everywhere. That experience taught me to choose something sturdy and compact, so you can trust your kit will hold up when you need it most.
Waterproof Options
Water can ruin your survival supplies quickly. A waterproof container keeps everything dry, especially important if you’re in a wet environment or need to store your kit outdoors. Look for containers with rubber seals or waterproof bags inside your main container to add extra protection.
Would you want your matches soaked or your first-aid supplies soggy when you need them? Keeping your items dry ensures they stay usable, no matter the weather.
Organizing Compartments
Keeping your supplies organized saves time and reduces stress during an emergency. Choose a container with compartments, dividers, or pockets to separate items like food, tools, and medical supplies. This way, you won’t waste precious minutes digging through a mess.
Using small clear bags or labeled sections inside your container can help you find what you need quickly. Have you ever wasted time searching for a tiny tool hidden at the bottom of a bag? Avoid that frustration by organizing your kit thoughtfully.
Selecting Essential Tools
Selecting essential tools is key to building a reliable survival kit. The right tools help you stay safe and meet basic needs. Focus on items that serve multiple purposes and fit your environment. Quality matters more than quantity for your kit’s effectiveness.
Cutting And Fire-making Tools
Cutting tools help with shelter, food, and other tasks. A sturdy fixed-blade knife works best. Include a small folding knife for lighter tasks. Fire-making tools are vital for warmth and cooking. Waterproof matches or a reliable lighter are must-haves. Add a ferrocerium rod for sparks in wet conditions.
Navigation Aids
Navigation tools keep you oriented in unknown areas. A simple compass is essential for direction. Pair it with a local map to avoid getting lost. A whistle can signal for help if needed. Consider a small mirror for signaling in daylight.
Multi-purpose Gear
Multi-purpose gear saves space and adds versatility. A good-quality multitool combines pliers, screwdrivers, and more. A durable paracord can serve many uses like tying or repairing. A lightweight tarp or emergency blanket offers shelter and warmth. These items help you adapt to many survival situations.
Including First Aid Supplies
Including first aid supplies is a key part of building a homemade survival kit. These items help treat injuries and prevent infections. A well-stocked first aid section supports safety during emergencies and outdoor activities.
Basic Medical Items
- Adhesive bandages in various sizes
- Sterile gauze pads and adhesive tape
- Antiseptic wipes or solution
- Disposable gloves for hygiene
- Scissors and tweezers
- Elastic bandage for sprains
- Thermometer to check fever
Emergency Medications
- Pain relievers like ibuprofen or acetaminophen
- Antihistamines for allergic reactions
- Anti-diarrheal tablets
- Antacid for stomach discomfort
- Hydrocortisone cream for skin irritations
- Oral rehydration salts for dehydration
Personal Health Needs
Include any medications used daily. Think about allergies, chronic conditions, or prescriptions. Pack extra supplies such as inhalers or insulin.
Also, add items like prescription glasses or contact lens solutions. Tailoring the kit to personal health ensures better care during emergencies.
Stocking Food And Water
Stocking food and water is essential for a reliable homemade survival kit. Food and water keep the body strong and healthy during emergencies. Choose items that last long and require little preparation. Focus on easy-to-store and nutrient-rich options. Water storage must be safe and enough for several days. Purification methods help make water drinkable if supplies run out. Energy boosters support stamina and alertness when needed most.
Non-perishable Food Choices
- Canned beans, vegetables, and fruits
- Dry rice, pasta, and lentils
- Peanut butter and nut butters
- Powdered milk and shelf-stable cheese
- Freeze-dried meals and soups
- Granola bars and trail mix
- Honey and hard candies
Choose foods with a long shelf life. Avoid items that need refrigeration. Pick foods that provide energy and nutrition. Store food in airtight containers to prevent spoilage.
Water Storage And Purification
- Use clean, food-grade water containers
- Store at least one gallon per person daily
- Keep water in a cool, dark place
- Rotate stored water every six months
- Carry water purification tablets or drops
- Invest in a portable water filter
- Boil water for at least one minute to purify
Safe water storage prevents contamination. Purification tools ensure water is safe to drink. Always have backup methods ready.
Energy And Nutrition Boosters
- Protein bars and energy gels
- Dried fruits like raisins and apricots
- Nuts and seeds for healthy fats
- Electrolyte powder packets
- Instant coffee or tea bags
- Vitamin supplements for added nutrition
These boosters help maintain energy levels. They are easy to carry and consume. Keep a variety to meet different needs.
Adding Shelter And Warmth Items
Adding shelter and warmth items to your homemade survival kit is crucial for staying safe and comfortable in unexpected situations. These items help protect you from harsh weather and maintain your body heat, which can make a big difference when you’re outdoors or in an emergency. Let’s look at some essential gear that can keep you sheltered and warm.
Emergency Blankets And Tarps
Emergency blankets are lightweight, compact, and designed to reflect body heat back to you. They can easily fit into any survival kit and are perfect for retaining warmth during cold nights. Tarps offer versatile shelter options—you can create a quick tent, a ground cover, or even use them to collect rainwater.
Think about how many times a simple tarp has saved you from getting soaked during sudden rain. Having both a tarp and an emergency blanket means you have flexible options for shelter and warmth no matter the situation.
Fire Starters And Heat Sources
Fire starters like waterproof matches, lighters, or ferro rods are essential for creating warmth, cooking food, and signaling for help. Carry multiple types to increase your chances of success in wet or windy conditions. Small heat sources like hand warmers can also provide immediate warmth without needing to build a fire.
Have you ever tried starting a fire with damp materials? It’s frustrating and time-consuming. That’s why having reliable fire starters in your kit saves you effort and keeps you warm when it counts most.
Clothing And Protection
Packing extra clothing layers such as thermal socks, gloves, and hats can prevent heat loss and protect your skin from wind and cold. Choose moisture-wicking and quick-drying fabrics to avoid staying wet, which lowers body temperature. Don’t forget a compact rain jacket or poncho for added protection against rain and wind.
Remember, your body loses most heat through your head and extremities. Protecting these areas can significantly improve your overall warmth and comfort in survival situations.
Including Communication And Signal Tools
Including communication and signal tools in your homemade survival kit can make a critical difference when you need help the most. These tools help you attract attention and stay connected, even in remote or challenging environments. Think about times you’ve been lost or stuck—having reliable ways to signal for help could save hours or even days.
Whistles And Mirrors
Whistles are simple, lightweight, and can produce loud sounds that carry far. A good survival whistle can be heard over long distances, even through dense forest or noisy surroundings. Always keep one easily accessible in your kit, as your voice might not always carry when you need it.
Mirrors work by reflecting sunlight to create a bright flash that can catch the eye of rescuers miles away. A small signal mirror fits easily in your kit and doesn’t rely on batteries or electronics. Have you ever tried signaling with a mirror? It’s surprisingly effective when you know how to aim it.
Flashlights And Batteries
A reliable flashlight helps you navigate and signal in the dark. Choose one that is compact but powerful enough to illuminate your path clearly. Don’t forget to pack extra batteries—dead batteries in an emergency are useless.
LED flashlights are energy-efficient and durable, ideal for survival situations. You might also consider a flashlight with a strobe or SOS mode to send distress signals. How often do you check your flashlight’s batteries? Regular checks can prevent surprises when you need light most.
Portable Chargers
Keeping your phone or communication devices charged is crucial for emergency calls or accessing GPS. A small, high-capacity portable charger can provide multiple charges and fit right in your survival kit. Look for solar-powered options if you plan to spend extended time outdoors.
Portable chargers give you the freedom to stay connected longer without relying on fixed power sources. Have you thought about how you would charge your phone if the power went out? Adding a charger to your kit prepares you for those unexpected moments.
Maintaining And Updating The Kit
Keeping your homemade survival kit ready means more than just packing it once and forgetting it. Regular maintenance ensures that everything inside works when you need it the most. Updating your kit helps you stay prepared for new challenges and changing conditions.
Regular Checks And Replacements
Set a schedule to check your survival kit at least twice a year. Look for expired food, dead batteries, and broken tools. Replace any item that no longer functions or is past its use-by date.
Pay close attention to items like medications, water purification tablets, and first aid supplies. These can lose effectiveness over time. Keeping a checklist makes this process easier and helps you avoid missing anything important.
Adapting To Seasonal Changes
Your survival needs shift with the seasons. Add warm clothing and thermal blankets for winter. In summer, include extra water and sun protection like sunscreen and hats.
Think about how weather affects your environment. Snow might block some paths, or heavy rains could cause flooding. Adjust your kit to match these conditions, so you’re ready no matter what season it is.
Personalizing For Specific Needs
Everyone’s survival kit should reflect their personal situation. If you have allergies, include necessary medications and identify safe food options. Families with children might add comfort items or child-sized tools.
Consider your location, lifestyle, and health requirements. Do you live in an earthquake-prone area or a rural setting? Tailor your supplies to fit those scenarios. The more customized your kit, the better it will serve you in a real emergency.

Credit: www.youtube.com

Credit: grimworkshop.com
Frequently Asked Questions
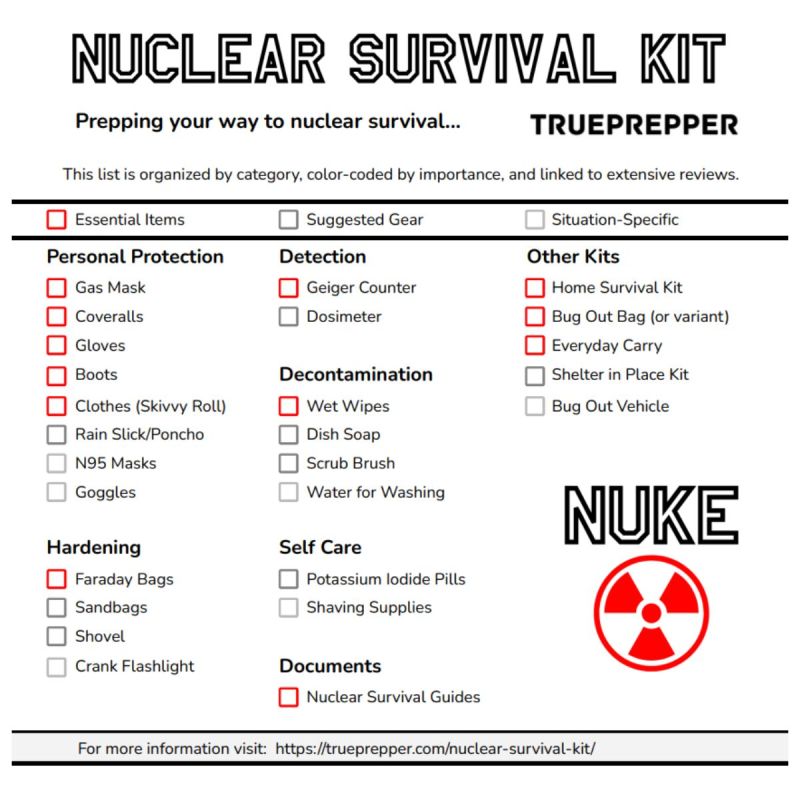
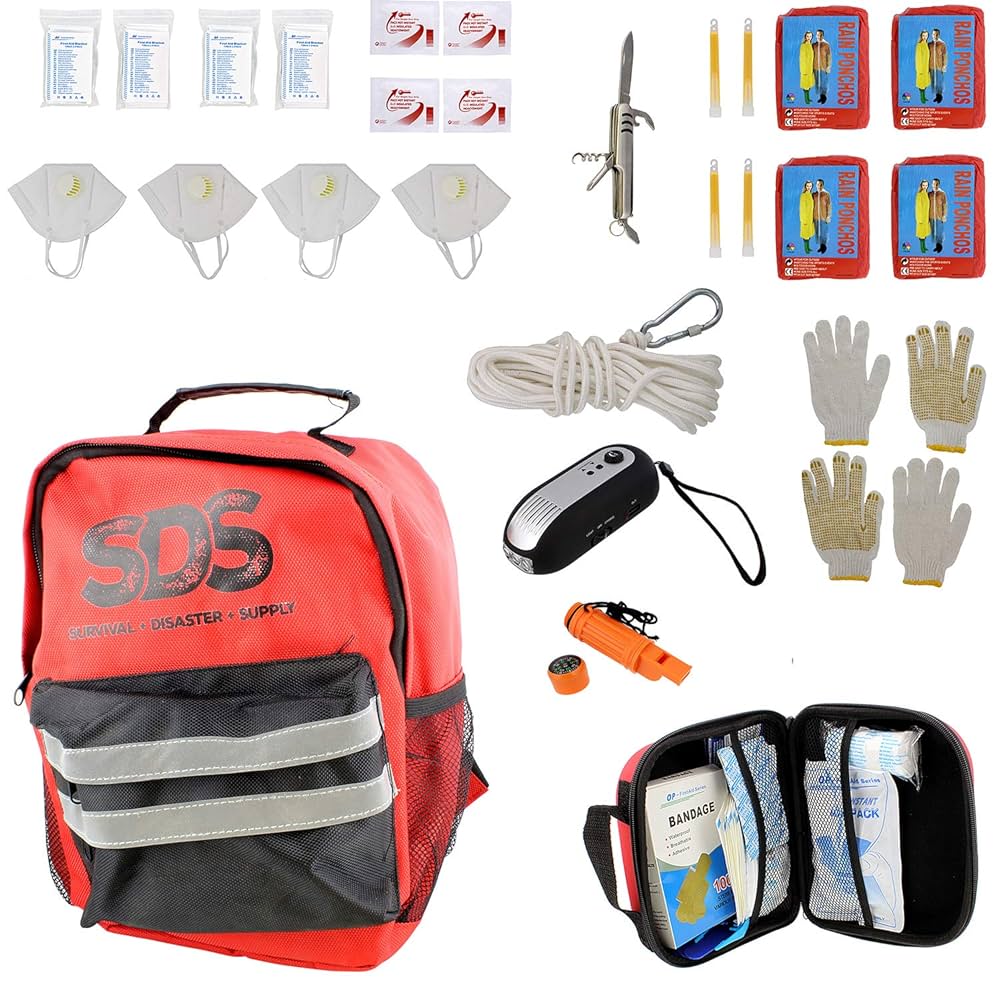
What Are The Essential Items For A Homemade Survival Kit?
Essential items include water, food, first aid, fire starter, shelter, and a multi-tool. These basics ensure safety and survival in emergencies.
How Do I Choose The Right Container For My Survival Kit?
Pick a durable, waterproof, and compact container. It should fit all items and be easy to carry for convenience.
How Often Should I Update My Survival Kit Supplies?
Update your kit every 6 to 12 months. Check for expired food, batteries, and replace damaged items promptly.
Can I Customize A Survival Kit For Different Environments?
Yes, tailor your kit to specific environments like forest, desert, or urban areas. Adjust items based on climate and terrain.
Conclusion
Building a homemade survival kit is essential. It prepares you for emergencies. Gather items carefully. Think about water, food, and first aid. Include tools like a flashlight and knife. Customize your kit for personal needs. Check your kit regularly. Replace expired items promptly.
Practice using each item. Confidence grows with preparation. A well-prepared kit can save lives. Stay safe and prepared. Your future self will thank you.