Imagine facing an emergency with no tools or supplies at hand. Scary, right?
That’s why having a well-assembled survival kit is not just smart—it can be life-saving. You might think putting one together is complicated or expensive, but it doesn’t have to be. You’ll discover simple steps to create a survival kit that fits your needs and budget.
By the end, you’ll feel confident knowing you’re ready for whatever comes your way. Ready to take control of your safety? Let’s get started.
Choosing The Right Container
Choosing the right container for your survival kit is more important than you might think. It’s the foundation that keeps all your essential items safe, organized, and ready to use when you need them most. The container needs to balance strength, convenience, and protection to match your unique survival needs.
Durability And Portability
Your container must withstand rough handling and harsh environments without breaking. Look for materials like hard plastic, metal, or heavy-duty fabric that won’t crack or tear easily. At the same time, it should be lightweight and easy to carry, so you won’t hesitate to bring it along on any adventure.
I once used a flimsy bag that tore during a hiking trip, scattering my supplies. Since then, I always choose containers that survive impacts and rough terrain. What kind of container would you trust to protect your gear in tough conditions?
Waterproof And Seal Features
Water can ruin your survival kit in minutes. Choose a container with a reliable waterproof seal to keep moisture, dirt, and insects out. Look for airtight lids or rubber gaskets that lock tightly and prevent water from seeping inside.
Even a small leak can spoil matches, bandages, or food. I learned this the hard way after a rainy night left my kit soaked. Can you imagine being without dry essentials when you need them most?
Size Considerations
The size of your container affects how much you can carry and how easily you can store it. Pick a size that fits your essential items without being bulky or heavy. Too large, and it becomes cumbersome; too small, and you might leave out crucial supplies.
Think about your typical outings: Do you need a compact kit for short trips or a larger one for extended emergencies? Choosing the right size ensures your kit is practical and ready for any situation.

Credit: www.youtube.com
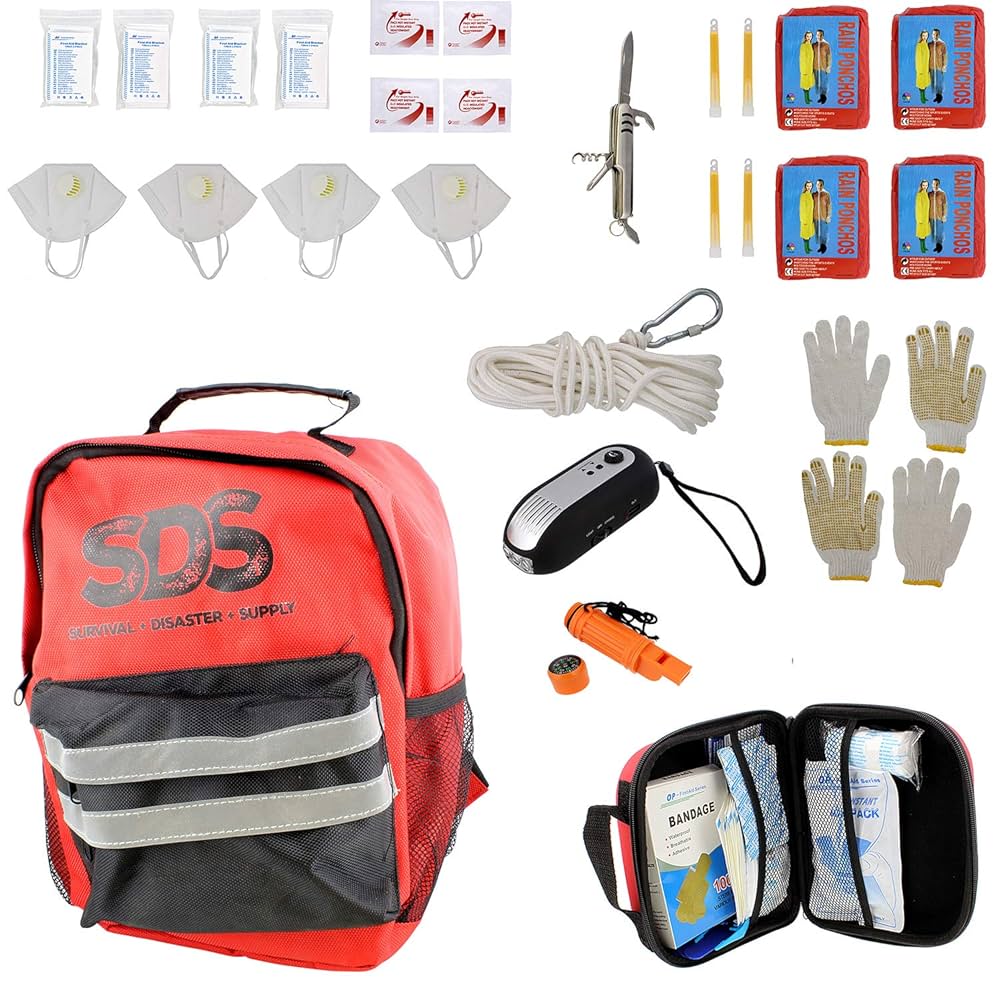
Essential Tools To Include
Building a survival kit requires careful selection of essential tools. These tools help you handle emergencies effectively. Focus on items that are versatile and reliable. Compact and lightweight tools are best for easy carrying. Choosing the right tools can save time and effort in tough situations.
Cutting Instruments
Cutting tools are vital for many survival tasks. Use sharp and durable blades for efficiency. A good cutting instrument can help prepare food, build shelter, and make repairs. Include items like a fixed blade knife and a folding saw. Consider a small pair of scissors for precision cuts. Keep blades clean and sharp for best performance.
Fire Starting Devices
Fire is essential for warmth, cooking, and signaling. Reliable fire starters increase your survival chances. Carry waterproof matches or a lighter for quick ignition. Flint and steel kits work well in wet conditions. Include fire starters like cotton balls soaked in petroleum jelly. Store them in a sealed container to keep dry.
Multi-tools And Knives
Multi-tools combine many functions in one compact device. They save space and add convenience. Look for tools with pliers, screwdrivers, and blades. A sturdy survival knife is a must-have for cutting and self-defense. Choose knives with comfortable handles and strong blades. Always keep these tools accessible and well-maintained.
Food And Water Supplies
Food and water are the most important parts of any survival kit. Having enough supplies can keep you alive and healthy during emergencies. Choose items that last long and provide good nutrition. Plan for both hydration and energy needs to stay strong.
Non-perishable Food Options
Choose foods that do not spoil quickly. These items can last months or years without refrigeration. Examples include:
- Canned beans and vegetables
- Dried fruits like raisins and apricots
- Rice, pasta, and instant noodles
- Peanut butter and nut butters
- Jerky and dried meats
- Powdered milk and shelf-stable cheese
Pack a variety to keep meals interesting and nutritious. Check expiration dates regularly and replace items as needed.
Water Storage And Purification
Water is critical for survival. Store clean water in sturdy, sealed containers. Aim for at least one gallon per person per day. Consider these options:
- Plastic water jugs or bottles
- Collapsible water bags
- Portable water filters
- Water purification tablets
- Boiling water to kill germs
Always have a backup plan to purify water from natural sources. Clean water prevents dehydration and illness.
Energy And Nutrition Boosters
Energy bars and supplements help maintain strength. Choose options rich in calories and nutrients. Good choices include:
- Granola bars and protein bars
- Trail mix with nuts and seeds
- Electrolyte powder or tablets
- Vitamin and mineral supplements
These items provide quick energy and support your body during stress. Keep them accessible in your kit.
First Aid And Medical Items
First aid and medical items are essential in any survival kit. They help manage injuries and prevent infections. Proper supplies can make a big difference during emergencies. Prepare your kit with care to stay safe and healthy.
Basic First Aid Supplies
- Adhesive bandages in various sizes
- Sterile gauze pads and adhesive tape
- Antiseptic wipes or solution
- Elastic bandages for sprains
- Disposable gloves for hygiene
- Scissors and tweezers
- CPR face shield or mask
- Instant cold packs for swelling
Medications And Prescriptions
Include over-the-counter pain relievers like ibuprofen or acetaminophen. Pack antihistamines for allergic reactions. Bring anti-diarrheal and antacid tablets. Store any personal prescription medicines in original containers. Keep extra doses for longer emergencies. Label all medicines clearly to avoid confusion.
Personal Hygiene Products
- Alcohol-based hand sanitizer
- Antibacterial soap or wipes
- Toothbrush and toothpaste
- Feminine hygiene products
- Small pack of tissues or toilet paper
- Moisturizing lotion to prevent dry skin
Shelter And Warmth Essentials
Keeping yourself protected from the elements is crucial when assembling a survival kit. Shelter and warmth essentials can mean the difference between comfort and danger in harsh conditions. You want gear that is lightweight, reliable, and easy to use, especially when every minute counts.
Emergency Blankets And Clothing
Emergency blankets are compact and incredibly effective. These thin sheets reflect your body heat back to you, helping to prevent hypothermia. You can stuff one in your pocket or backpack without adding bulk.
Layering clothing is another simple way to stay warm. Choose moisture-wicking base layers and insulated outerwear to trap heat. Have you tested your clothing setup in cold weather to see how well it performs?
Tents And Tarps
A lightweight tent offers solid protection from wind, rain, and insects. However, a tarp is even more versatile and can be set up quickly in various configurations. You can create a makeshift shelter almost anywhere with a sturdy tarp and some rope.
Consider how much space your shelter takes up and how easy it is to set up alone. Practicing pitching your tent or tarp before you actually need it will save you frustration in the field.
Heat Sources
Having a reliable heat source can be a lifesaver. Portable options like compact stoves or fire starters are ideal because they don’t rely on electricity. Carry waterproof matches or a magnesium flint striker to ignite a fire under wet conditions.
Heat packs are another great addition. They provide quick warmth and are perfect for emergencies when building a fire isn’t possible. What heat source fits best with your survival style and environment?

Credit: www.rvem.org
Navigation And Communication Gear
Navigation and communication gear is essential in any survival kit. These tools help you find your way and stay in touch during emergencies. They increase your chances of rescue and keep you safe.
Compasses And Maps
A compass guides you by showing direction. It works without batteries, making it reliable. Pair it with a detailed map of your area. Learn to read maps before you need them. Together, they help you navigate unknown terrain safely.
Signal Devices
Signal devices alert rescuers to your location. Bright whistles are loud and easy to carry. Signal mirrors reflect sunlight to catch attention. Flares create bright light visible from far away. Choose lightweight, durable options for your kit.
Emergency Radios
Emergency radios keep you informed about weather and news. Look for radios that run on batteries or hand crank power. Some include NOAA weather channels for alerts. Radios with flashlight and charging ports add extra value. Staying updated can save your life in a crisis.
Organizing And Maintenance Tips
Keeping your survival kit organized and maintained is just as important as assembling it. A well-maintained kit ensures you can find what you need quickly and trust that every item works when you need it most. Let’s dive into practical ways to keep your survival kit in top shape.
Packing Techniques
Use clear, resealable bags to separate different types of items like first aid supplies, tools, and food. This not only keeps things neat but protects items from moisture and damage.
Arrange heavier items at the bottom and lighter ones on top for better balance and easy access. Think about how you’ll grab essentials fast—pack those near the top.
Label each section clearly. When seconds count, you don’t want to be digging around wondering where your fire starter or water purifier is.
Regular Checks And Updates
Set a reminder every three months to inspect your kit. Check for expired food, dead batteries, or damaged gear.
Replace used or outdated items immediately. A survival kit with expired medicine or broken tools is more dangerous than no kit at all.
Test your equipment regularly, like flashlights and radios. You might be surprised how often batteries drain or devices malfunction without warning.
Customizing For Specific Needs
Think about your environment—urban, rural, cold, or hot climate—and adjust your kit accordingly. You won’t need the same gear in a desert as you would in a snowy forest.
Consider personal health issues or family needs. If you have allergies, add necessary medications; if you have kids, pack child-friendly items.
Ask yourself: what unique challenges do you face daily? Tailoring your kit to your lifestyle makes it more useful when disaster strikes.

Credit: premierbodyarmor.com
Frequently Asked Questions
What Are The Essential Items In A Survival Kit?
A survival kit must include water, food, a first aid kit, a flashlight, and a knife. These basics ensure safety, nourishment, and emergency care in any situation.
How Do I Choose The Right Container For My Kit?
Select a durable, waterproof container that is easy to carry. It should protect contents from damage and moisture during emergencies.
How Often Should I Update My Survival Kit?
Update your survival kit every six months. Check expiration dates, replace used items, and adjust contents based on changing needs or environments.
Can I Customize My Survival Kit For Specific Environments?
Yes, customize your kit based on climate and terrain. Include items like insect repellent for forests or extra water for deserts.
Conclusion
Creating a survival kit is essential for emergencies. Keep it simple and organized. Choose items wisely, focusing on basic needs. Water, food, and first aid are crucial. Include a flashlight and batteries. Don’t forget important documents. A whistle can signal for help.
Regularly check and update your kit. Practice using each item. Your safety depends on being prepared. Stay ready for any situation. With a well-assembled kit, you gain peace of mind. Stay safe, stay prepared.