Are you ready to create a survival kit that could save your life or someone else’s? Making your own survival kit might seem tricky, but it’s easier than you think—and having one ready is one of the smartest moves you can make.
In this guide, you’ll discover simple steps to build a survival kit that fits your needs perfectly. By the time you finish reading, you’ll know exactly what to include and how to organize it, so you’re prepared for any emergency.
Keep reading, and take control of your safety starting right now.
Choosing Your Kit Type
Choosing the right type of survival kit is crucial before you start gathering supplies. Your kit should match your lifestyle, environment, and the situations you expect to face. Think about how often you’ll carry it, where you’ll use it, and what emergencies you’re preparing for.
Everyday Carry Kits
Everyday Carry (EDC) kits are small and lightweight. You can keep them in your pocket, backpack, or car. These kits usually include basics like a pocket knife, flashlight, lighter, and a compact first aid kit.
Imagine having just enough tools on you daily to handle minor emergencies without feeling weighed down. Does your daily routine call for a kit that stays with you all the time? If yes, focus on compact, multi-use items that blend into your everyday life.
Bug-out Bags
Bug-out bags are designed for quick evacuation during major emergencies. They are larger and packed with essentials for survival over several days. Items like water purification tablets, non-perishable food, extra clothing, and shelter materials are typical.
Think about where you would go if you had to leave your home immediately. Would a 72-hour supply cover your needs? Your bug-out bag should be tailored to your location’s climate and potential disasters, so consider these factors carefully.
Specialized Kits
Specialized kits focus on specific environments or scenarios, such as wilderness survival, urban emergencies, or medical crises. They include tools and supplies targeted to those conditions, like bear spray for forest areas or trauma supplies for urban settings.
Do you spend a lot of time hiking, or live in a city prone to power outages? Your kit should reflect those unique risks. Building a specialized kit means you’re prepared for the challenges you’re most likely to face, not just generic emergencies.
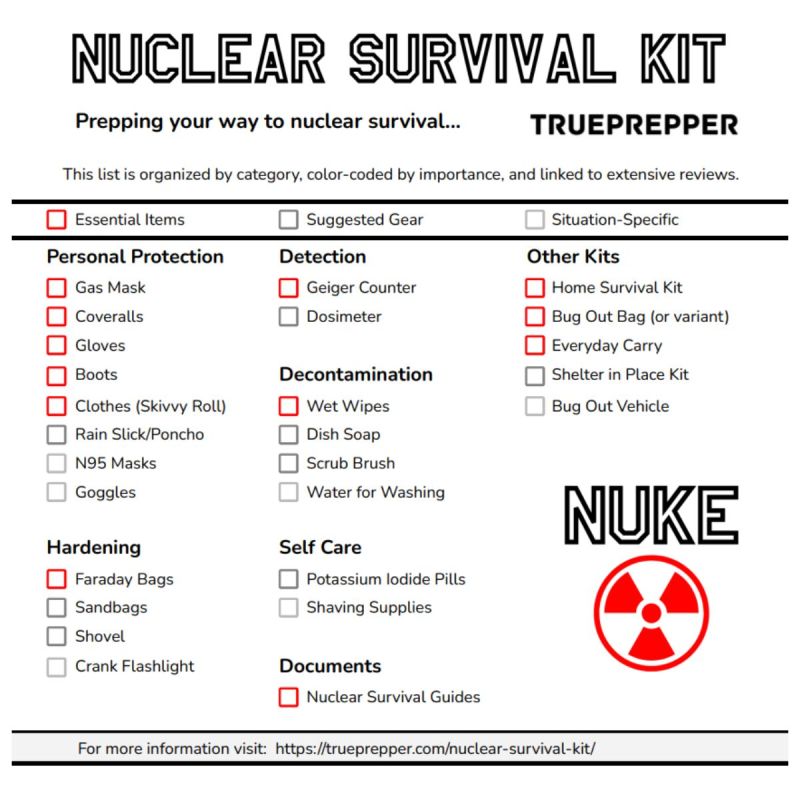
Essential Survival Items
Building a survival kit is more than just gathering random items. You need to focus on essentials that sustain life, ensure safety, and keep you connected. These crucial tools can make a huge difference in emergency situations.
Water And Hydration Tools
Water is your top priority. Without it, survival time drastically reduces. Include a durable water bottle and a reliable water filter or purification tablets.
I once trusted a stream for water during a hike, only to fall ill because I didn’t treat it properly. That experience taught me the importance of carrying purification tools every time.
Food And Nutrition
Pack non-perishable, high-energy foods like granola bars, nuts, and dried fruits. They provide quick energy and last long without refrigeration.
Consider lightweight options that don’t take up much space but pack a nutritional punch. Have you ever tried emergency rations? They’re compact and calorie-dense.
Shelter And Warmth
Protection from the elements is crucial. A compact tarp, emergency blanket, or lightweight tent can shield you from rain and wind.
Warmth isn’t just comfort; it prevents hypothermia. Adding hand warmers or a poncho can be lifesaving in cold conditions.
First Aid Supplies
A basic first aid kit should include bandages, antiseptic wipes, pain relievers, and tweezers. These items help you handle minor injuries that could turn serious without care.
Remember, even a small cut can get infected. I always add allergy medication and burn cream to my kit for added protection.
Navigation And Communication
Don’t rely solely on your phone’s GPS. Pack a compass and a detailed map of the area. These tools don’t depend on batteries or signal.
For communication, a whistle or a signal mirror can attract help. Have you tested your emergency communication tools before? Knowing how to use them is just as important as having them.
Selecting Durable Containers
Selecting durable containers is a key part of building a reliable survival kit. Your gear needs protection from weather, rough handling, and long storage periods. Choosing the right container can make the difference between easy access and a frustrating mess when you need your supplies most.
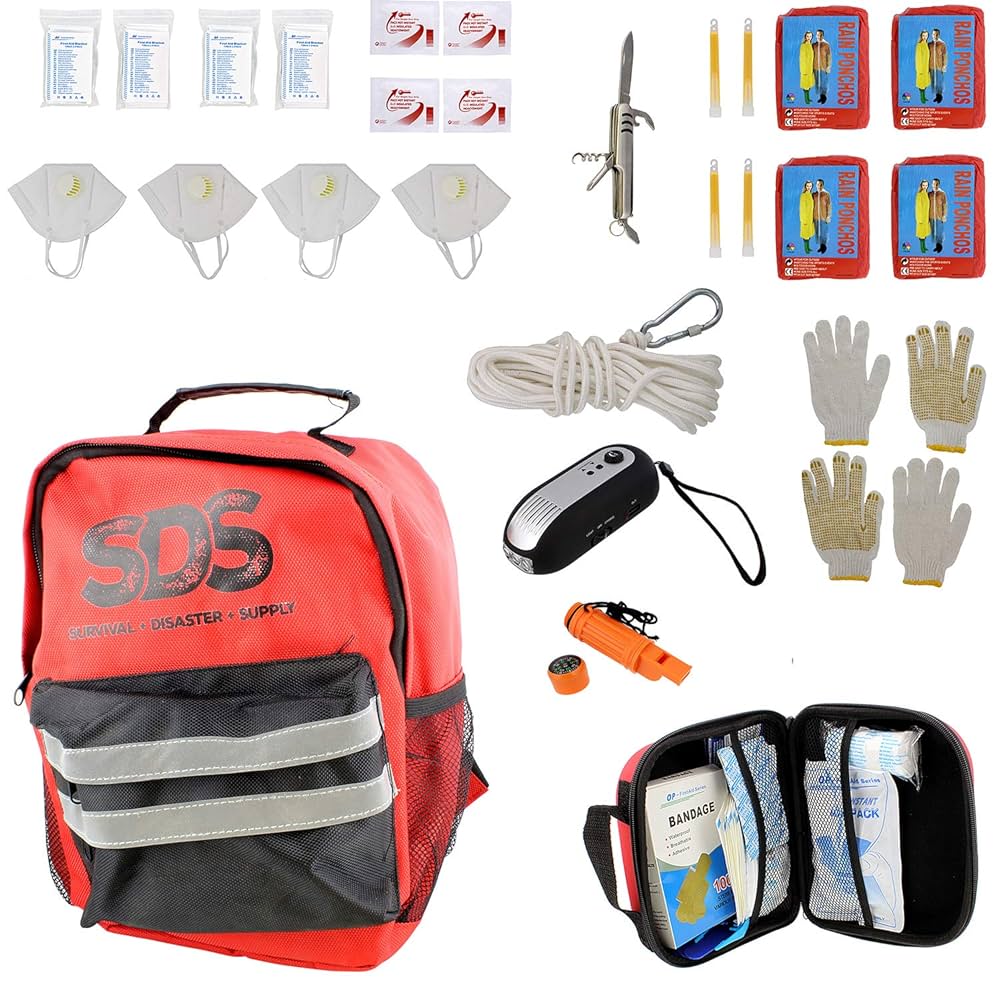
Backpacks And Bags
Backpacks are often the first container people think of for a survival kit. Look for bags made with heavy-duty materials like ballistic nylon or Cordura. These fabrics resist tears and abrasions, keeping your items safe during outdoor activities or emergencies.
Check the stitching and zippers—these small details affect durability more than you might expect. A sturdy frame and padded straps add comfort, especially if you carry your kit for long distances. Have you tested how your backpack feels fully loaded? Comfort impacts how often you’ll actually carry your kit.
Waterproof Cases
Waterproof cases keep your essentials dry, which is critical if you face rain, floods, or humid conditions. Hard plastic cases with secure latches provide excellent protection against water and physical shocks. Some come with foam inserts to keep items from shifting inside.
Consider smaller waterproof cases for electronics, matches, or important documents. You can also use resealable plastic bags inside your main container for an extra layer of moisture protection. What items in your kit absolutely cannot get wet?
Organizers And Pouches
Organizers and pouches help separate your gear, so you find what you need without digging through everything. Look for pouches with clear windows or mesh panels to easily identify contents. Multiple compartments prevent smaller items from getting lost or damaged.
Velcro or MOLLE-compatible pouches allow you to customize your setup and attach extras to your main bag. Organizing your kit this way saves time and reduces stress during critical moments. How much time do you want to spend searching for gear when every second counts?

Credit: www.youtube.com
Packing Tips For Efficiency
Packing a survival kit requires smart organization. Efficiency saves time and energy during emergencies. Focus on balance and easy access.
Weight Distribution
Place heavy items near the center of the pack. This keeps the kit balanced and reduces strain on your back. Spread weight evenly on both sides. Avoid putting all heavy things on one side.
Accessibility
Keep essential items where you can reach them fast. Store first aid supplies and tools on the outside pockets. Arrange gear by how often you need it. Quick access can save lives.
Compact Storage
Use small containers and zip bags to save space. Roll clothes and compress soft items tightly. Avoid bulky packing; it wastes room and adds weight. A compact kit fits better and moves easily.
Creating Your Youtube Video
Creating your YouTube video is where your survival kit idea really comes to life. This stage demands a clear plan, a comfortable filming setup, and attention to detail in sound and visuals. You want your audience to feel confident that they can build the kit themselves after watching.
Planning Your Script
Write down the key points you want to cover about the survival kit. Keep your language simple and direct so viewers can easily follow along. Imagine explaining each item and why it’s essential—this helps keep your content practical and relatable.
Think about questions your audience might have and answer them in your script. For example, why choose certain tools over others? What mistakes should they avoid? This approach makes your video more helpful and trustworthy.
Setting Up Your Filming Space
Choose a quiet, well-lit area to shoot your video. Natural light works best, but if you don’t have it, use lamps to brighten your face and the kit items. Avoid cluttered backgrounds that distract from your message.
Make sure your filming space feels inviting and organized. You want viewers to focus on your survival kit, not your messy room. A clean, simple background keeps the attention where it belongs.
Camera And Audio Tips
Use a tripod or stable surface to keep your camera steady. Shaky footage can frustrate viewers and look unprofessional. If you’re using a smartphone, turn on airplane mode to avoid interruptions.
Clear audio is just as important as good visuals. Use an external microphone if possible, or film in a quiet room to reduce background noise. Speak clearly and at a steady pace—imagine you’re chatting with a friend who needs your advice.
Editing Essentials
Trim any long pauses or mistakes to keep your video engaging. Add text overlays to highlight important points or item names—this helps viewers remember details. Simple transitions between clips keep the flow smooth.
Include close-up shots of each survival kit item so viewers can see exactly what you’re recommending. If you mention where to buy something or give a tip, add that information as text on screen for easy reference.

Credit: www.youtube.com
Engaging Your Audience
Engaging your audience is key to making a survival kit YouTube video that holds attention. People want clear, helpful content that they can follow easily. The more interactive and understandable your video feels, the more viewers will stay till the end. Focus on showing, not just telling. Keep your explanations simple and direct. Use tools that help viewers learn quickly and clearly.
Clear Demonstrations
Show each step of building the survival kit clearly. Use close-up shots to highlight important items. Move slowly so viewers can see every detail. Repeat key actions to reinforce learning. Avoid fast or shaky camera work. Speak in a calm, steady voice. This builds trust and helps viewers follow along without confusion.
Using Visual Aids
Visual aids make your video easier to understand. Use text overlays to name items and steps. Include diagrams or simple drawings to explain tricky parts. Use arrows or circles to point out details on screen. Color coding can help organize information. Visual aids break up long explanations and keep viewers interested.
Answering Common Questions
Think about what questions viewers might have. Answer these questions clearly during the video. Use a Q&A section or pause to explain common doubts. This shows you care about their understanding. Invite comments for more questions to boost engagement. Clear answers reduce confusion and build confidence in your advice.
Promoting Your Video
Promoting your survival kit YouTube video helps more people find and watch it. Good promotion increases views and builds your channel audience. Focus on smart, clear ways to share your video.
Using Social Media
Share your video on popular social platforms like Facebook, Twitter, and Instagram. Write short, catchy posts that explain what your video is about. Use relevant groups or forums where survival enthusiasts gather. Encourage friends and followers to watch and share the video. Post at different times to reach more people worldwide.
Collaborations
Work with other creators who make survival or outdoor content. Collaborate on videos or ask them to mention your video. This brings their audience to your channel. Find creators with similar audience size for best results. Build real connections by commenting and sharing their content too.
Seo Strategies
Optimize your video title with keywords like “survival kit” and “how to.” Write a clear, detailed description using simple words. Add tags related to survival, emergency kits, and outdoor gear. Use a custom thumbnail that shows your kit clearly. Add subtitles to help non-native speakers understand. These steps improve your video’s search ranking.

Credit: www.youtube.com
Frequently Asked Questions
What Essential Items Should I Include In A Survival Kit?
Include water, non-perishable food, a first aid kit, flashlight, multi-tool, matches, and a whistle. These basics cover hydration, nutrition, safety, and signaling in emergencies.
How Do I Organize A Survival Kit For Youtube Demonstration?
Use clear containers and label each item for easy identification. Arrange items visually appealingly and explain their purpose clearly during your video.
Can I Customize A Survival Kit For Different Environments?
Yes, customize your kit based on climate and terrain. Add sunscreen for sunny areas or thermal blankets for cold regions to enhance survival chances.
How Often Should I Update My Survival Kit Contents?
Check your kit every six months. Replace expired food, batteries, and medical supplies to ensure readiness and effectiveness during emergencies.
Conclusion
Creating a survival kit is essential. It prepares you for emergencies. Always include basics like food, water, and a flashlight. Customize your kit to meet personal needs. Regularly check and update supplies. Watching YouTube videos can offer visual guidance. They provide practical, step-by-step instructions.
This makes learning easy and fun. Remember, preparation saves lives. Stay informed and ready. Prioritize safety for you and your family. Start building your kit today. It’s a smart move.